


[logo]
[TITLE]
MARCH 9, 2000
[PART NUMBER]
Audioaccess Trouble Shooting
Page 2
AUDIOACCESS TROUBLE SHOOTING GUIDE
Isolation of individual components is the key to successful system diagnostics
.
The vast majority of system failures in the field are due to installation difficulties and not component failure.
Although easy to install and program, a small installation mistake such as a keypad not terminated correctly, may
cause a failure that affects overall system operation. Most system failures, however, are not catastrophic. Once
problems are isolated through the process of elimination, most system malfunctions may be repaired in the field.
Some will require reprogramming or terminations, some may require replacing components in the field, while
others will need factory service. The following guide lists some specific problem descriptions, describes some
basic diagnostics, and offers some common solutions.
Note - For any control related problems, first disconnect the keypad bus from the PX-
600. If the PX-600 operates normally through the front panel, there is a problem with the
keypads or their connections. If the PX-600 does not operate with keypads
disconnected, their may be a problem in the PX-600.
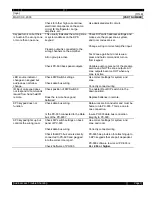
KEYPAD RELATED
Problem Encountered
Find the problem component
solution
Keypad locked up - lights
come on but no functions.
System locked up
Zone or system locks up
after ON button is
pressed.
Intermittent keypad lock
up or control.
Unplug (isolate) all keypad wires
from control unit and test unit
functions from front panel.
Test each keypad on system
individually.
Test using an alternate KPS
addressed for the same zone.
For alternate front panel control of
zones use the “ROOM” button for
MRX and “ZONE” button on PX-600
programmer. When zone # is called
up the front panel controls that zone.
Set DIP switches for correct zone,
room, & system.
Check Keypad (data bus) wire insulation
is not inserted in between the wire and
the connectors.
Insure data bus wires polarity.
Replace KPS Processor assembly.
Check front panel Volume knob is not
rubbing on Motor Pot bracket. Gently
pull out knob 1/16
th
”.
Keypad has no functions
and no lights
On back panel of head unit. Check
bus fuse - Use ohmmeter to
measure for 0 ohms.
Check bus voltage -Use voltmeter
across pin 1 & 4 – DC voltage is
unregulated and should be between
8 – 13 volts DC.
Replace bus fuse w/ 1.5 A slo-blo.
Check data bus wires termination and
polarity.
Replace KPS Processor assembly.
Slow reaction time from
keypad, front panel or RT-
A remote.
Check KPS terminator switches.
Check wire terminations.
Check for IR interference (Ambient
light source)
Change to opposite direction and test
system speed.
Make sure there are no cut or frayed
wires, that there are no intermittent
shorts in wiring.
Disable IR on keypad - DIP switch 9 UP.
Summary of Contents for PX-603
Page 2: ......
Page 3: ......
Page 4: ......
Page 5: ......
Page 6: ......
Page 7: ......
Page 8: ......
Page 9: ......
Page 10: ......
Page 11: ......
Page 12: ......
Page 13: ......
Page 14: ......
Page 15: ......
Page 16: ......
Page 17: ......
Page 18: ......
Page 19: ......
Page 20: ......
Page 21: ......
Page 22: ......
Page 23: ......
Page 24: ......
Page 25: ......
Page 26: ......
Page 27: ......
Page 28: ......
Page 29: ......
Page 30: ......
Page 41: ......
Page 42: ......
Page 43: ......
Page 44: ......
Page 45: ......
Page 46: ......
Page 47: ......
Page 48: ......
Page 49: ......
Page 50: ......
Page 59: ...PX 603 EPROM Replacement ...
Page 64: ......
Page 65: ......
Page 67: ......
Page 68: ......


