background image


43 


2


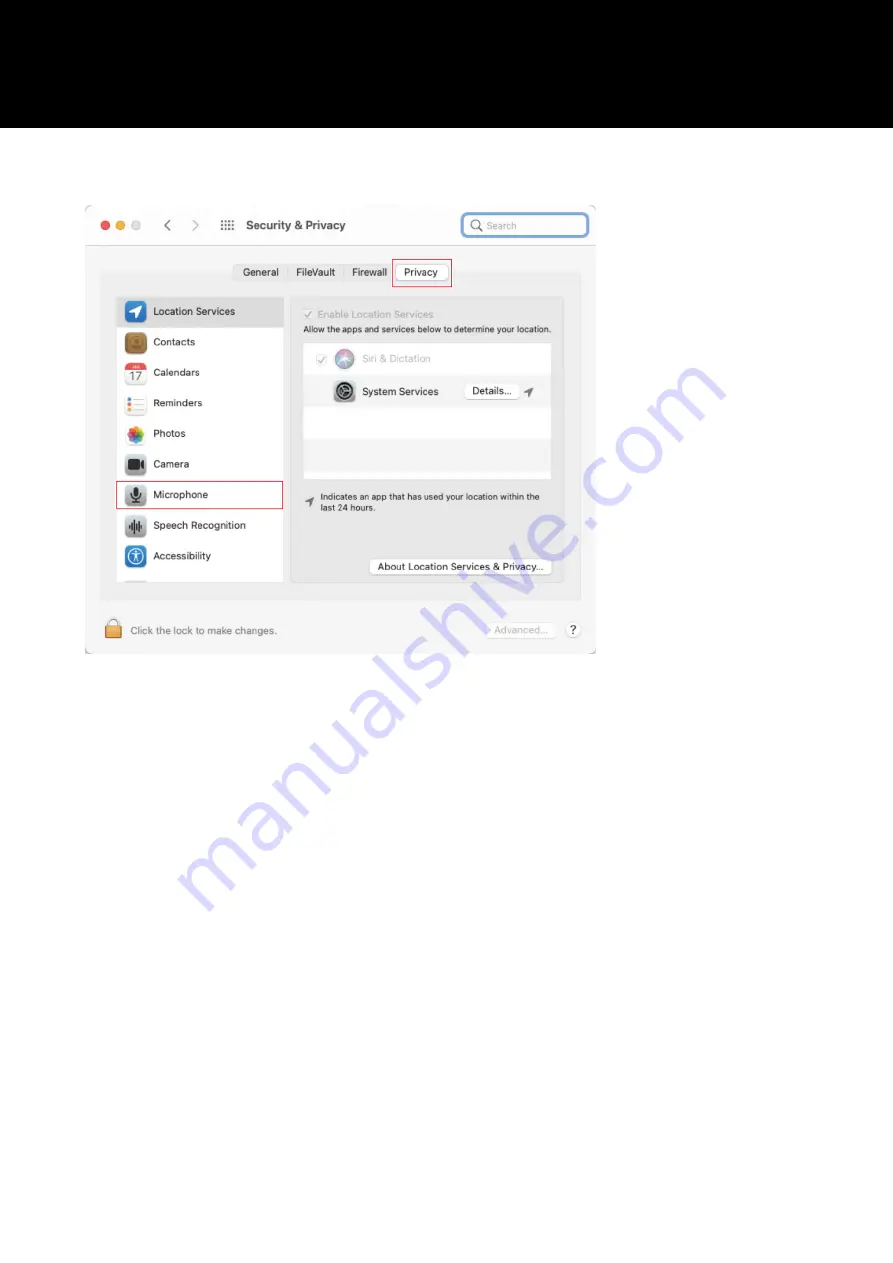
In the "Privacy" tab, select "Microphone". 


3


Check that the recording software you are using is enabled. 


If it is not enabled, select the check box next to this software. 


To change the "Security & Privacy" settings, you have to unlock them with the icon in the lower-left corner of 
the screen. Clicking this icon displays a screen for unlocking the settings. Enter the user name and password, 
and then click "Unlock". After changing the settings, lock them. 

Summary of Contents for AT2020USB-X

Page 1: ...AT2020USB X Cardioid Condenser USB Microphone User Manual English ...

Page 2: ...gs and cautions while using the product Cautions for the product Do not subject the product to strong impact to avoid malfunction Do not disassemble modify or attempt to repair the product Do not handle the product with wet hands to avoid electric shock or injury Do not store the product under direct sunlight near heating devices or in a hot humid or dusty place ...

Page 3: ...ses and can radiate radio frequency energy and if not installed and used in accordance with the instructions may cause harmful interference to radio communications However there is no guarantee that interference will not occur in a particular installation If this equipment does cause harmful interference to radio or television reception which can be determined by turning the equipment off and on t...

Page 4: ...cable into the microphone and the connected device check that the connector is facing in the correct direction before inserting it straight Inserting the plug diagonally may cause a malfunction When not in use disconnect the USB cable from the product Make sure that no foreign matter enters inside the mesh part of the product Performance may be degraded Depending on the surface treatment of the ta...

Page 5: ...the sound coming from the computer and the monitored volume level of the audio being input voice Touch sensor for mute Turns the muting of the microphone on off Headphone level control dial Adjusts volume of headphone output USB terminal USB Type C Use to connect the included USB cable 3 8 Stand mounting screw hole Use when attaching the stand Headphone jack 3 5 mm 1 8 stereo mini jack Use to conn...

Page 6: ...5 Included accessories Stand USB cable USB Type C to USB Type A 3 8 16 to 5 8 27 threaded adapter USB conversion adapter USB Type A to USB Type C ...

Page 7: ...up in various positions to discover how best to record sound in your current environment Attaching the stand You can use the stand to place the product on a table or a similar surface 1 Attach the stand to the mounting screw hole on the product and then turn the screw to secure the parts Adjust the angle of the product and then turn the grip of the stand to tighten it Note Use the included 3 8 16 ...

Page 8: ...r USB Type A to USB Type C depending on the USB terminal of the computer you are using Use the USB conversion adapter for the USB terminal of the computer side Do not connect it to the USB terminal of the product side If you are using Windows refer to Computer settings Windows p 8 to do the settings If you are using Mac refer to Computer settings macOS p 38 to do the settings Make sure that the mu...

Page 9: ...e product lights The computer automatically recognizes the product and the driver is installed on the computer In the lower right part of the screen a message appears indicating that new hardware has been found or a notification appears indicating that the driver software has been installed 3 Click Start Menu and select Settings 4 Select System ...

Page 10: ...ected If a device other than the product is being used as the output device select this other device from Choose where to play sound If you are using commercially available recording software to record audio refer to Microphone privacy settings p 10 to configure the settings ...

Page 11: ...10 Microphone privacy settings If you are using commercially available recording software check the microphone privacy settings 1 Click Start Menu and select Settings 2 Select Privacy security ...

Page 12: ...11 3 Under App permissions select Microphone 4 Check that Microphone access is set to On ...

Page 13: ...firm that the recording software you are using is set to On If it is not set to On change the setting of the recording software you are using to On 6 Check that Let desktop apps access your microphone is set to On Changing this setting to On allows the recording software to access the product ...

Page 14: ...13 Microphone property settings To change the microphone level and sample rate of the microphone configure the following settings 1 Click Start Menu and select Settings 2 Select System ...

Page 15: ...14 3 Select Sound 4 Under Advanced select More sound settings ...

Page 16: ...5 5 In the Playback tab confirm that the product is selected If the product is not selected select the product and then click Set Default 6 Double click the product s icon and open the properties window ...

Page 17: ...16 7 Select the Levels tab check that the microphone speaker icon is on and then click OK If it is not on click the microphone speaker icon to turn it on ...

Page 18: ... the Recording tab confirm that the product is selected If the product is not selected select the product and then click Set Default 9 Double click the product s icon and open the Microphone Properties window ...

Page 19: ...t the Levels tab to adjust the microphone level To adjust the microphone level after you start recording make the adjustments from this window This setting is different from the Volume setting in the Sound window ...

Page 20: ...ality recorded audio data but will also make these files large For stable recording with less load on the computer change the sample rate to 48 kHz When controlling the microphone from the recording software select the Give exclusive mode applications priority check box under Exclusive Mode The sample rate will be set according to the settings of the recording software 12 When a Device In Use mess...

Page 21: ...hts The computer automatically recognizes the product and the driver is installed on the computer In the lower right part of the screen a message appears indicating that new hardware has been found or a notification appears indicating that the driver software has been installed 3 Click Start Menu and select Settings 4 Select System ...

Page 22: ...lected If a device other than the product is being used as the output device select this other device from Choose your output device If you are using commercially available recording software to record audio refer to Microphone privacy settings p 22 to configure the settings ...

Page 23: ...22 Microphone privacy settings If you are using commercially available recording software check the microphone privacy settings 1 In the Sound window select Microphone privacy settings ...

Page 24: ... microphone is set to On 3 Check that the recording software you are using is set to On under Choose which Microsoft Store apps can access your microphone If it is not set to On change the setting of the recording software you are using to On ...

Page 25: ...24 4 Check that Allow desktop apps to access your microphone is set to On Changing this setting to On allows the recording software to access the product ...

Page 26: ...25 Microphone property settings To change the microphone level and sample rate of the microphone configure the following settings 1 In the Sound window select Sound Control Panel ...

Page 27: ...6 2 In the Playback tab confirm that the product is selected If the product is not selected select the product and then click Set Default 3 Double click the product s icon and open the properties window ...

Page 28: ...27 4 Select the Levels tab check that the microphone speaker icon is on and then click OK If it is not on click the microphone speaker icon to turn it on ...

Page 29: ...8 5 In the Recording tab confirm that the product is selected If the product is not selected select the product and then click Set Default 6 Double click the product s icon and open the properties window ...

Page 30: ...e Levels tab to adjust the microphone level To adjust the microphone level after you start recording make the adjustments from this window This setting is different from the Master volume setting in the Sound window ...

Page 31: ...ality recorded audio data but will also make these files large For stable recording with less load on the computer change the sample rate to 48 kHz When controlling the microphone from the recording software select the Give exclusive mode applications priority check box under Exclusive Mode The sample rate will be set according to the settings of the recording software 9 When a Device In Use messa...

Page 32: ...e appears indicating that new hardware has been found or a notification appears indicating that the driver software has been installed 3 Right click Start Menu and select Control Panel 4 Select Sound 5 In the Playback tab confirm that the product is selected If the product is not selected select the product and then click Set Default If you are using commercially available recording software to re...

Page 33: ...ially available recording software check the microphone privacy settings 1 Click Start Menu and select PC settings 2 Select Privacy 3 Select Microphone 4 Check that Let apps use my microphone is set to On 5 Check that the recording software you are using is set to On under Let these apps use my microphone If it is not set to On change the setting of the recording software you are using to On ...

Page 34: ...f the microphone configure the following settings 1 In Control Panel select Sound 2 In the Playback tab confirm that the product is selected If the product is not selected select the product and then click Set Default 3 Double click the product s icon and open the properties window ...

Page 35: ...34 4 Select the Levels tab check that the microphone speaker icon is on and then click OK If it is not on click the microphone speaker icon to turn it on ...

Page 36: ...5 5 In the Recording tab confirm that the product is selected If the product is not selected select the product and then click Set Default 6 Double click the product s icon and open the properties window ...

Page 37: ...e Levels tab to adjust the microphone level To adjust the microphone level after you start recording make the adjustments from this window This setting is different from the Master volume setting in the Sound window ...

Page 38: ...te may result in high quality recorded audio data but will also make these files large For stable recording with less load on the computer change the sample rate to 48 kHz When controlling the microphone from the recording software select the Give exclusive mode applications priority check box under Exclusive Mode The sample rate will be set according to the settings of the recording software ...

Page 39: ... 1 Use the USB cable to connect the product to a computer 2 Confirm that the mute indicator lamp on the product lights The computer automatically recognizes the product and the driver is installed on the computer 3 From the Apple icon select System Preferences 4 Select Sound ...

Page 40: ...39 5 In the Input tab confirm that the product is selected ...

Page 41: ...to the microphone will cause the Input level indicator to move so you can adjust the input volume while viewing this indicator Use Output volume to adjust the volume of the computer s speakers and headphone jack This is different from adjusting the microphone level ...

Page 42: ...s other device from Select a device for sound output You can use Balance to set the balance between the left and right volumes Use Output volume to adjust the playback level from the computer If you are using commercially available recording software to record audio refer to Security and privacy settings p 42 to configure the settings ...

Page 43: ...sing commercially available recording software check the security and privacy settings If you are using commercially available recording software use software that is compatible with macOS 1 In the System Preferences window select Security Privacy ...

Page 44: ...bled select the check box next to this software To change the Security Privacy settings you have to unlock them with the icon in the lower left corner of the screen Clicking this icon displays a screen for unlocking the settings Enter the user name and password and then click Unlock After changing the settings lock them ...

Page 45: ...ect the sample rate and bit depth from Format Two types of the product are displayed but select the one that shows 1 in 0 outs With this product you can select a sample rate of up to 96 kHz Selecting a high sample rate may result in high quality recorded audio data but will also make these files large For stable recording with less load on the computer change the sample rate to 48 kHz Match the sa...

Page 46: ... output For details see the User Manual for the recording software Adjusting the microphone level To get the best performance you need to appropriately adjust the microphone level of the product If the sound is distorted or the recording software you are using is always at peak levels then decrease the microphone level of the product in the settings on the control panel system preferences for macO...

Page 47: ... the headphone output it does not adjust the microphone level Using the mix control dial The product allows you to directly monitor your own voice from the product while listening to a sound source from your computer You can use the mix control dial to adjust the balance of the volume level of the sound source stored on the computer and the monitored volume level of the audio being input Turning t...

Page 48: ...47 Muting the microphone Turn the muting of the microphone on off 1 Touch the touch sensor for mute Each time you touch this control muting turns on lights red or off lights blue ...

Page 49: ... dirt off the product with a dry cloth If the cables become dirty because of sweat etc wipe them with a dry cloth immediately after use Failure to clean the cables may cause them to deteriorate and harden over time resulting in a malfunction Caution If the product will not be used for an extended period of time store it in a well ventilated place free from high temperatures and humidity ...

Page 50: ... using Match the sampling rate settings For details on the settings refer to Computer settings Windows p 8 or Computer settings macOS p 38 The product is not recognized no sound is produced sound is distorted recorded audio is played back at twice the normal speed The product may not operate correctly depending on the computer you are using Countermeasures for these situations are provided on the ...

Page 51: ...6 bit 44100 Hz 1 channel 16 bit 48000 Hz 2 channel 16 bit 48000 Hz 1 channel 16 bit 88200 Hz 2 channel 16 bit 88200 Hz 1 channel 16 bit 96000 Hz 2 channel 16 bit 96000 Hz 1 channel 24 bit 44100 Hz 2 channel 24 bit 44100 Hz 1 channel 24 bit 48000 Hz 2 channel 24 bit 48000 Hz 1 channel 24 bit 88200 Hz 2 channel 24 bit 88200 Hz 1 channel 24 bit 96000 Hz 2 channel 24 bit 96000 Hz ...

Page 52: ...51 Dimensions ...

Page 53: ...16 bit 24 bit Supported sampling rates 44 1 kHz 48 kHz 88 2 kHz 96 kHz Controls Headphone level control Mix control Mute Dimensions 142 mm 5 6 long 52 mm 2 0 maximum body diameter Weight About 373 g 13 oz Output connector USB Type C Headphone output 110 mW at 1 kHz 1 T H D 32 ohms Headphone jack 3 5 mm 1 8 stereo mini jack Included accessories Stand AT8702 3 8 16 to 5 8 27 threaded adapter USB cab...

Page 54: ...53 Polar pattern Frequency response Polar pattern Frequency response ...

Page 55: ... Windows are registered trademarks of Microsoft Corporation in the United States and or other countries Microsoft Windows operating system is indicated in its abbreviated form as Windows Mac and macOS are trademarks of Apple Inc registered in the U S and other countries and regions ...

Page 56: ...o Technica Corporation 2 46 1 Nishi naruse Machida Tokyo 194 8666 Japan www audio technica com 2022 Audio Technica Corporation Global Support Contact www at globalsupport com 株式会社オーディオテクニカ 194 8666 東京都町田市西成瀬2 46 1 www audio technica co jp ...

Reviews: