background image

22

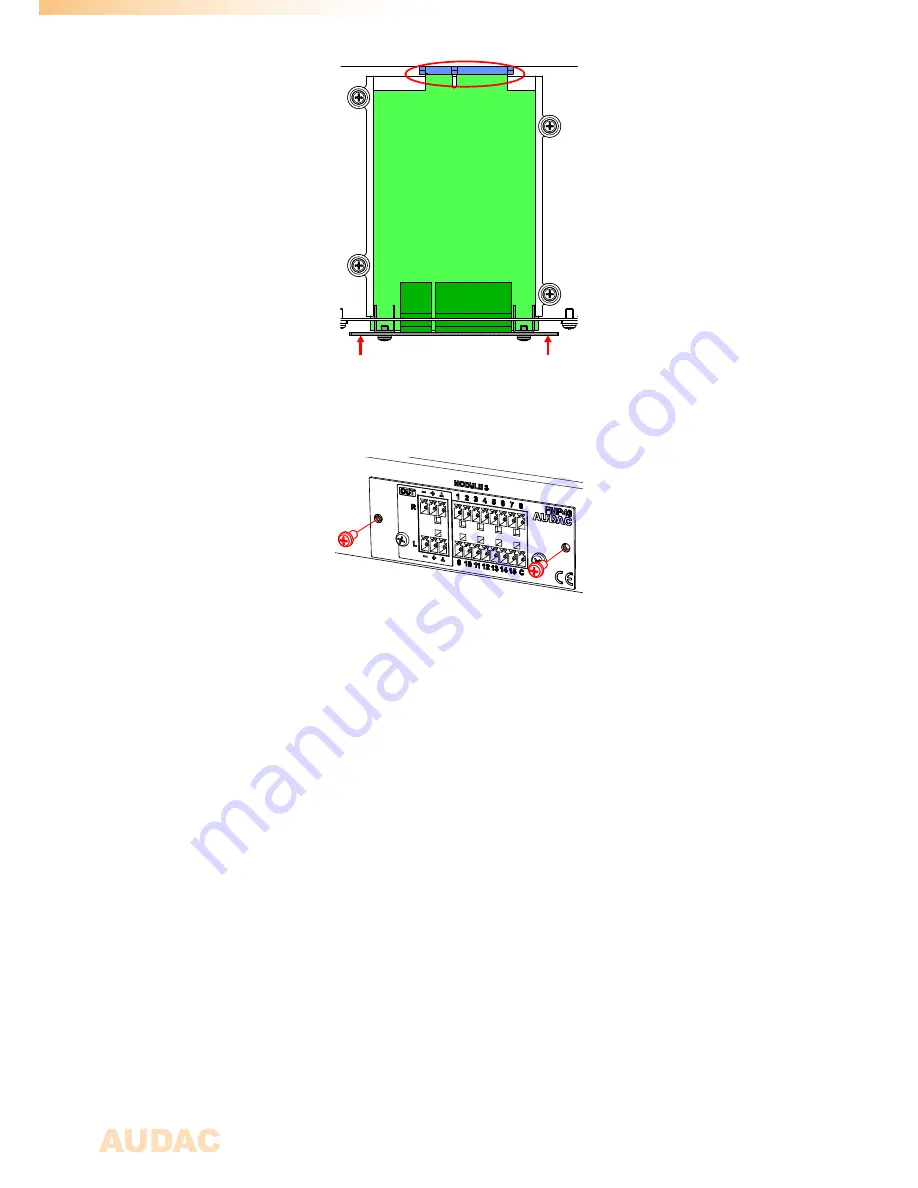
Step 5:

Fasten the module into the slot using the included screws. Be aware that damage or 
malfunctions may occur if the module is not correctly fastened. 

Step 6:

Repeat steps 3 to 5 for every additional module which needs to be installed. If all the 
modules are installed, the system can be powered-on and the modules will get automatically 
discovered. 

Summary of Contents for XMP44

Page 1: ...XMP44 User Manual www audac eu ...

Page 2: ...2 ...

Page 3: ...r 2 Front rear panel 10 Front panel overview 10 Front panel description 10 Rear panel overview 11 Rear panel description 11 Chapter 3 User interface control 12 Front panel control 12 Main 13 Module 13 Module settings 14 General settings 15 Network settings 16 Web control interface 17 Login 17 Main 17 Module 19 Settings 19 Chapter 4 Installing the modules 21 Chapter 5 Additional information 23 IP B...

Page 4: ...4 ...

Page 5: ...for any multi zone audio system The front panel of the system accommodates a 2 8 TFT display in combination with a push rotary function dial and 4 tactile pushbuttons The controls and indicators on the front panel of the unit are guaranteeing an intuitive and user friendly operation allowing hassle free operation and configuration to even unexperienced users Four USB interfaces one for each module...

Page 6: ...ATUS THAT PRODUCE HEAT DO NOT PLACE THIS UNIT IN ENVIRONMENTS WHICH CONTAIN HIGH LEVELS OF DUST HEAT MOISTURE OR VIBRATION THIS UNIT IS DEVELOPED FOR INDOOR USE ONLY DO NOT USE IT OUTDOORS PLACE THE UNIT ON A STABLE BASE OR MOUNT IT IN A STABLE RACK ONLY USE ATTACHMENTS ACCESSORIES SPECIFIED BY THE MANUFACTURER UNPLUG THIS APPARATUS DURING LIGHTNING STORMS OR WHEN UNUSED FOR LONG PERIODS OF TIME O...

Page 7: ...nt damage WASTE ELECTRICAL AND ELECTRONIC EQUIPMENT WEEE The WEEE marking indicates that this product should not be disposed with regular houshold waste at the end of its life cycle This regulation is created to prevent any possible harm to the environment or human health This product is developed and manufactured with high quality materials and components which can be recycled and or reused Pleas...

Page 8: ...corresponding to international wiring standards for professional audio equipment 3 Pin Terminal Block For balanced signal input link output connections Left Signal XLR Pin 3 Center Signal XLR Pin 2 Right Ground XLR Pin 1 For balanced line input connections For balanced line output connections For unbalanced line in output connections ...

Page 9: ...tandard RS232 PIN 2 XMP44 TX PIN 3 XMP44 RX PIN 5 GND Settings 19200 Baud 8 Bit 1 Stop bit No parity No Handshaking RS232 The XMP44 has an RS232 and TCP IP ports accepting the same commands The complete command set to control the XMP44 is available in the XMP44 commands user manual which is freely downloadable on www audac eu ...

Page 10: ...cal LCD display with tactile push buttons and rotary selection dial A clear system overview and intuitive user experience is offered using the 2 8 graphical LCD display accompanied with four tactile selection buttons left side and a rotary selection dial right side The true colour display offers a clear overview of the systems current operation mode with intuitive and user friendly browsing throug...

Page 11: ...AN network is possible using the RJ45 ethernet connection This allows control of the system and its installed modules from any ethernet supported device Various possibilities of ethernet control are available including sending commands over TCP IP controlling the system through the integrated web interface or full system control using the Audac Touch application For more information about the Ethe...

Page 12: ...rk address is not within range of your LAN network it can be changed in the settings menu using the front panel interface Front panel control The front panel controllable functions are strongly depending of the installed module and its functionalities Therefore it is not possible to describe the menu structure possibilities for each individual module in detail An overview of how the entire menu is...

Page 13: ...elected the module to be operated the control screen for the corresponding module will be loaded As earlier indicated in this manual the available functions and construction of this screen depends of the installed module and its functionality In this chapter the basic functions and structure is indicated allowing you to understand and use any type of control screen for any type of module The left ...

Page 14: ...e current selection Save current settings Switch between FM DAB functionality Front control Module settings Each on the modules has a module settings screen This settings screen can be accessed by clicking the in the control screen Depening on the installed module the available module settings will be different For a full overview of the available settings for the corresponding module refer to the...

Page 15: ...out requiring any password to be entered If the configured password is different from 0000 the user will be requested to enter the password before any access to the systems functions is provided The configuration of the selected password can be made by selecting it in the general settings menu The currently set password will be shown and the adjusting digit can be selected turns red and confirmed ...

Page 16: ...this option since then the IP address of the system will not always be known for the user and might be different after system reboot IP address The IP address for the system can be configured in this window Each section of the IP address can be individually adjusted by turning the rotary dial clockwise for up and counter clockwise for down The currently adjusting section will be indicated in blue ...

Page 17: ... and configuration possibilities The factory default password for administrator access is XMP When logging in using the user password restricted access for only the basic functions of the system is given allowing system control and operation without authorization for making any changes to the system configuration The factory default password for user access is user After the right password is ente...

Page 18: ...indicated on the center area of the screen Settings At the bottom of the modules overview column a Settings button is indicated This button links to the XMP44 settings menu which includes all General XMP44 settings including the settings for the installed modules More details about the configurable settings are described later in this instruction manual Functions overview The main area of the scre...

Page 19: ...n the top right corner of this screen When clicking this icon a detailed overview of the available browsing functionalities is given Browsing through this menu is possible by clicking and scrolling through this menu structure Web control Settings The settings screen includes all configurable settings which can be made to the XMP44 and its installed modules This interface is constructed as an accor...

Page 20: ...versions All General settings configurable through the front panel interface can also be adjusted here Module settings The configurable module settings are depending on the model functionalities of the installed modules For a full overview of the available settings for the corresponding module refer to the instruction manual of the installed module ...

Page 21: ... grounded metal chassis of the XMP44 or any other grounded point to prevent electrostatic discharges affecting the sensitive electronic components It is recommended to always hold the module card by the metal connection panel and avoid touching of the components on the circuit board directly Step 3 Align both edges of the module with the guide rails inside the slot and carefully insert the module ...

Page 22: ...re that damage or malfunctions may occur if the module is not correctly fastened Step 6 Repeat steps 3 to 5 for every additional module which needs to be installed If all the modules are installed the system can be powered on and the modules will get automatically discovered ...

Page 23: ...not communicate with each other Example Device 1 IP address 192 168 000 001 Device 2 IP address 192 168 000 002 Device 3 IP address 192 168 001 003 In this example Device 1 can communicate with Device 2 but not with Device 3 because the first three numbers must be the same These first three parts are called the IP range so the devices must be in the same IP range to communicate with each other The...

Page 24: ...ith volume control Power Type Switching mode Range 100 240V AC 50 60 Hz Power consumption 2 Watt without module installed Dimensions W x H x D 482 x 44 x 330 mm Weight 3 4 Kg Unit height 1 HE Compatible devices DMP40 DAB DAB FM tuner module FMP40 Voice file interface module IMP40 Internet radio module MMP40 Media player recorder module TMP40 FM tuner module BMP40 Bluetooth receiver module Optional...

Reviews: