


VIA KT133 ATX MAINBOARD
BIOS UPGRADE
5-3
Step 3. Start to update the system BIOS:
1.
Have the diskette which we made in Step 2 inserted in the floppy disk
drive..
2.
Start the PC system and click on the “del” key to start the BIOS setup
program. Select the “Advanced BIOS features” and then make sure to select
the floppy disk drive is the first boot device.
3.
Having made the boot sequence selection, save the setup and restart the PC
system.
4.
When the DOS prompt “A:>” appears, run AWDFLASH.EXE program.
(You can use “AWDFLASH /?” to more detail of the program.)
5.
When you have started the “AWDFLASH.EXE”, it will ask you to input the
file name of the new BIOS. Key-in “
KT133I
.BIN” and then click the
“ENTER” key.
6.
When you see the message - Do you want to save BIOS (Y/N)?. you may
choose “Y” to have the onboard BIOS copied in to the floppy diskette. If
you do not want to make the backup copy of the onboard BIOS, simply
chose “N” and start to update the system BIO. (if you want to make a
backup copy of the onboard system BIOS, then select “Y” and then give a
file name to the backup copy.)
7.
You will see from the screen whether you are going to start the BIOS
update. If you are sure that the new BIOS is correct and nothing is wrong,
chose “Y” to start the BIOS update. ( you can chose “N” and terminate the
BIOS update program.)
8.
During the BIOS updating, you will see the “Programming Flash Memory”
message display on the screen. (
IMPORTANT
:
you can not stop or reset
the PC system when the BIOS is updating
.)
9.
When the BIOS update is completed, remove the floppy diskette from the
floppy disk drive and restart the PC system..
10.
When you see the PC system start to boot, it indicate that the BIOS update
is successful.
11.
Click the “del” key during the Power On Self Test to trigger the BIOS setup
program..
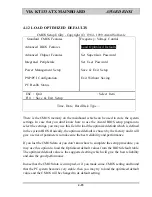
12.
Chose "Load Optimized Default" and have the default setting written into
the CMOS memory.
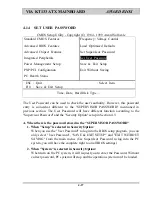
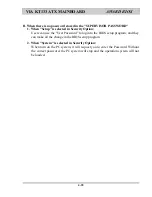
13.
Chose "Save and Exit" and then restart the PC system.
14.
Having finished the procedures above, the BIOS update is completed.


