ATTO Technology ExpressSAS H1208 GT HBA Installation And Operation Manual Download Page 17


5


Install Hardware 

Use this chapter as a guide to install the ATTO ExpressSAS adapter into a x8 or x16 PCI Express expansion slot on your computer. If 
you have followed the Getting Started Guide successfully, you do not need to read this chapter. 


 Back up your system data before changing 

or installing any hardware. 

System requirements 

The ATTO ExpressSAS adapter package contains: 


ExpressSAS adapter 


A low-profile or standard bracket and the installation 
procedure 


If any of these items are missing, contact your ATTO 
authorized sales representative. 


In addition you must have:  


A computer with an available x8 or x16 PCI Express 
4.x/

3.x/2.x/1.2 expansion slot. Check your computer’s 

documentation. 


SAS/SATA storage, cables and connectors. 

See 

Bracket Details


and 

Adapter Board Details

 for details of 

the adapters and brackets. 

SAS address 

Each ATTO ExpressSAS adapter has a unique SAS address 
designated by the Institute of Electrical and Electronic 
Engineers which allows the system to recognize the ATTO 
ExpressSAS adapter as a unique part of your configuration.  

The address is marked on the back of the board for easy 
identification. Please keep a reference copy of the number in 
a safe place. 

Installing the Adapter 

 ATTO ExpressSAS adapters contain components that are 

sensitive to electrostatic discharge (ESD). ESD can cause damage to the 
ATTO ExpressSAS adapter. Please follow standard methods to avoid ESD. 

1.


Install system drivers before you begin hardware 
installation. Refer to 

Install Drivers

. 

2.


Power down the computer and unplug the computer 
from all power sources. 

3.


Open the case. 

4.


If applicable, attach the low profile or standard bracket 
to the adapter. 

5.


Remove the original bracket from the adapter, being 
careful not to damage the board.Use an ESD-safe #1 
Phillips screwdriver to remove the Phillips screws at the 
top and bottom edges of the board.  


 Make sure the screwdriver is centered in 

the top of the screw to prevent damage to the screw. 
Damaging the screw can void the warranty. 


Set the bracket and screws aside. 


Place the adapter on top of the replacement 

bracket, positioning the bracket so that the holes 
in the bracket are aligned with the openings in  
the board. 


It is recommended that you dip the screws into 

Loctite® 242 to decrease the chance of the threads 
becoming loose. 


Use an ESD-safe #1 Phillips torque screwdriver to e 

tighten the screws. The screwdriver should be set 
to a maximum torque of 3.98 in/lbs (0.45N m). 


 Do not exceed the torque specification to 

avoid damaging the board, connectors or screws.  

6.


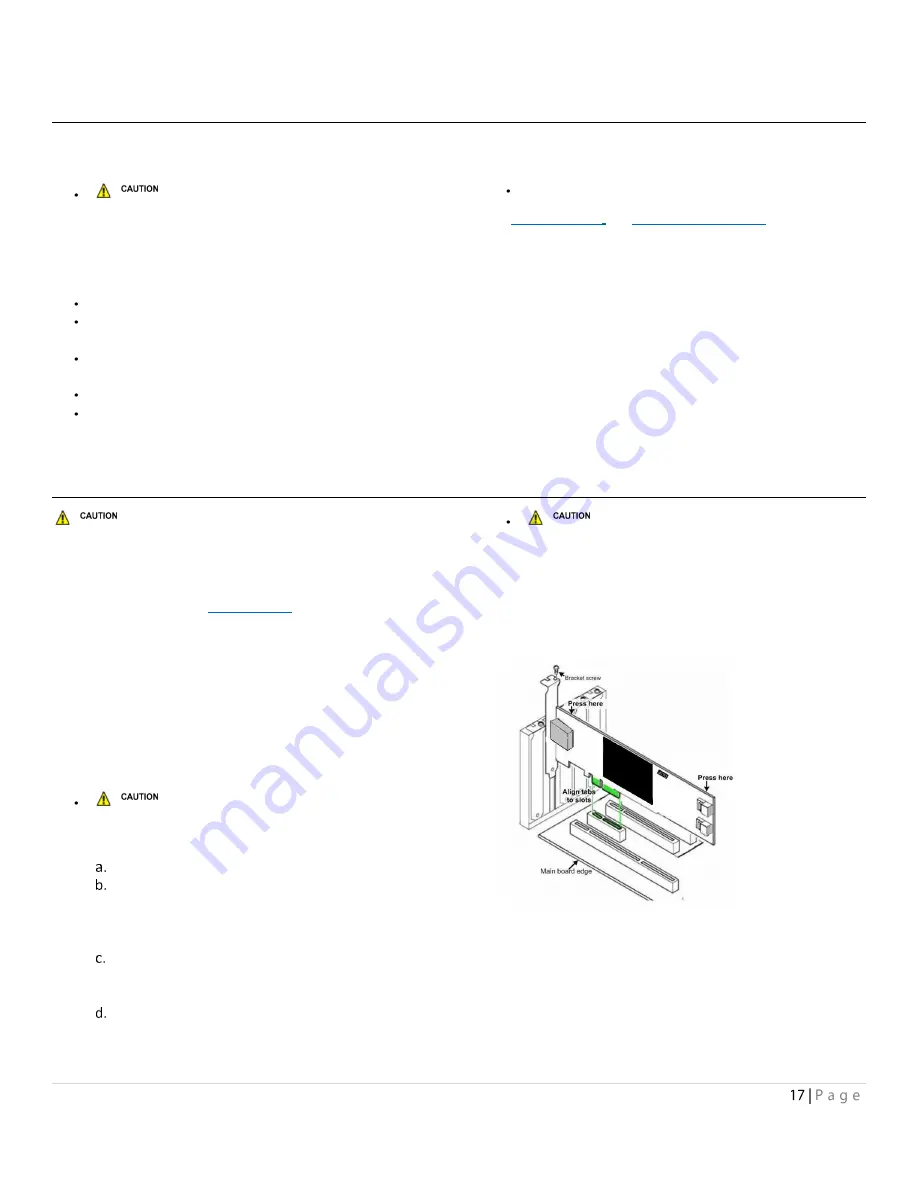
Insert the ATTO ExpressSAS adapter into any open PCI 
Express expansion slot. If you have questions about how 
to install an expansion card in your system, consult your 

computer’s documentation. 


7.


Close the case on the computer and power it up. 

8.


Installed drivers are loaded. 

For Windows: 

1.


 Windows detects your adapter and automatically installs 
the required drivers. If drivers do not load, refer to page 
9 for driver installation and troubleshooting. 

2.


Shut down the computer. 

Summary of Contents for ExpressSAS H1208 GT HBA

Page 1: ...T HBA ATTO ExpressSAS H1280 GT HBA ATTO ExpressSAS H120F GT HBA ATTO ExpressSAS H12F0 GT HBA ATTO ExpressSAS H1244 GT HBA ATTO ExpressSAS H644 HBA ATTO ExpressSAS H680 HBA 2020 ATTO Technology Inc All...

Page 2: ...Contents...

Page 3: ......

Page 4: ...supported on FreeBSD VMware and illumos The CLI tools which are provided in the FreeBSD VMware and illumos driver package may be used instead 3 Install the adapter Refer to Install Hardware 4 Attach S...

Page 5: ...terface Up to 12Gb s per port performance Conforms to PCIe low profile form factor Length 6 600 Height 2 713 Operating temperature 0 55 C 32 F 131 F Operating humidity 10 90 non condensing Storage tem...

Page 6: ...per port performance Conforms to PCIe low profile form factor Length 6 600 Height 2 713 Operating temperature 0 55 C 32 F 131 F Storage humidity 5 95 non condensing Power typ 12V 1 2A 3 3V 0 1A 11W Ai...

Page 7: ...ost interface Up to 12Gb s per port performance Conforms to PCIe low profile form factor Length 6 600 Height 2 713 Operating temperature 0 55 C 32 F 131 F Operating humidity 10 90 non condensing Stora...

Page 8: ...e humidity 5 95 non condensing Power typ 12V 0 8A 3 3V 0 2A 10 3W Airflow 200 lf m minimum H1244 GT technical specifications 4 external SFF 8644 4 internal SFF 8643 SAS ports to PCIe 4 0 host interfac...

Page 9: ...densing Storage temperature 40 70 C 40 F 157 F Storage humidity 5 95 non condensing Power typ 12V 0 6A 3 3V 0 2A 8W Airflow 100 lf m minimum H680 technical specifications Eight external SFF 8088 ports...

Page 10: ...orer users may select Run to automatically run the downloaded self extracting executable file 10 All other browser users select a download destination and run the self extracting executable file 11 Co...

Page 11: ...essSAS HBA tar xfz lnx_drv_esashba _XXX tgz 12 The driver files are extracted to a directory called lnx_drv_esashba_XXX 13 Navigate to that directory 14 Compile and install the driver using install sh...

Page 12: ...ere XXX is the driver s version number cd fbsd_drv_esashba4_XXX 9 Compile and install the driver by executing the install script as follows install sh 10 You will be prompted a number of times to prov...

Page 13: ...step This will launch the EFI Configuration Utility for the associated adapter 3 Use the on screen menus to configure your adapter Help is available at the bottom of the screen 4 When exiting the conf...

Page 14: ...5 Windows Setup searches for drivers matching devices in your system If the ExpressSAS adapter is not in the Select the driver to be installed click Browse and locate the driver 6 Select the ExpressS...

Page 15: ...g additional products you do NOT need to perform this procedure unless you are updating a previously installed driver Also the driver may only be installed to the currently booted operating system In...

Page 16: ...o nvram d atto args esashba2 for H6xx Driver Events The reporting of driver events is controlled by the event mask driver setting See the Driver Settings section for information on how to set this mas...

Page 17: ...oid ESD 1 Install system drivers before you begin hardware installation Refer to Install Drivers 2 Power down the computer and unplug the computer from all power sources 3 Open the case 4 If applicabl...

Page 18: ...Bracket Details Exhibit 1 ExpressSAS H1208 H1208 GT HBA brackets Exhibit 2 ExpressSAS H1280 H1280 GT HBA brackets Exhibit 3 ExpressSAS H120F H120F GT HBA brackets...

Page 19: ...Exhibit 4 ExpressSAS H12F0 H12F0 GT HBA brackets Exhibit 5 ExpressSAS H1288 H1248 and H1244 H1244 GT HBA brackets...

Page 20: ...Exhibit 6 ExpressSAS H644 HBA brackets Exhibit 7 ExpressSAS H680 HBA brackets...

Page 21: ...Adapter Board Details Exhibit 8 ExpressSAS H1208 HBA board Exhibit 9 ExpressSAS H1280 HBA board Exhibit 10 ExpressSAS H120F HBA board Exhibit 11 ExpressSAS H12F0 HBA board...

Page 22: ...Exhibit 12 ExpressSAS H1288 HBA board Exhibit 13 ExpressSAS H1248 HBA board Exhibit 14 ExpressSAS H1244 HBA board Exhibit 15 ExpressSAS H12F0 GT board...

Page 23: ...Exhibit 16 ExpresssSAS H1280 GT board Exhibit 17 ExpressSAS H120F GT board Exhibit 18 ExpressSAS H1208 GT board...

Page 24: ...Exhibit 19 ExpressSAS H1244 GT board Exhibit 20 ExpressSAS H644 HBA board Exhibit 21 ExpressSAS H680 HBA board...

Page 25: ...heck the PCI slot Replace the case Apply power If it is properly seated and devices are still not accessible contact an ATTO Technology authorized representative 3 Verify the driver is loaded 4 Click...

Page 26: ...o RAM without using the CPU s resources DMA bus master Allows a peripheral to control the flow of data to and from system memory by block as opposed to allowing the processor to control the data by by...

Page 27: ...CD ROM printers scanners etc SEP SCSI Enclosure Process A SEP is a device typically a backplane that is capable of executing SCSI SES commands SES SCSI Enclosure Services A SCSI specification that de...

Page 28: ...ng antenna Increase the separation between the equipment and receiver Connect the equipment into an outlet on a circuit different from that to which the receiver is connected Consult the dealer or an...

Page 29: ...limited to replacing or repairing any defective product at ATTO s option There is no charge for parts or labor if ATTO determines that this product is defective PRODUCTS WHICH HAVE BEEN SUBJECT TO ABU...

Reviews: