14 |
P a g e
Install the XstreamCORE
If you have not already completed the instructions on the Quick Start page packed with your XstreamCORE, use the following instructions to
install the XstreamCORE.
Unpack the packing box; verify contents
The XstreamCORE. Note the serial number of
your XstreamCORE unit:
________________________
Power cords
“L” brackets for mounting in a 19” rack
Ethernet cable
RS-232 cable
Install the XstreamCORE
1.
Place the XstreamCORE on a stable flat surface or install
it into a standard rack.
2.
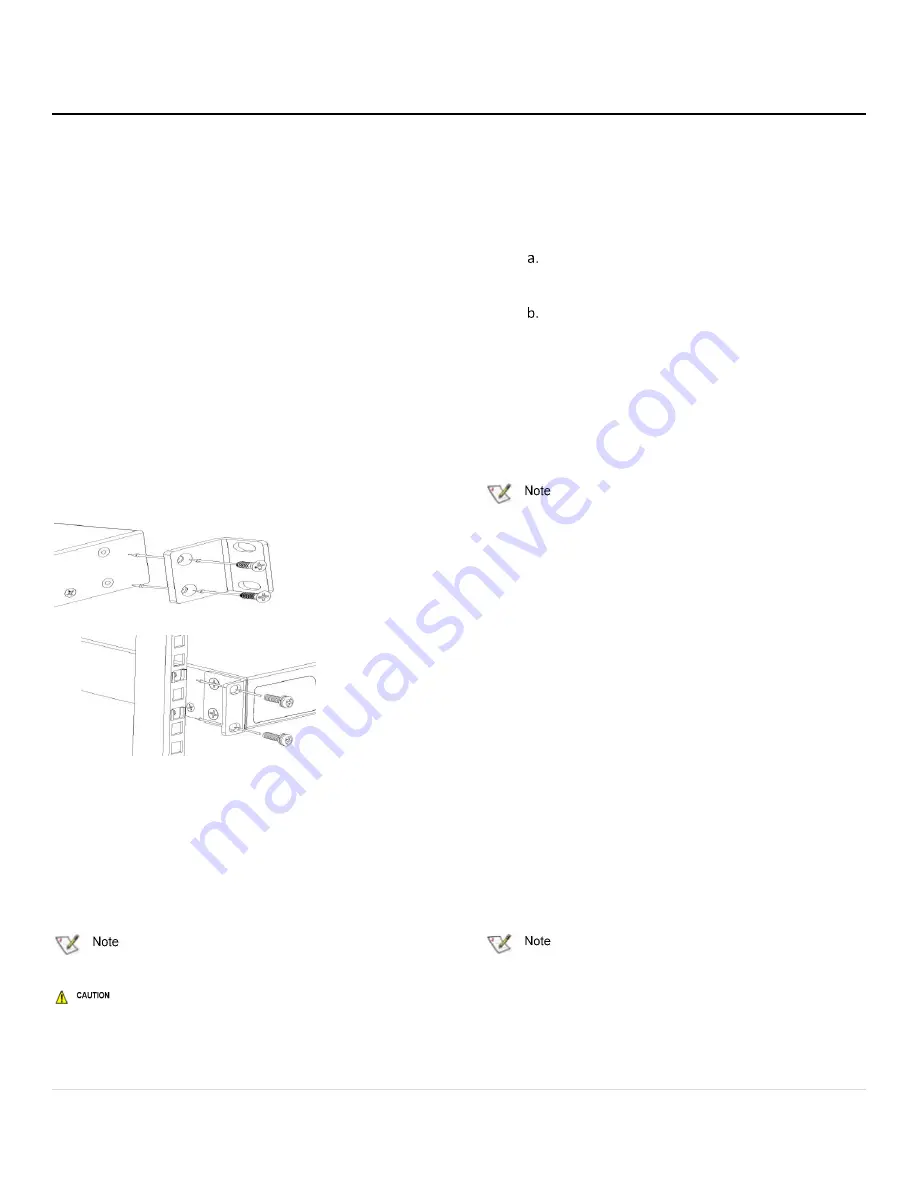
If installing into a rack, attach the brackets to both sides
of the XstreamCORE enclosure. Then install the
XstreamCORE assembly horizontally within the rack so it
does not reduce the air flow within the rack.
E
XHIBIT
7
B
RACKETS TO INSTALL THE
X
STREAM
CORE
INTO A RACK
.
3.
Connect the host computer by connecting the cable to FC
port 1, 2, 3, or 4.
4.
Connect target devices by connecting SAS cables to SAS
connector A, B, C or D.
5.
Power up the target devices.
6.
Connect the Ethernet port to your network.
7.
Connect the AC power cords from the XstreamCORE to
the proper AC
source outlets.
Power is automatically supplied to the 7500/7550/7600
when plugged into an AC outlet.
The power source must be connected to a protective earth
ground and comply with local electrical codes. Improper grounding
may result in an electrical shock or damage to the unit. Also, be aware
that this unit is powered on once a power source is connected. Make
sure the power supply module is fully inserted before applying power.
Failure to do so may cause injury or damage the unit.
If you are using a rack:
Properly ground the XstreamCORE to the rack
equipment. The earth ground connection must be
maintained.
The power requirements plus the power draw of
the other equipment in the rack must not
overload the supply circuit and/or wiring of the
rack.
8.
Wait for the XstreamCORE Ready LED to light, indicating
that the XstreamCORE has completed its power-on self
test sequence.
Discover the IP address
The XstreamCORE is initially configured with DHCP
enabled. It is best if you have access to a DHCP server.
1.
Power on your system and log in as a user with proper
administrative privileges from the computer attached to
the XstreamCORE Ethernet port on the same domain.
2.
Go to www.atto.com.
3.
Select Downloads from the Support menu.
4.
Register or log in if previously registered.
5.
Select Storage Controllers from the product list.
6.
Select your model.
7.
From the table, find your Operating System.
8.
Click on the entry for the QuickNAV™ utility.
9.
Select a download destination and allow the download to
complete. Double-click the downloaded QuickNAV™ file
to install onto your operating system.
10.
Locate the XstreamCORE with the serial number
recorded earlier.
11.
Highlight the serial number.
12.
Click Next.
13.
If a DHCP server is available on your network, an address
is assigned automatically by the server. Note the
assigned address:
_____________________________________
If you do not have a DHCP server, get an IP address and
subnet mask from your network administrator, type it into the area
provided, and click on Next.
14.
Click on Launch Browser. Your browser points to the
ATTO XstreamVIEW™ splash screen. If you use Internet
Explorer as a browser, you may continue on to the


