Installation Guide
2
AT-OPUS-810M
1
2
3
4
5
6
7
8
1
2
3
4
5
6
7
8
9
10
AUDIO IN
1
2
1
2
3
4
5
6
7
8
9
10
LAN
DEBUG
IR IN
RS-232
RX
S
TX
R
L
R
L
AUDIO OUT
R
L
R
L
R
L
R
L
R
L
R
L
R
L
R
L
R
L
R
L
1
2
TOSLINK IN
3
4
1
2
3
4
5
6
7
8
9
10
TOSLINK OUT
IR IN
IR OUT
S
S
S
S
S
S
S
S
S
S
S
S
S
S
S
S
S
S
ON
1
2
3
4
5
6
7
8
1
2
3
4
5
6
PoE
LINK
HDBaseT OUT
7
8
HDMI OUT
9
10
CHASSIS
GROUND
PoE
LINK
PoE
LINK
PoE
LINK
PoE
LINK
PoE
LINK
PoE
LINK
PoE
LINK
AT-OPUS-810M
HDMI IN
AT-OPUS-810M
CANCEL
INFO
EDID
FNC
1
2
3
4
POWER
ENTER
6
7
8
9
5
10
OPUS
TM
PWR: 100-240VAC 50/60Hz
OFF
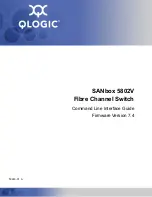
1
Function Buttons
Power
- Sets the unit in and out of
standby.
Enter
- Used for making selections.
FNC
- Use to switch number buttons to
their secondary function.
CANCEL
- Navigates back one step in the
OSD.
2
Number Buttons
Use for selection of inputs and outputs.
1
- Press FNC + 1 to route selected input
to all outputs.
2
- Press FNC + 2 to turn the front IR
receiver on and off.
3
- Press FNC + 6 to open the EDID menu.
4
- Press FNC + 7 to display the device
firmware. Press 7 again to view more info.
3
HDMI IN
Connect HDMI cables to these ports from
HDMI sources.
4
HDBaseT OUT
Connect a CAT5e/6/6a/7 cable from this
port to an HDBaseT receiver.
5
HDMI OUT
Connect HDMI cables from these ports to
local HDMI displays.
6
TOSLINK IN
Connect digital audio sources to these
ports.
7
LAN
Connect an Ethernet cable from this port
to a Local Area Network (LAN).
8
DEBUG
Connect a mini USB cable from this port
to a PC to troubleshoot the unit.
9
Control Port
Connect a third party controller or PC
to control the matrix through either IR or
RS-232
10 TOSLINK OUT
These ports provide digital audio output to
audio DSPs, amplifiers, or player devices.
11 AUDIO IN
Connect unbalanced 2CH audio sources
to these ports.
12 IR IN
Connect a control system to these ports
to route IR signals to the corresponding
HDBaseT outputs.
13 AUDIO OUT
This port provides source audio 2CH de-
embedding and direct audio loop through
for the audio inputs.
14 IR OUT
These ports provide an output for IR
signals to each source and the two local
HDMI outputs.
15 Power Switch
Toggle this switch to power the unit on
or off.
16 100-240VAC 50/60Hz Power Port
Connect the included IEC cord from this
port to the wall for power.
Panel Descriptions
3
5
6 7
8
9
11
13
10
12
14
15
16
4
1
2