background image

2

Installation Guide

AT-HDVS-210H-TX-WP

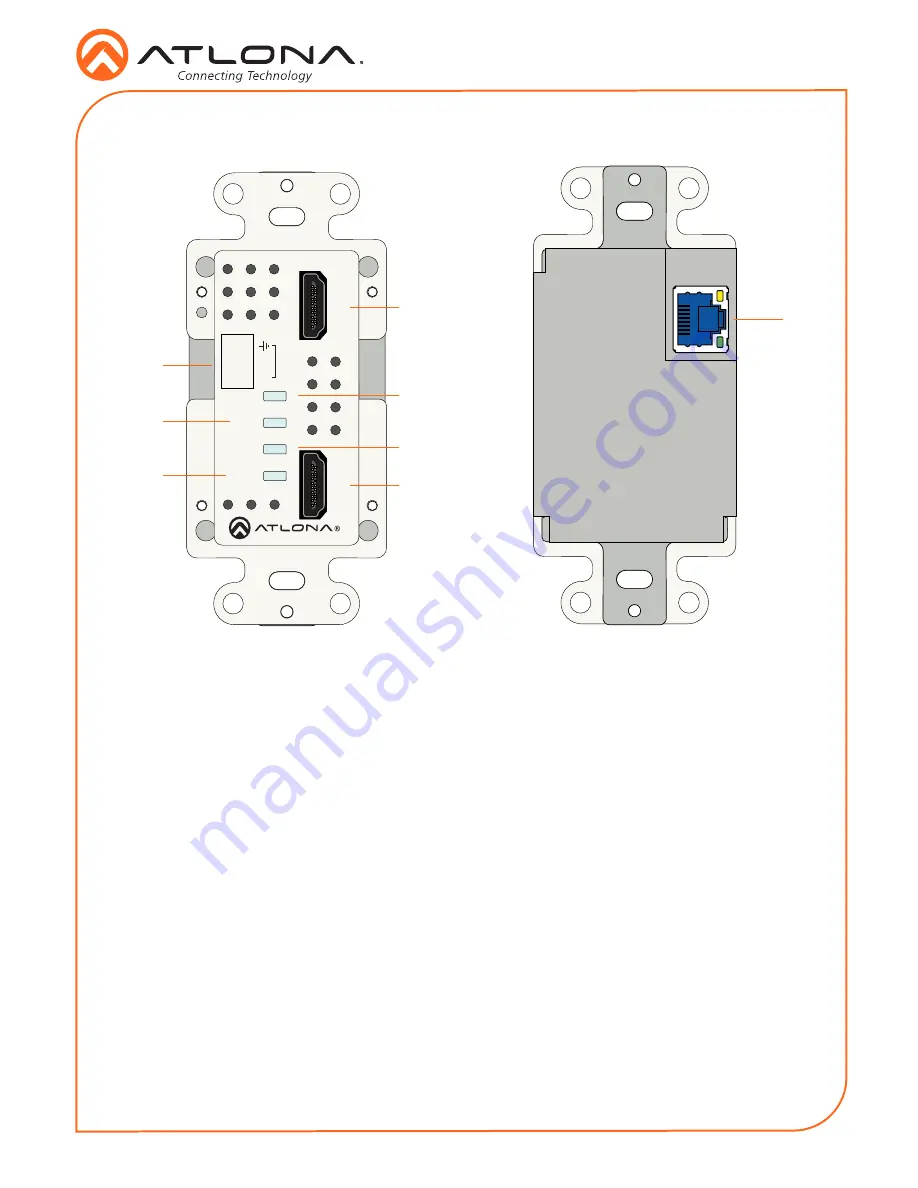
Panel Descriptions

1

8

3

5

2

4

6

7

HDMI 2

HDMI 1

LINK

HDMI 1

HDMI 2

PWR

RS-232

RX

TX

AT-HDVS-210H-TX-WP

HDMI

HDBaseT

OUT

HDMI 1


Connect an HDMI cable from this port to a UHD/HD source.

RS-232


Connect an RS-232 control system to this port.  The RS-232 port is covered by a plate and 

must be removed to expose the RS-232 port.

PWR


This LED indicator glows solid green when the unit is powered.

LINK


This LED indicator glows solid green to indicate the presence of an A/V signal. 

HDMI 1


This LED indicator glows solid green when the 

HDMI 1

 port is the active port.

HDMI 2


This LED indicator glows solid green when the 

HDMI 2

 port is the active port.

HDMI 2


Connect an HDMI cable from this port to a UHD/HD source.

HDBaseT OUT


Connect an Ethernet cable from this port to a locally-powered HDBaseT receiver such as 

the AT-HDVS-200-RX or AT-UHD-EX-100CE-RX-PSE.

Summary of Contents for AT-HDVS-210H-TX-WP

Page 1: ...use with select HDVS Series receivers and scalers as well as the AT UHD EX 100CE RX PSE receiver and Atlona switchers and matrix switchers with HDBaseT inputs This transmitter can serve as an integral component of a fully automated AV system with the convenience of automatic input selection and display control It is remotely powered by the AT UHD EX 100CE RX PSE or other Atlona HDBaseT equipped de...

Page 2: ...he RS 232 port 3 PWR This LED indicator glows solid green when the unit is powered 4 LINK This LED indicator glows solid green to indicate the presence of an A V signal 5 HDMI 1 This LED indicator glows solid green when the HDMI 1 port is the active port 6 HDMI 2 This LED indicator glows solid green when the HDMI 2 port is the active port 7 HDMI 2 Connect an HDMI cable from this port to a UHD HD s...

Page 3: ...t least 3 16 5 mm from the insulation of the RX TX and GND wires 4 Insert the TX RX and GND wires into correct terminal using the included 3 pin captive screw connector 5 Connect the opposite end of the cable to the control system NOTE Typical DB9 connectors use pin 2 for TX pin 3 for RX and pin 5 for ground On some devices functions of pins 2 and 3 are reversed RS 232 GND RX TX HDMI 2 LINK HDMI 1...

Page 4: ...s head screws Do not over tighten or apply high torque devices to the screws Doing so may damage the faceplate and or the screws 4 Install the AT HDVS 210H TX WP to the electrical box or mud ring 5 Reattach the wallplate Removal of the faceplate requires that the AT HDVS 210H TX WP be disassembled from the electrical box or mud ring A small Phillips head screwdriver is required to remove the facep...

Page 5: ...all the AT HDVS 210H TX WP into a 1 gang electrical box or mud ring 4 Attach the included Decora wallplate to secure the AT HDVS 210H TX WP to the wall surface 5 Connect up to two UHD HD sources using the HDMI 1 and HDMI 2 ports 6 Optionally connect an control system to the RS 232 port on the AT HDVS 210H TX WP Installation Connection Diagram AT HDVS 210H TX WP HDMI 2 LIN K HD MI 1 HD MI 2 PW R RS...

Page 6: ...moval and Assembly for more information 1 Make sure the AT HDVS 210H TX WP is powered by connecting it to a PoE compatible receiver such as the AT HDVS 200 RX Power is supplied by the receiver over HDBaseT 2 Remove the faceplate 3 Press and hold the Reset button for approximately 15 seconds Release the Reset button once the PWR LED indicator begins to flash The number of flashes will indicate the ...

Page 7: ...plate to the front of the AT HDVS 210H TX WP and reinstall into the electrical box or mud ring Accessing the webGUI The AT HDVS 210H TX WP includes a built in webGUI which allows easy management and control of all features Follow the instructions below to access the webGUI 1 Make sure that an Ethernet cable is connected between the LAN port on the receiver unit and the network 2 Launch a web brows...

Page 8: ... different one Check the cable for possible damage or loose connections How do I switch inputs The AT HDVS 210H TX WP uses automatic input selection which is based upon the most recent device that is connected Manual switching can be performed by disconnecting the device you have most recently connected or by disconnecting and re connecting the previous input The AT HDVS 210H TX WP is not powering...

Reviews: