background image

Getting Started

11

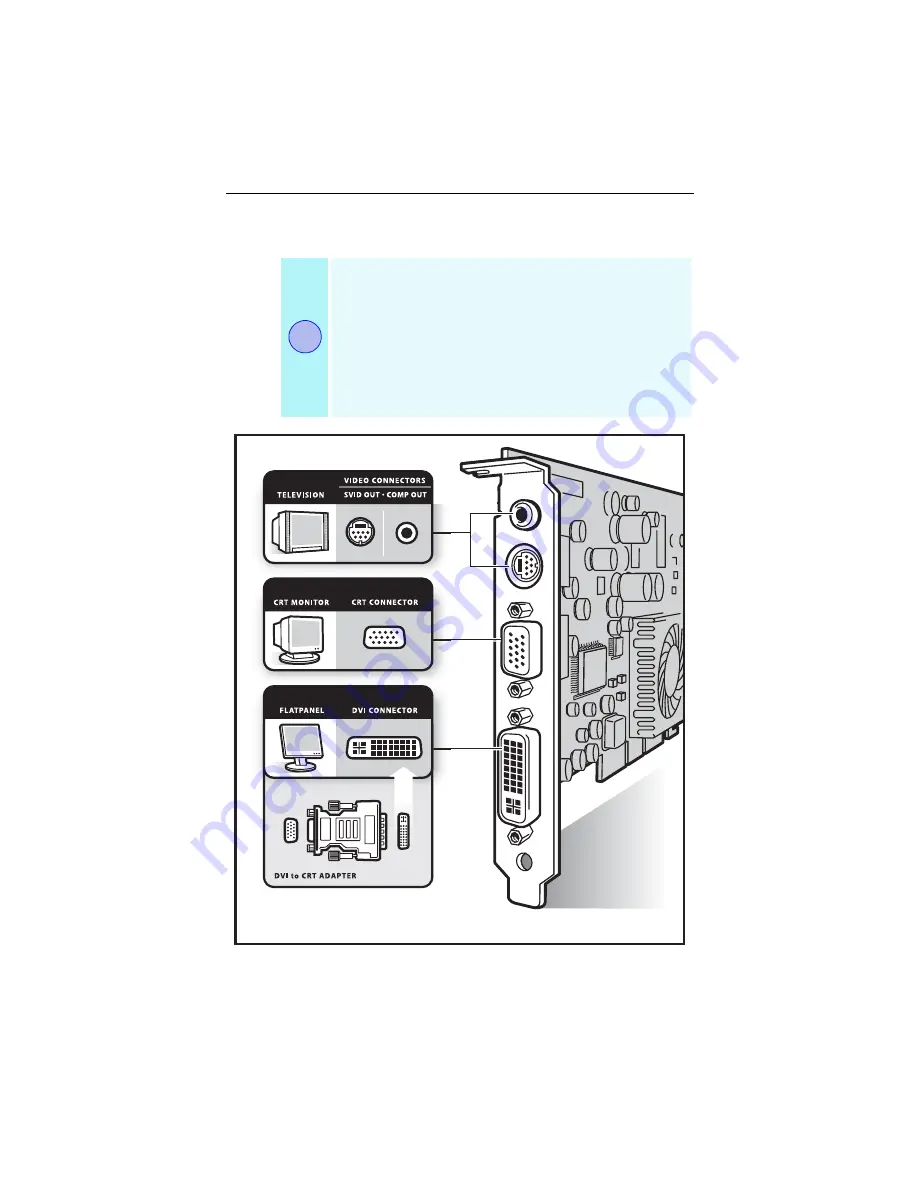
Using the connectors 

The following illustration shows all possible 
connector combinations. Your specific ATI Graphics 
Accelerator card may not have all the shown 
connectors.

S-VID OUT and COMP OUT ports are both shown 
here to illustrate the connections. Your card will 
have one or the other, not both.

i

Summary of Contents for RADEON 9500 SERIES

Page 1: ...echnologies Inc All other company and or product names are trademarks and or registered trademarks of their respective owners Features performance and specifications are subject to change without noti...

Page 2: ...12 Installing the CATALYST Software Suite 13 Troubleshooting Tips 15 Using the Electronic User s Guide 16 Getting Additional Accessories 16 Warranty Information 17 Product Warranty Registration 17 Cus...

Page 3: ...iii...

Page 4: ...ntel Chipset Based Motherboards Several AGP motherboard manufacturers use non Intel AGP chipsets Chipsets include those made by Acer Laboratories ALI Silicon Integrated Systems SIS and VIA Technologie...

Page 5: ...The chipset manufacturer s name will appear as the device name Once you have determined the chipset manufacturer for your motherboard obtain and then install the latest AGP drivers from VIA Technolog...

Page 6: ...l in your computer 1 Close all applications that are currently running 2 Click Start Settings Control Panel and select Add Remove Programs 3 Select your current graphic drivers and click Add Remove 4...

Page 7: ...your card RADEON 9800 Series users see Installing a RADEON 9800 Series on page 8 and 9700 9500 Series users see Installing a RADEON 9700 9500 Series on page 6 If you are not sure whether your card is...

Page 8: ...to disable it on the motherboard For more information see your computer documentation 5 After locating the AGP or PCI slot and if necessary removing the metal cover Align your ATI Graphics Accelerato...

Page 9: ...it in firmly until the card is fully seated 2 Remove the power cable from the Hard Drive power connector 3 Connect A of the Power Extension Cable to the RADEON 9700 9500 Series power connector as show...

Page 10: ...e the computer cover 7 Plug the monitor cable into your card 8 Turn on the computer and monitor Your computer will beep and a warning message may appear on the display and the boot process will stop i...

Page 11: ...Graphics Accelerator card with the AGP slot Press it in firmly until the card is fully seated 2 Remove the power cable from the Hard Drive power connector 3 Connect A of the Power Extension Cable to t...

Page 12: ...ace the computer cover 7 Plug the monitor cable into your card 8 Turn on the computer and monitor Your computer will beep and a warning message may appear on the display and the boot process will stop...

Page 13: ...es from your computer 2 Locate the orange switch near the fan see illustration on page 9 3 Use a sharp pencil to move slider switch number 1 as shown in the illustration 4 Re install the graphics acce...

Page 14: ...tration shows all possible connector combinations Your specific ATI Graphics Accelerator card may not have all the shown connectors S VID OUT and COMP OUT ports are both shown here to illustrate the c...

Page 15: ...tly install your new hardware Cancel the Wizard if you are using Windows 2000 or Windows XP and proceed to Installing the CATALYST Software Suite on page 13 If the Add New Hardware Wizard does not app...

Page 16: ...ensure you install the latest software use the ATI Installation CD ROM that shipped with your ATI Graphics Accelerator card To install the CATALYST software suite 1 Insert the ATI INSTALLATION CD ROM...

Page 17: ...nded If your ATI Graphics Accelerator card includes a multimedia component the software for that component will automatically be installed along with the ATI graphics driver Not all software component...

Page 18: ...facturer NOTE Some manufacturers do not allow the built in graphics to be disabled or to become the secondary display For more troubleshooting tips right click the ATI icon in the taskbar and select T...

Page 19: ...w adobe com To open the User s Guide 1 Insert the ATI INSTALLATION CD ROM into your CD ROM drive 2 If Windows runs the CD ROM automatically proceed to step 6 3 Click Start 4 Select Run 5 Type the foll...

Page 20: ...n CD ROM If you require further assistance with your product the following options are available Online For product information video drivers Frequently Asked Questions and Email support visit http ww...

Page 21: ...n receipt with an equivalent Any replaced parts become the property of ATI This warranty does not apply to the software component of a product or a product which has been damaged due to accident misus...

Page 22: ...iable for damage or loss to the product in shipment Limitations This warranty is valid only if the online Product Warranty Registration form at http www ati com online registration is successfully sub...

Page 23: ...wise in respect of the product No other representations warranties or conditions shall be implied by statute or otherwise In no event shall ATI be responsible or liable for any damages including but n...

Page 24: ...n the user is encouraged to try to correct the interference by one or more of the following measures Re orient or relocate the receiving antenna Increase the separation between the equipment and recei...

Page 25: ...ormation EMC Directive 89 336 EEC and Amendments 92 31 EEC and 93 68 EEC for Class B Digital Device EN 55022 1998 CISPR 22 1997 Class B Limits and Methods of Measurement of Radio Disturbance Character...

Page 26: ...rective de Basse Tension pour produits contenir tuner de t l vision 73 23 CEE Directive basse tension EN 60950 1992 A1 A2 A3 A4 S curit du mat riel des technologies de l information CE befolgungInform...

Page 27: ...24...

Reviews: