4
Network Protocol: TCP/IP, UDP/IP, SNMP, HTTP, ARP, DHCP client
Mechanical:
Antenna: PCB board-mount antenna option, or
Ipex connector for external antenna and cable option
Dimensions: 95 x 76 x 26 mm)
Environmental:
Temperature: Operating: 0 to +55
°
C / +32 to +131
°
F
Storage: -20 to +65
°
C / -4 to +149
°
F
Relative Humidity: 95% (non-condensing)
Emissions EMC Certificate:
U.S.A.: FCC Part 15 Subpart C
CE: ETSI EN 300 328, EN 301 489-1/17, EN 55022, EN 61000, EN 50371
Certification: Some models are already FCC Modular-Certified for immediate
public sale.
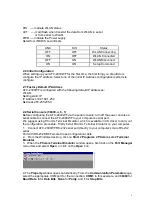
1.5 Serial Port Pin Assignments
RS-232/422/485 Pinouts
RS-232 Pinout(DB9 Female )
PIN
RS-232
Input/Output
2
RXD
I
3
TXD
O
5
GND
-
7
RTS
O
8
CTS
I
RS-422/485 Pinout(SIX Terminal from Left)
PIN
RS-422
RS-485
1
T+
485+
2
T-
485-
3
R+
NC
4
R-
NC
5
VIN+
VIN+
6
VIN-
VIN+
1.6 Connecting the Hardware
This section describes how to connect ATC-2000WF to serial devices for first time testing
purposes. We cover Wiring Requirements, Connecting the Power, Connecting to the
Network,
You should also pay attention to the following items:
Use separate paths to route wiring for power and devices. If power wiring and device wiring
paths must cross, make sure the wires are perpendicular at the intersection point.
Connecting the Power
Connect the 9-36 VDC power line with ATC-2000 power jack. When the power is
properly supplied, the .Link and DIS. LED will light in red and yellow color until the system
is ready, at which time the .Link. LED will be put out and DIS PWR LED still light.
Connecting to a Serial Device
Connect the serial data cable between ATC-2000WF and the serial device.
1.7 Top Panel LED Indicators
LINK ---- Indicate WLAN status


