AT&T CL83203 Complete User'S Manual Download Page 105

Appendix 

99

Deregistering handsets

You may need to deregister your handsets if:

You have 12 registered handsets and need to replace a handset.

-OR-

You wish to change the designated handset number of your  
registered handsets.

You must first deregister ALL handsets, and then register each handset you 

wish to use again, one at a time.

Please read carefully through all the instructions on this page before 

beginning the deregistration process.

Deregister all handsets from the telephone base

1. Make sure that all handsets are out of the telephone base and chargers 

before you begin deregistration.
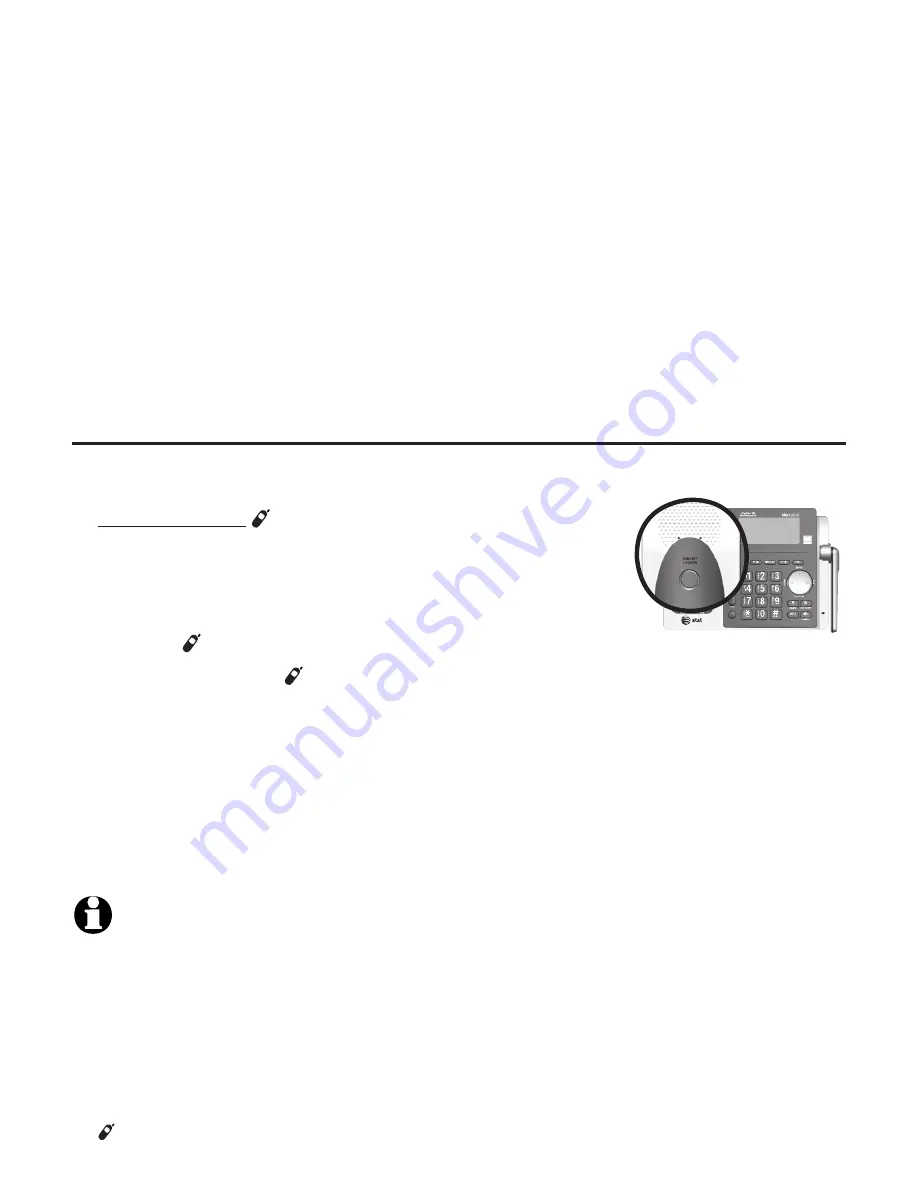
2. Press and hold   /

HANDSET LOCATOR

 on the  

telephone base for about ten seconds (until the  

IN USE

 light starts to flash). The telephone base 

screen shows 

Registering... Please wait

 for five 

seconds, then it shows 

Deregister all devices?


Release   /

HANDSET LOCATOR

.

3. Immediately press   /

HANDSET LOCATOR

 while the  

IN USE

 light is still flashing. (If the light stops flashing, start again with 

Step 1 above.)

4. It takes up to ten seconds to complete the deregistration process. Before 

registering the handset again, wait for the cordless handset screen to 

display 

To register HS, see manual

.

5. To register the handset(s) to the telephone base again, follow the 

registration instructions on the previous page. 

NOTES:

If the deregistration process fails, you may need to reset the system and try again. To reset, 

unplug the power from the telephone base and plug it back in.
You cannot deregister the handsets if any other system handset is in use.
Even if the battery is depleted, you can still deregister the handsets by following the steps above. 

After the handset is charged for at least ten minutes, the screen shows  

To register HS, see manual.

If in Step 2 above you already have 12 registered handsets, the telephone base  

shows Registration slots are full and sounds two beeps. Continue holding  

/

HANDSET LOCATOR

 until 

Deregister all devices?

 displays.


Summary of Contents for CL83203

Page 1: ...Complete user s manual CL83203 CL83303 CL83403 DECT 6 0 cordless telephone answering system with caller ID call waiting...

Page 2: ...T 6 0 cordless telephone answering system with caller ID call waiting Serial number Purchase date Place of purchase Both the model and serial numbers of your AT T product can be found on the bottom of...

Page 3: ...ement visit our website at www telephones att com or call 1 800 222 3111 In Canada dial 1 866 288 4268 Telephone base installation This quick start guide provides you with basic instructions only For...

Page 4: ...ettings 13 Ringer volume 14 Ringer tone 14 Set date time 15 LCD language 16 Caller ID announce 17 Set speed dial voicemail number 18 Voicemail visual message waiting indicator 18 Clear voicemail indic...

Page 5: ...call 56 Make an outgoing call during PTT call 57 End or leave a PTT call 57 Directory About the directory 58 Shared directory 58 Capacity 58 Create directory entries 59 Create a new directory entry 59...

Page 6: ...ounter displays 94 Remote access 95 Appendix Adding and registering handsets headsets 97 Register a handset to the telephone base 97 Deregistering handsets 99 Deregister all handsets from the telephon...

Page 7: ...and caller ID problems caused by DSL interference Please contact your DSL service provider for more information about DSL filters Your product may be shipped with protective stickers covering the hand...

Page 8: ...message playback press to call back the caller if the caller s number is available page 90 1 While reviewing a caller ID log entry press repeatedly to add or remove 1 in front of the telephone number...

Page 9: ...p to the previous menu or exit the menu display or press and hold this key to exit to idle mode When the handset is ringing press to mute the ringer temporarily page 35 Press and hold while the teleph...

Page 10: ...Directory page 59 Caller ID log page 71 Intercom page 46 Ringers page 14 Set date time page 15 Settings page 16 Web address page 22 Using menus Press MENU SELECT to show the menu Press qCID or pDIR t...

Page 11: ...idle mode press to adjust the base ringer volume When on a call press to adjust the listening volume MIC Microphone 1 Press and hold to set page 29 or to dial your voicemail number page 67 MENU SELECT...

Page 12: ...e reviewing the caller ID history the directory or the redial memory press to delete an individual entry While predialing press to delete digits During message or announcement playback press to delete...

Page 13: ...address page 33 Using menus Press MENU SELECT to show the menu Press qCID or pDIR to scroll through menu items Press MENU SELECT to confirm or save changes to a highlighted menu item Press CANCEL to c...

Page 14: ...place if it is plugged into a ceiling under the table or cabinet outlet Plug the power adapter into a power outlet not controlled by a wall switch Charger installation Telephone base installation Rai...

Page 15: ...attery charge indicators and actions to take Battery indicators Battery status Action The screen is blank or shows Place in charger and flashing Battery has no or very little charge The handset cannot...

Page 16: ...battery to prevent possible leakage After you install your telephone or power returns following a power outage the handset and telephone base will prompt you to set the date and time For instructions...

Page 17: ...e wall jack or DSL filter 2 Press down on the tabs on the wall mount bracket on the telephone base to release it from tabletop orientation 3 Swivel the wall mount bracket down to wall mount position a...

Page 18: ...ne line cord or DSL filter from the wall Unplug the power adapter from the power outlet 2 Swivel the wall mount bracket up to tabletop position and push it into the telephone base until it clicks into...

Page 19: ...scroll to the feature to be changed When scrolling through the menu the symbol indicates the selected menu item 3 Press MENU SELECT to select the highlighted item NOTE Press OFF CANCEL to cancel an o...

Page 20: ...r volume is set to off that handset is silenced for all incoming calls If the ringer volume is set to off the caller ID will not be announced and the screen will briefly display Caller ID won t be ann...

Page 21: ...r pDIR to scroll to Set date time and then press MENU SELECT Press qCID or pDIR to select the month then press MENU SELECT or enter the number using the dialing keys Press qCID or pDIR to select the d...

Page 22: ...n ais or Espa ol then press MENU SELECT The screen prompts Set English Fran ais Espa ol as LCD language 5 Press MENU SELECT to save your preference There is a confirmation tone and the screen returns...

Page 23: ...only Base Change the setting for the telephone base only 5 Use qCID or pDIR to highlight On or Off then press MENU SELECT There is a confirmation tone and the screen returns to the previous menu If y...

Page 24: ...it Press and hold MUTE DELETE on the handset to erase all digits Press REDIAL PAUSE to enter a three second dialing pause a p appears 5 Press MENU SELECT to save There is a confirmation tone The scree...

Page 25: ...cemail indicators 1 Press MENU SELECT when in idle mode to enter the main menu 2 Use qCID or pDIR to scroll to Settings then press MENU SELECT 3 Use qCID or pDIR to scroll to Clr voicemail then press...

Page 26: ...pace and delete a character Press and hold MUTE DELETE to delete all characters 5 Press MENU SELECT to save the setting and return to the previous menu There is a confirmation tone Key tone The handse...

Page 27: ...your home area code the caller ID history only displays the seven digits of the telephone number This feature makes it easy for you to place a call from the caller ID log If you dial ten digits to mak...

Page 28: ...l mode to pulse dialing before using the telephone To set the dial mode 1 Press MENU SELECT in idle mode to enter the main menu 2 Use qCID or pDIR to scroll to Settings then press MENU SELECT 3 Use qC...

Page 29: ...in idle mode to enter the QUIET mode setting screen The screen shows Quiet _ _ hours 1 12 hours 2 Use the dialing keys to enter the desired number of hours 1 12 you would like to turn on QUIET mode th...

Page 30: ...main menu 2 Press qCID or pDIR to scroll to the feature to be changed When scrolling through the menu the symbol indicates the selected menu item 3 Press MENU SELECT to select the highlighted item NOT...

Page 31: ...ls If the ringer volume is set to off the telephone base is silenced for all incoming calls If the ringer volume is set to off the caller ID will not be announced and the screen will briefly display C...

Page 32: ...pDIR to scroll to Set date time and then press MENU SELECT 3 Press qCID or pDIR to select the month then press MENU SELECT or enter the number using the dialing keys 4 Press qCID or pDIR to select th...

Page 33: ...ais or Espa ol then press MENU SELECT The screen prompts Set English Fran ais Espa ol as LCD language 5 Press MENU SELECT to confirm and save your preference There is a confirmation tone and the scre...

Page 34: ...highlight the desired option then press MENU SELECT Set all On Off Change the setting for the base and all handsets Base Change the setting for the telephone base only 5 Use qCID or pDIR to highlight...

Page 35: ...ress and hold X DELETE on the telephone base to erase all digits Press REDIAL PAUSE to enter a three second dialing pause a p appears 5 Press MENU SELECT to save There is a confirmation tone and the s...

Page 36: ...w voicemail indicators 1 Press MENU SELECT when in idle mode to enter the main menu 2 Use qCID or pDIR to scroll to Settings then press MENU SELECT 3 Use qCID or pDIR to scroll to Clr voicemail then p...

Page 37: ...ckspace and delete a character Press and hold X DELETE to delete all characters 5 Press MENU SELECT to save the setting and return to the previous menu There is a confirmation tone Key tone The teleph...

Page 38: ...within your home area code the caller ID history only displays the seven digits of the telephone number This feature makes it easy for you to place a call from the caller ID log If you dial ten digit...

Page 39: ...ary service you must change the dial mode to pulse dialing before using the telephone To set the dial mode 1 Press MENU SELECT in idle mode to enter the main menu 2 Use qCID or pDIR to scroll to Setti...

Page 40: ...s not affect the elapsed time On hook dialing predialing Using a cordless handset 1 Enter the telephone number Press MUTE DELETE to make corrections when entering the phone number 2 Press PHONE FLASH...

Page 41: ...silence the ringer temporarily on that handset only This turns off the ringer without disconnecting the call The next incoming call rings normally at the preset volume Using the telephone base Press...

Page 42: ...the call remains in speakerphone mode until you hang up or the battery becomes depleted After installing a battery into the handset the screen may show Low battery If you use the speakerphone at this...

Page 43: ...H or SPEAKER then press REDIAL PAUSE repeatedly to view the redial memory Press MENU SELECT to dial the displayed number Using the telephone base To dial the displayed number press SPEAKER OR Press SP...

Page 44: ...select the equalizer setting Treble 1 Treble 2 Bass or Natural the default setting The current setting is shown on the handset screen for two seconds NOTES If you switch the call between the handset a...

Page 45: ...d speakerphone volume settings are independent When the volume reaches the minimum or maximum setting you hear two beeps Call waiting If you subscribe to call waiting service from your telephone servi...

Page 46: ...MUTE icon displays until you turn off mute To end mute a call Press MUTE DELETE again When mute is off Microphone ON appears temporarily on the handset Using the telephone base To mute a call While on...

Page 47: ...then press MENU SELECT 3 Press qCID or pDIR to scroll to the desired number 4 Press MENU SELECT to dial the number shown To access the caller ID log while on a call 1 Press MENU SELECT 2 Press qCID or...

Page 48: ...2 Press qCID or pDIR to scroll to the desired number or press REDIAL PAUSE repeatedly to find the desired number Press MENU SELECT to dial the number shown NOTES You cannot edit a directory entry whil...

Page 49: ...e outside call is put on hold and your handset shows Transferring call The telephone base rings and shows Transfer from HANDSET X If you have more than one handset your screen shows TRANSFER TO Use th...

Page 50: ...tside call is put on hold and the telephone base shows Transferring call or Transferring call to all The other handset s rings and shows Transfer from BASE 0 BASE represents the base name 3 To answer...

Page 51: ...ONE or on the handset s OR Press HANDSET LOCATOR MUTE or CANCEL on the telephone base Join a call in progress When a handset or the telephone base is already on a call and you would like to join the c...

Page 52: ...followed by 0 2 for handsets 10 12 or TONE followed by for all devices or press qCID or pDIR to scroll to the desired device and press MENU SELECT Your handset screen shows Calling HANDSET X Calling...

Page 53: ...swer the intercom call press PHONE FLASH SPEAKER or any dialing key 0 9 TONE or on the destination handset Both the base and the handset now show Intercom 3 To end the intercom call one party presses...

Page 54: ...r SPEAKER on the handset or SPEAKER on the telephone base The intercom call ends automatically The party on the intercom call hears four beeps Other system devices can also answer the incoming call by...

Page 55: ...light Share call then press MENU SELECT You can end the intercom call and continue the outside call with your handset Press PHONE FLASH or OFF CANCEL on your handset the ended intercom call party hear...

Page 56: ...another device which is accessing the answering system or on an intercom call or outside call your device screen shows Not available at this time NOTE The PTT function is not available when QUIET mode...

Page 57: ...0 BASE represents the base name for a few seconds When the connection is made both your and the destination device screens display Press and hold PTT to talk 2 Press and hold PUSH TO TALK A chirp ind...

Page 58: ...seconds When the connection is made both the telephone base and destination handset display Press and hold PTT to talk 2 Press and hold PTT A chirp indicates your microphone is on Speak towards the t...

Page 59: ...multiple devices When the handset is not in use Press and hold PUSH TO TALK until the handset shows Connecting to group Press PUSH TO TALK Press qCID or pDIR to choose Group Press MENU SELECT or pres...

Page 60: ...When the connection is made both the caller and the destination parties hear a beep The speakerphones on all other devices automatically activate 2 You need to press and hold PTT when you want to spe...

Page 61: ...ive handset numbers appear When your speakerphone light is off the screen shows Press and hold PTT to talk press and hold PUSH TO TALK on your handset or PTT on your telephone base You will hear a chi...

Page 62: ...he telephone base or charger or press CANCEL on the telephone base Both screens show Intercom ended Answer an incoming call during a PTT call When you receive an outside call during PTT there is an al...

Page 63: ...the rest of the PTT participants End or leave a PTT call For one to one PTT calls both initiating and destination devices can end the PTT call For PTT calls to multiple devices the initiating device c...

Page 64: ...ectory the screen shows Not available at this time Capacity The directory can store up to 50 entries with a maximum of 15 alphanumeric characters including spaces for names and 30 digits for telephone...

Page 65: ...D or pDIR or pressing REDIAL PAUSE repeatedly to locate the number Press MENU SELECT to copy the number 6 Press MENU SELECT to move on to the name The display shows Number already saved if the number...

Page 66: ...nge the entry later see page 64 Add a predialed telephone number to the directory You can save a predialed telephone number to the directory 1 Enter the telephone number when in idle mode 2 Follow the...

Page 67: ...rectory Press MENU SELECT twice 2 Press qCID or pDIR to browse through the directory Entries appear alphabetically by the first letter in the name NOTES If the telephone number in the directory exceed...

Page 68: ...abetical order For example if you have the names Jennifer Jessie Kevin and Linda in your directory If you press 5 JKL once you see Jennifer Press qCID and you see Jessie If you press 5 JKL twice you s...

Page 69: ...the directory press PHONE FLASH or SPEAKER on the handset or SPEAKER on the telephone base Delete a directory entry Using a cordless handset To delete the displayed directory entry press MUTE DELETE P...

Page 70: ...old REDIAL PAUSE to add a three second dialing pause a p appears 3 Press MENU SELECT to move on to the name The screen shows EDIT NAME along with the name to be edited 4 To edit the name Press the dia...

Page 71: ...ws Copy from Directory then displays the directory list 5 Press qCID or pDIR to scroll to the phone number you wish to assign to the selected speed dial location 6 Press MENU SELECT to save the settin...

Page 72: ...ed dial Press MENU SELECT 4 Press qCID or pDIR to choose the location you wish to reassign then press MENU SELECT to show the directory entry 5 Press MENU SELECT again 6 Scroll to Change SD and then p...

Page 73: ...ete the displayed speed dial number There is a confirmation tone and the screen shows Speed dial empty before returning to the speed dial list Make a call using speed dial When in idle mode press and...

Page 74: ...are fees for caller ID services In addition services may not be available in all areas This product can provide information only if both you and the caller are in areas offering caller ID service and...

Page 75: ...andset or the telephone base is in idle mode and has new or missed calls its screen shows XX Missed calls All new and missed entries are counted as missed calls Each time you review a new caller ID lo...

Page 76: ...f this is how you entered it into your directory NOTE The number shown in the caller ID log will be in the format sent by the telephone service provider The telephone service provider usually delivers...

Page 77: ...list 3 Press OFF CANCEL on the handset or CANCEL on the telephone base to exit the caller ID history You hear a double beep when the list reaches the beginning or end of the caller ID log NOTE Only o...

Page 78: ...ER on the telephone base to call the number To save the number to the directory see Save a caller ID log entry to the directory on the next page Dial a caller ID log entry 1 When in the caller ID log...

Page 79: ...et or X DELETE on the telephone base to erase all characters Press pound key to move the last word to the front For example Johnson Charlie becomes Charlie Johnson when you press pound key 6 Press MEN...

Page 80: ...The caller prefers not to show the name PRIVATE CALLER The caller prefers not to show the phone number and name UNKNOWN NUMBER Your telephone service provider cannot determine the caller s number UNKN...

Page 81: ...ssage after the tone You can use this announcement or record your own You can record an announcement up to 90 seconds The system does not record any announcement shorter than two seconds To play your...

Page 82: ...ess MENU SELECT to enter the main menu 2 Press qCID or pDIR to scroll to Answering sys then press MENU SELECT 3 Press MENU SELECT again to select Announcement 4 Scroll to Record annc and press MENU SE...

Page 83: ...en press MENU SELECT 3 Press MENU SELECT again to select Announcement 4 Press qCID or pDIR to scroll to Reset annc then press MENU SELECT The screen shows Reset to default annc 5 Press MENU SELECT aga...

Page 84: ...the handset shows ANS ON Using the telephone base Press ANS ON OFF to turn the answering system on or off If the answering system is turned on it announces Calls will be answered If the answering syst...

Page 85: ...handset or telephone base is in idle mode press MENU SELECT to enter the main menu 2 Press qCID or pDIR to scroll to Answering sys then press MENU SELECT 3 Press qCID or pDIR to scroll to Ans sys setu...

Page 86: ...the handset or telephone base is in idle mode press MENU SELECT to enter the main menu 2 Press qCID or pDIR to scroll to Answering sys then press MENU SELECT 3 Press qCID or pDIR to scroll to Ans sys...

Page 87: ...Press qCID or pDIR to scroll to Answering sys then press MENU SELECT 3 Press qCID or pDIR to scroll to Ans sys setup then press MENU SELECT 4 Press qCID or pDIR to scroll to Remote code then press MEN...

Page 88: ...ss qCID or pDIR to scroll to Answering sys then press MENU SELECT 3 Press qCID or pDIR to scroll to Ans sys setup then press MENU SELECT 4 Press qCID or pDIR to scroll to Msg alert tone then press MEN...

Page 89: ...SELECT to enter the main menu 2 Press qCID or pDIR to scroll to Answering sys then press MENU SELECT 3 Press qCID or pDIR to scroll to Ans sys setup then press MENU SELECT 4 Press qCID or pDIR to scro...

Page 90: ...splay on the handset and the telephone base your telephone service provider is indicating that it has new voicemail for you To listen to your voicemail you typically dial an access number provided by...

Page 91: ...n the length of each message Individual messages can be up to three minutes and the maximum recording time is approximately 14 minutes The actual recording time depends on individual message character...

Page 92: ...all screening Press PLAY STOP to temporarily turn on the call screening if call screening is set to off Press SPEAKER to answer the call To screen a call at the handset If the answering system is on y...

Page 93: ...Temporarily turning off the message alert tone If the message alert tone is turned on the telephone base beeps every ten seconds when there are new messages Pressing any telephone base key except HAND...

Page 94: ...OP on the telephone base to listen to the messages If there are new and old messages press qCID or pDIR to select Play new msgs or Play old msgs then press MENU SELECT or PLAY STOP If there are only n...

Page 95: ...OLUME p to adjust the message playback volume Press SKIP to skip to the next message Press REPEAT to repeat the message Press twice to hear the previous message Press X DELETE to delete the message Pr...

Page 96: ...The screen shows Call back then press MENU SELECT PHONE FLASH or SPEAKER to call back the caller if the caller s number is available If the dialing format used is not correct then use the option below...

Page 97: ...ID or pDIR to highlight Delete all old then press MENU SELECT The screen shows Delete all old messages 4 Press MENU SELECT again to confirm The screen displays Deleting then All old msgs deleted There...

Page 98: ...in idle mode press MENU SELECT to enter the main menu 2 Press qCID or pDIR to scroll to Answering sys Press MENU SELECT 3 Press qCID or pDIR to highlight Record memo then press MENU SELECT The system...

Page 99: ...to record a memo 5 Press 5 to stop recording The system announces Recorded The system does not save memos shorter than two seconds OR 1 When the telephone base is in idle mode press RECORD 2 Press RE...

Page 100: ...total number of answering system messages See the table below for other message counter displays Message counter displays 0 No messages 1 99 Total number of messages and memos The system is answering...

Page 101: ...begins to play them 3 You can also enter the following remote commands Remote commands 1 Press to listen to all messages 2 Press to listen to new messages only 3 Press to delete the current message du...

Page 102: ...call automatically If you pause for more than four seconds during remote access you hear a help menu listing all features and commands If there is no command for another 20 seconds the call ends auto...

Page 103: ...y registered as HANDSET 1 and so forth Additional handsets are assigned numbers in the sequential order they are registered up to HANDSET 12 Register a handset to the telephone base 1 Before you begin...

Page 104: ...register HS see manual and the telephone base returns to idle mode This may take up to five minutes to occur Please start again from Step 1 NOTES You cannot register a handset if any other system hand...

Page 105: ...ly press HANDSET LOCATOR while the IN USE light is still flashing If the light stops flashing start again with Step 1 above 4 It takes up to ten seconds to complete the deregistration process Before r...

Page 106: ...ng system on the answering system is turned on to answer calls Message new message in the built in answering system NEW New caller ID log new and missed calls MUTE MUTE the handset microphone is off M...

Page 107: ...he base during a call Four short beeps Low battery warning Telephone base alert tones One short beep Tone of each key press if key tone is turned on One long beep Indication to begin recording a messa...

Page 108: ...or when handsets are being deregistered Flashes when another telephone is in use on the same line Big lighted buttons SPEAKER On when the speakerphone is on ANS ON OFF On when the answering system is...

Page 109: ...tory is full You cannot save any new entries unless you delete some current entries Ended You have just ended a call HANDSET X is calling Another system handset is calling Incoming call There is a cal...

Page 110: ...handsets Phone The handset is on a call Place in charger The battery is very low The handset should be charged Quiet mode on QUIET mode is on Quiet mode is off QUIET mode is turned off Rec mem full T...

Page 111: ...nable to call Line in use Failed phone call the telephone line is in use Unable to call Try again You try to join a call when there are already four handsets on that call You try to make an outside ca...

Page 112: ...base Unplug the electrical power Wait for approximately 15 seconds then plug it back in Allow up to one minute for the cordless handset and telephone base to reset You may need to purchase a new batte...

Page 113: ...ase You may have moved out of range Reset the telephone base Unplug the electrical power Wait for 15 seconds then plug it back in Allow up to one minute for the cordless handset and telephone base to...

Page 114: ...and caller ID problems as a result of DSL interference Please contact your DSL service provider for more information about DSL filters You may be able to improve the performance of your cordless phon...

Page 115: ...et to the telephone base or charger when not in use You may have too many extension phones on your telephone line to allow all of them to ring simultaneously Try unplugging some of the other phones Th...

Page 116: ...her apart from one another or use a different surge protector Move your telephone base to a higher location The phone may have better reception when installed in a high area If other phones in your ho...

Page 117: ...ive caller ID when on a call Make sure you subscribe to caller ID with call waiting features from your telephone service provider Caller ID features works only if both you and the caller are in areas...

Page 118: ...x machine connected to the same telephone line try disconnecting the fax machine If that solves the problem consult your fax machine documentation for information on compatibility with answering syste...

Page 119: ...ng New voicemail and show on the screens and I don t know why Your telephone has both a built in answering system and voicemail indication If New voicemail and appear on the screens then your telephon...

Page 120: ...hub with its own external power supply If you are using a firewall it may prevent access to your nontraditional telephone service provider Contact your service provider for more information Common cu...

Page 121: ...ms Electrical storms can sometimes cause power surges harmful to electronic equipment For your own safety take caution when using electric appliances during storms Cleaning your telephone Your telepho...

Page 122: ...etc Do not use this product near water or when you are wet For example do not use it in a wet basement or shower or next to a swimming pool bathtub kitchen sink or laundry tub Do not use liquids or a...

Page 123: ...ce the telephone base of the cordless telephone near or on top of a TV or VCR If interference is experienced moving the cordless telephone farther away from the TV or VCR will often reduce or eliminat...

Page 124: ...et when it is turned ON Should use the wireless telephone at the ear opposite the pacemaker WTR s evaluation did not identify any risk to bystanders with pacemakers from other persons using wireless t...

Page 125: ...anufacturer or its authorized agents For repair procedures follow the instructions outlined under the Limited warranty If this equipment is causing harm to the telephone network the telephone service...

Page 126: ...different from that to which the receiver is connected Consult the dealer or an experienced radio TV technician for help Changes or modifications to this equipment not expressly approved by the party...

Page 127: ...er back to the power outlet 3 After about 20 seconds when the IN USE light starts flashing release HANDSET LOCATOR and then press it again within two seconds The process takes up to one minute to comp...

Page 128: ...tion You should expect the repair or replacement to take approximately 30 days How long is the limited warranty period The limited warranty period for the PRODUCT extends for ONE 1 YEAR from the date...

Page 129: ...nd the date of purchase or receipt and Provide your name complete and correct mailing address and telephone number 7 Other limitations This warranty is the complete and exclusive agreement between you...

Page 130: ...by the Federal Communications Commission FCC Even so this handset and telephone base can communicate over only a certain distance which can vary with the locations of the telephone base and handset t...

Page 131: ...Chain dialing 41 42 Charger installation 8 Clear voicemail indication handset 19 telephone base 30 Clock handset 15 telephone base 26 D Day and time handset 15 telephone base 26 Delete a caller ID lo...

Page 132: ...Names enter into directory 59 search 62 Number of rings 80 O On hook dialing predialing 34 Outgoing announcement 75 P Paging tone 45 Phonebook 58 Power adapter 8 Predialing 34 Push to talk 50 57 Q Qui...

Page 133: ...or 29 Temporary ringer silencing 35 Time handset 15 telephone base 26 Troubleshooting 106 114 V Visual message waiting indicator handset 18 telephone base 29 Voice announce caller ID telephone base 28...

Page 134: ...message 6 Record announcement 7 End remote access call 8 or hang up Turn system off or on 0 Call your phone number then enter your two digit access code preset to 19 Models CL83203 CL83303 CL83403 Ty...

Page 135: ...can Telephones All Rights Reserved AT T and the AT T logo are trademarks of AT T Intellectual Property licensed to Advanced American Telephones San Antonio TX 78219 Printed in China Issue 3 0 AT T 03...

Reviews: