background image

16

Listening to Your Messages

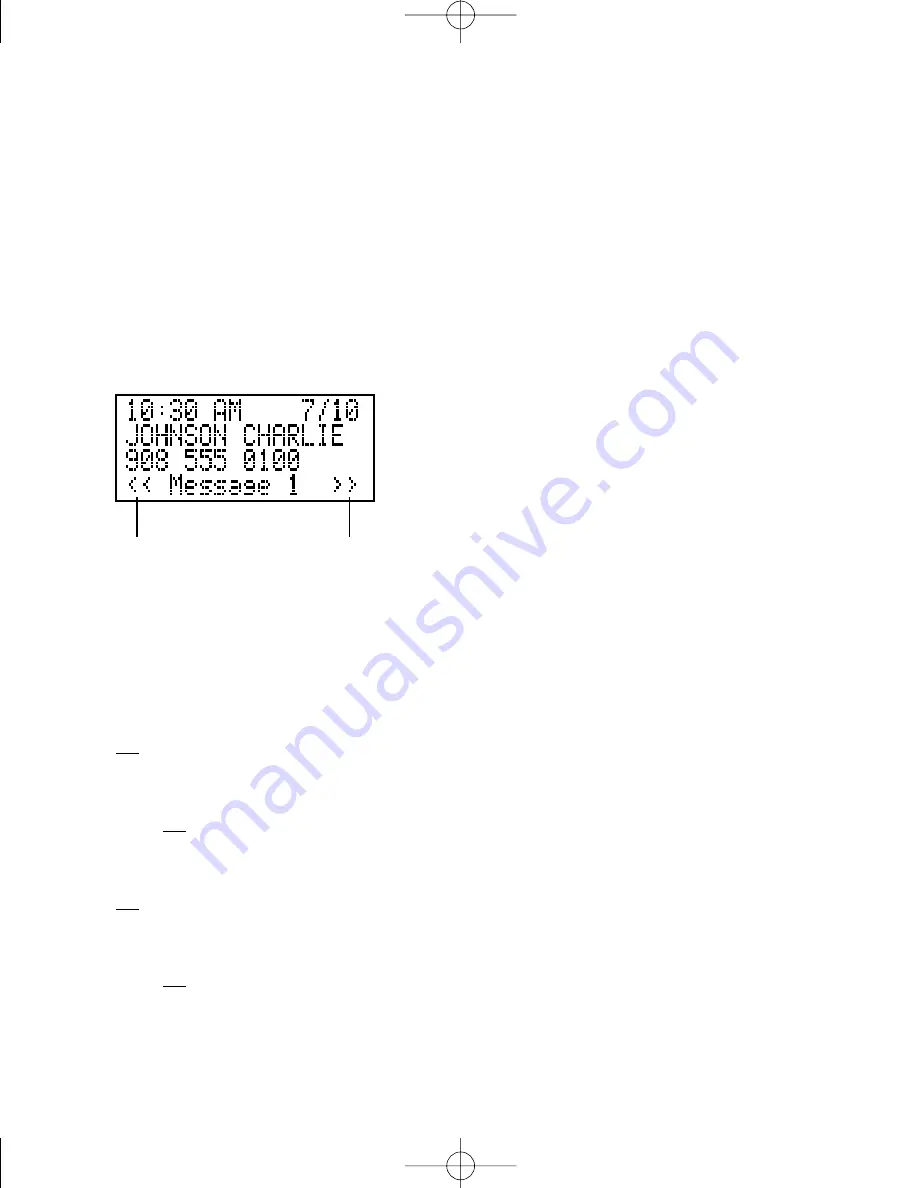
As the system plays back messages, the screen displays the number of the message playing.
Before playing each message, the system announces the day and time the message was
received. The screen displays the caller’s name and number, if stored. You can dial the
displayed number by pressing 

d

(see “Display Dial” in the CALLER ID OPERATION

section for more information).

After playing the last message, the system announces “End of messages.”

Play all messages

Press 

P

. (If you have no messages, the system announces,“No messages.”)

Play new messages only

Press and hold 

P

for about two seconds. (If you have no new messages, the

system announces,“No new messages.”)

Repeat a message

Select 

<<

to repeat a message. Press the left softkey repeatedly to return to an earlier

message.

Repeat part of a message

Hold down 

<<

until you hear a beep. The more beeps you hear, the farther back in the

message you will be when you release the button.

Skip a message

Select 

>>

to skip a message. Press the right softkey repeatedly to skip more than one

message.

Skip part of a message

Hold down 

>>

until you hear a beep. The more beeps you hear, the farther into the

message you will be when you release the button.

ANSWERING SYSTEM OPERATION

Repeat a
message

Skip a message

1760_book_1AT&T  5/1/00  7:38 PM  Page 16

Summary of Contents for 1760

Page 1: ...l are registered trademarks of AT T Corp licensed to Advanced American Telephones USER S MANUAL Part 2 Please read Part 1 Important Product Information included in this package Para recibir este manual en español por favor llame al 1 800 222 3111 1760_book_1AT T 5 1 00 7 38 PM Page iii ...

Page 2: ... 2000 Advanced American Telephones All rights reserved Printed in Mexico 850002718 Issue 1AT T 5 00 1760_book_1AT T 5 1 00 7 38 PM Page ii ...

Page 3: ...1760_book_1AT T 5 1 00 7 38 PM Page iv ...

Page 4: ...ording a Memo 17 When Memory is Full 17 ANSWERING SYSTEM OPERATION From a Remote Touch Tone Phone 18 Connect with the Answering System 18 Play Messages 18 Delete Messages 19 Record Announcement 19 Record a Memo 19 Room Monitor with Intercom 19 Ending the Remote Access Call 20 Changing Remote Access Code 20 Turn System Off 20 Turn System On 20 Memory Full 20 CALLER ID OPERATION 21 Call Waiting 21 N...

Page 5: ...1760_book_1AT T 5 1 00 7 38 PM Page 2 ...

Page 6: ...tes unreviewed call information in call history Caller s telephone number C c Play messages Stop message playback Indicates caller left message Delete messages Turn system on or off Access system features Adjust volume Record a memo Dial number displayed on screen Time of call Date of call 1760_book_1AT T 5 1 00 7 38 PM Page 3 ...

Page 7: ...ys underlined in the display and in this manual Table Desk Installation 1 Connect the telephone Optional if you do not want to connect a telephone skip to Step 2 If you do not connect a telephone you will be unable to use the Display Dial feature Connect the line cord from your telephone to the jack labeled TEL SET on the back of the unit INSTALLATION Modular Telephone Jack TEL LINE Telephone Set ...

Page 8: ...ction is displayed in the center of the screen Use the softkey to select an alternate language for display screen messages It is pre set to English Select OK to accept English and move to storing the Home Area Code OR To change to Spanish use the left softkey to select ESPANOL Then select SI when ESPANOL is displayed in the center of the screen under Idioma Language 5 Store Home Area Code After yo...

Page 9: ...lay to one of eight levels Press C or c until the screen displays your desired setting Select OK to save 9 Set Dial Mode This product comes set for touch tone dialing if you have touch tone dialing service you do not need to set this feature If you have pulse dialing service you cannot dial numbers with the phone set to touch tone The current selection is displayed Select CHANGE to switch to PULSE...

Page 10: ... 4 Round Head screws appropriate for your wall material screws not included Screw in the screws until the heads are about 1 8 away from the wall 4 Position the unit over the screws and pull down until it is firmly in place Adjust the screws as necessary for a secure fit INSTALLATION Modular Telephone Jack 4 Round Screws Wall Mount Template Telephone Set Cord Power Cord Standard Electrical Outlet T...

Page 11: ...is received However you must manually set the time and date once for the day announced with your messages to be correct 1 Press o 2 Use the softkey to select CLOCK 3 Press C or c to change the hour setting 4 Select NEXT to move to the minutes setting 5 Press C or c to change the minutes setting 6 Select NEXT to move to AM or PM 7 Press C or c to change the setting 8 Select DONE 9 Press C or c to c...

Page 12: ...nt is automatically played back for you Delete Outgoing Announcement NOTE You can delete only the user recorded announcement 1 Press o 2 Use the softkey to select ANS SYS The screen displays Announcement 3 Press P to play the announcement 4 Press D The system erases your current user recorded outgoing announcement and announces Deleted The system defaults to the pre recorded announcement Review Ou...

Page 13: ...screen displays Rings 4 Select CHANGE or press C or c until the screen displays your ring selection 5 Select OK Remote Access Code The Remote Access Code allows you to access features and functions of the answering system from a touch tone phone The Remote Access Code is preset to 500 but you can change it to any three digit number from 000 to 999 1 Press o 2 Use the softkey to select ANS SYS 3 Se...

Page 14: ...rea Codes Home and Local Area codes must be programmed into the unit to allow it to properly recognize and dial calls from the Caller ID call history when using the Display Dial feature By programming these specific area codes the unit will be able to distinguish a local call from a long distance call and will thereby dial the appropriate number of digits Home Area Code Guidelines Most users simpl...

Page 15: ... users do not need to program any Local Area Codes However if you dial only 10 digits to make calls to some areas outside your Home Area Code without dialing 1 then program these Local Area Codes into the unit up to four codes can be programmed After programming if you receive a call from one of these Local Area Codes the screen displays the 10 digits of the phone number When you use Display Dial ...

Page 16: ...ave finished programming Local Area Codes Blocked Call Information NOTE This feature may be called by different names by different local telephone companies and may not be available in all areas You can set up the system so that when a call is received from a caller with a blocked telephone number the system will play a pre recorded announcement We re sorry blocked calls to this number cannot be a...

Page 17: ...tion is displayed in the center of the screen Set Display Contrast 1 Press o 2 Press C 3 Use the softkey to select CALL ID 4 Select OK until the screen displays Display Contrast 5 Press C or c until the screen displays your desired setting 6 Select OK Set Dial Mode 1 Press o 2 Press C 3 Use the softkey to select CALL ID 4 Select OK until the screen displays Dial Mode 5 Select CHANGE until the scre...

Page 18: ...f you set the volume at 0 and then press P to play back messages the volume is reset to 2 Call Screening Intercept Set the system to answer calls set the Announcement Monitor to On and set the volume control so you can hear the caller s message If you set the volume to 0 you will be unable to hear callers If you decide to take the call pick up any phone on the same line as the answering system If ...

Page 19: ... Play new messages only Press and hold P for about two seconds If you have no new messages the system announces No new messages Repeat a message Select to repeat a message Press the left softkey repeatedly to return to an earlier message Repeat part of a message Hold down until you hear a beep The more beeps you hear the farther back in the message you will be when you release the button Skip a me...

Page 20: ...to delete all messages Deleting Selected Messages Press D while the message you want to delete is playing The system beeps once and continues with the next message When the system reaches the end of the last message the messages not deleted are renumbered and the screen displays the total number of messages remaining in memory Recording a Memo You can record a memo to be stored as an incoming mess...

Page 21: ...system is ready to accept a remote command Play Messages 1 Connect with the answering system 2 After the two beeps wait four seconds and the system plays back messages OR Press 1 to play all messages OR Press 2 to play only new messages if there are no new messages the system announces No new messages 3 To repeat a message Press 4 while the message is playing To repeat part of a message Hold down ...

Page 22: ...ew announcement To review your announcement Press 7 1 Record a Memo 1 Connect with the answering system 2 Press and begin speaking after the beep 3 Press 5 when you are finished Room Monitor with Intercom You can call the answering system and listen to any activity in the room 1 Connect with the answering system 2 Press 9 8 to listen for 30 seconds 3 If you wish you can press 8 while the monitor i...

Page 23: ...announces The machine is off Turn System On When the system is off it answers after 10 rings announces The machine is off and beeps twice 1 Connect with the answering system 2 Press 0 to turn the system on The system announces The machine is on 3 The system beeps twice and is ready to answer calls and record messages If the system beeps five times the memory is full Memory Full The system answers ...

Page 24: ...E You must subscribe to combined Caller ID with Call Waiting as a single service to see Call Waiting information Check with your local telephone company for availability This unit assigns each incoming call a number from 1 to 99 The most recent unreviewed call will have the highest number For example if two calls have been received call number 02 is the most recent When the call history is full th...

Page 25: ... all calls from history press C or c until the screen displays End Of List then press D The screen prompts Remove All Calls Are you sure Use the softkey to select YES Display Dial NOTE You must have a phone attached to the unit see INSTALLATION and you must lift the receiver for this feature to work As you review calls in history you can dial a displayed phone number If the call information came f...

Page 26: ... no number on the screen or the screen displayed Err no number can be dialed No number can be dialed Display Dial Options Use this feature if you want to check and or change the way a number in call history is dialed 1 Press C or c to locate the number you want to call 2 Lift the handset then press d to make a call OR Press o then use the softkey to select CHANGE to see choices of how the number c...

Page 27: ... phone company is unable to receive information about this caller s name and number Waiting for caller A call has come in and the unit is waiting for information from information your phone company Reset clock Unit has lost power at some point Press the softkey next to the time reset if necessary then select OK Err Appears with call number and other possibly garbled information when incomplete cal...

Page 28: ...even seconds the system stops recording and disconnects the call If the system s memory fills up during a message the system stops recording and disconnects the call System Does Not Answer After Correct Number of Rings If the Toll Saver feature is on the number of rings changes when you have new messages waiting See the FEATURE SETUP section of this manual In some cases the system might be affecte...

Page 29: ... disconnected from AC power it will not operate Your announcement and messages are retained in memory during a power failure but you will need to reset the clock See the instruction label on the bottom of the unit NEW CALL Light Remains On Review the call history completely The light will go off Screen is Flashing Unplug the power cord for 10 seconds then plug it back in Screen Continues to Displa...

Page 30: ...TEMPLATE FOR WALL MOUNTING Use two 4 screws 1760_book_1AT T 5 1 00 7 38 PM Page 27 ...

Page 31: ...an Telephones All rights reserved Printed in Mexico 850002726 Issue 1AT T 5 00 fold 1 Answering System 1760 Remote Commands To connect with your answering system 1 Dial your telephone number from a touch tone phone 2 When the system answers enter your Remote Access Code The system announces the number of messages and beeps twice 3 Wait four seconds for the system to play back all messages OR Enter...

Page 32: ... COMMANDS Play All Play New Delete Repeat Stop Exit Skip System On Record Memo TWO KEY REMOTE COMMANDS Turn system off 0 0 Delete all messages 3 3 Review announcement 7 1 Record announcement 7 speak after beep press 5 to stop Room monitor 9 8 press 8 to speak with someone in the room press 5 or to exit Change Remote Access Code 9 9 End remote access call 9 ONE KEY REMOTE COMMANDS Play All Play New...

Reviews: