15
3-2-2
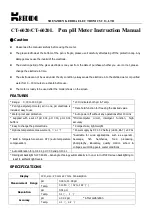
Temperature Sensor Preparation
Attach the temperature sensor to the main unit (Cannot be used with S beaker).
m
Insert the temperature sensor
all the way until you hear a faint
"click."
3-2-3
Sample Preparation
m
The reference line most suited to
your application depends on the
type of spindle that is used.
m
A reference line for normal
measurements and a reference
line for quick measurements are
present only on the L Beaker.
m
Make sure that no air bubbles are
trapped in the sample.
1.
Pour some sample in the beaker up to the
reference line.*
L Beaker (100mL)
S Beaker (15mL)
N
The illustration is for reference only and
may differ from the actual product.
*
If reference lines are not present
on the beaker:
Align the surface of the sample with the
spindle's reference line.
Reference line
Spindle name
Reference line
Spindle name
Reference line (solid line)
For normal measurement use.
Reference line (dotted line)
For quick measurement use.
Temperature sensor
attachment point
Summary of Contents for VISCO
Page 1: ......