background image

30

DCB-05V2 Gate Controller 

Owner Installation Instructions

Hold   To Set

PREV

NEXT

EXIT

SET

Close Cycle Time

PRESS

This section shows how to set the travel times when using drive units with slip clutches etc. Two methods are available for 

setting up the travel times. The first allows the installer to drive the motor(s) so that the actual travel time can be recorded. 

The second allows exact times to be entered.  

Current Trips

PREV

NEXT

EXIT

SET

Are Disabled OK?

PRESS

Confirming Obstruction detection is disabled

I - Time Travel 2 Wire Setup

Appendix

Fig I.1

Fig I.2

SET=Drive Motors

PREV

NEXT

EXIT

SET

EXIT=Enter times

Selecting install method

Setting close cycle time

Fig I.3

Fig I.4

Parameter

Description

M1 Normal Open Time

Sets Open drive time for M1

M1 Normal Close Time

Sets Close drive time for M1

* M2 Normal Open Time

Sets Open drive time for M2

* M2 Normal Close Time

Sets Close drive time for M2

* Close Sync Delay

Sets Delay before M1 is started on closed cycles

* Open Sync Delay

Sets Delay before M2 is started on open cycle

* Only used for dual gate installations. Once the parameter values have be set

press EXIT and the main screen is displayed, the gate is ready for use.

NOTE: The limit setting procedure can be aborted at any time by 

pressing EXIT.

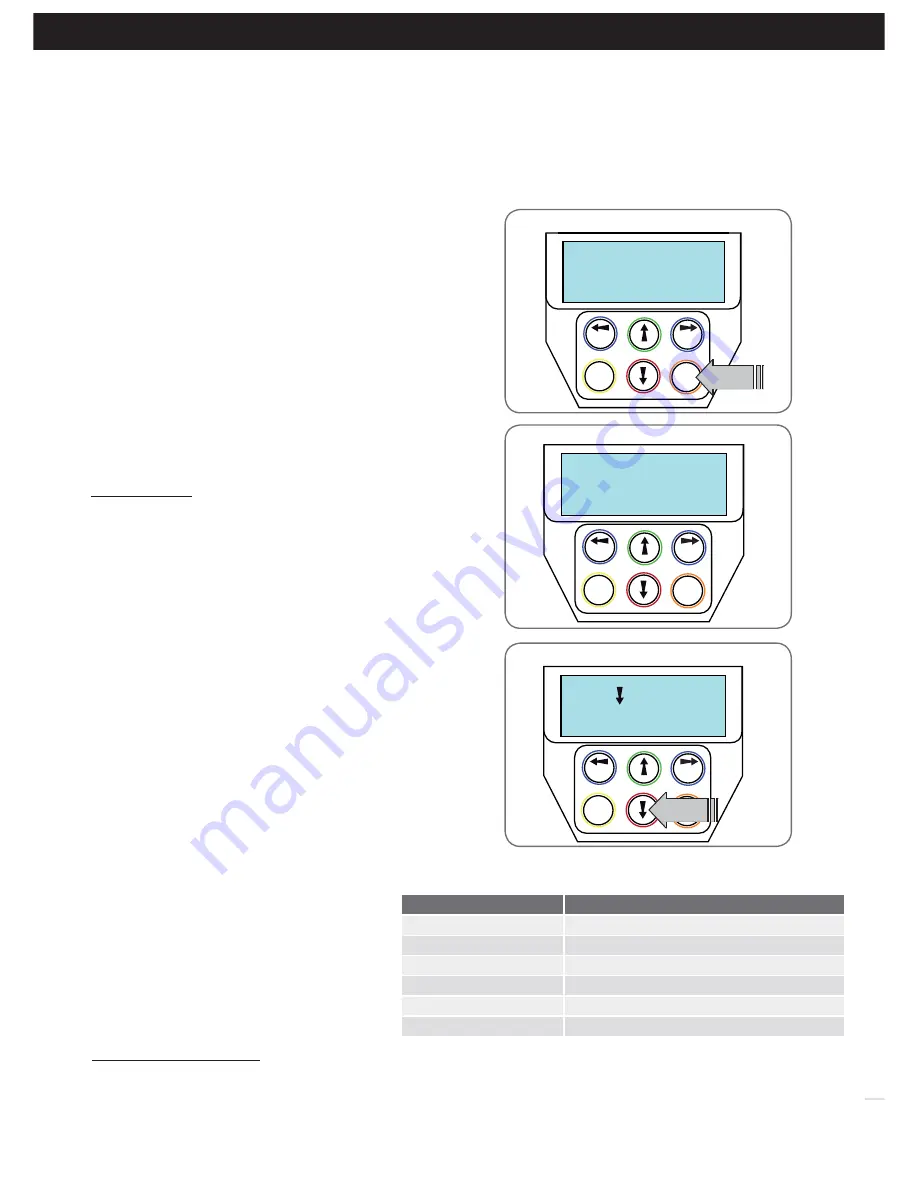
Navigating To “Timed Travel Menu”

a. Press NEXT to navigate to Menu 10.

b. Presee SET to locate Menu 10.2.

c. Press SET again to start the the setup.

d. Confirm that the motor wiring is complete. Press SET to continue.

e. No current trip obstruction detection is available when using timed

travel. Press SET if you accept this

 (Fig. I.1

)

.

f. Enter the number or motors by using the UP or DOWN key to

select the correct number and then press SET.

Selecting Setup Method

a. DCB-05V2 will now prompt for the setup procedure to be selected.

There are 2 methods


(Fig. I.2)

;

i. DRIVE MOTORS = Press SET to continue

ii. ENTER TIME PARAMETERS = Press EXIT to continue

DRIVE MOTORS

Adjusting Gate Leaf Synchronising Delays.  

(Dual gate installations only)

DCB-05V2 will prompt for you to edit the gate leaf synchronising 

delays. The settings are used to introduce a delay between when 

the motors start so that overlapping gates are opened and closed in 

the correct order. 

a. Press SET to access the gate leaf synchronising delay parameters

b. Follow LCD display to edit delay.

Confirming Gate Is Open

DCB-05 will now prompt for you to confirm that the gate is open.

a. If the gate is open press SET and continue.

b. If the gate is closed Press EXIT and DCB-05 will now prompt for

the gate to be opened.

i. Press and Hold the UP key until the gate is open. When the UP

key is released the motor(s) will stop and you will be asked if

the gate is open.

NOTE:

 If the motor drives in the wrong direction the motor wiring 

needs to be swapped.

Setting Close Cycle Drive Time

To set the close cycle drive time press and hold the DOWN key until 

the gate is driven fully closed. 

(Fig I.3)


NOTE: 

 If the motor drives in the wrong direction the motor wiring 

needs to be swapped.

Setting Open Cycle Drive Time

To set the open cycle drive time press and hold the 

UP key until the gate is driven fully open.

Confirming Settings

Press SET to confirm or EXIT to restart from 

Confirming gate is open.

Once the setting have been SET and the main 

screen is displayed, the gate is ready for use.

ENTER TIME PARAMETERS

When the ENTER TIMES method is selected a list 

of parameters  is provided to configure the gates 

travel. The parameters provided are listed below 

in 

Fig I.4


with a brief description

.

Summary of Contents for DCB-05V2

Page 1: ...Dual Gate Controller 24 Volt Gate Control System DCB 05V2 Doc 160020_04 Part 13314 Released 02 06 15...

Page 2: ...9 8 Setting Limits 10 8 1 Setting Travel Limits 10 8 2 Adjusting Close Limit s 10 8 3 Adjusting Open Limit s 10 8 4 Automatic Profiling 10 8 5 Code A Transmitter For Limit Setting 11 8 6 Setting Limi...

Page 3: ...installed by a qualified electrical contractor CAUTION Entrapment from operating gate DO NOT operate the gate opener unless the gate is in full view and free from objects such as cars and children peo...

Page 4: ...T 1 N C relay contact OUT 1 COM relay contact OUT 1 N O relay contact MOTOR 2 terminal 1 MOTOR 2 terminal 2 MOTOR 2 close limit switch input terminal MOTOR 2 open limit switch input terminal COM termi...

Page 5: ...vere injury Follow ALL installation instructions CAUTION do not use any cables which carry green yellow wires as this signifies earth and do not comply with electrical authority regulations 4 1 Mounti...

Page 6: ...sed by swapping the motor connections An opportunity to confirm the correct motor polarity is provided during the limit setup procedure MI Close MOTOR 2 TERMINAL 1 MOTOR 2 TERMINAL 2 MOTOR 2 CLOSE LIM...

Page 7: ...g 6 2 Fig 6 3 6 1 Wiring motors and limit switches DCB 05V2 can be connected to the dual gate drive units in one of several ways Wiring Figure 5 Wire Dual Gate 6 1 3 Wire Dual Gate 6 2 2 Wire Dual Gat...

Page 8: ...OR 1 TERMINAL 1 MOTOR 1 TERMINAL 2 V PWR FOR ACCESSORIES OV Red Black White Blue Orang e Black White Orang e Red Blue Fig 6 4 6 3 Dual NeoSlider Kit This section illustrates how to wire two NeoSliderT...

Page 9: ...cord for damage and ensure it cannot become entangled in any moving parts 7 2 Powering up the DCB 05V2 a After checking the initial wiring apply power to the DCB 05V2 The controller will go through a...

Page 10: ...se limit and for the limit switches to be adjusted so that the motor stops at the desired position b Drive the motor using the UP and DOWN arrows on the console keypad Fig 8 4 c After making adjustmen...

Page 11: ...me transmitter button again as prompted by display d Press the SET button to store the transmitter Navigating To Set Gate Travel Menu a Press PREV to navigate to Menu 10 b Press SET to display MENU 10...

Page 12: ...mps 0 7 PRESS Fig 9 2 Fig 9 3 9 3 Force Pressure For Close Cycle Navigating To Current Trips a Press NEXT or PREV to navigate to Menu 2 Current Trips b Press SET Fig 9 2 c MENU 2 1 CLOSE Margin is dis...

Page 13: ...or the button Available functions VAC Vacation Mode LGT Courtesy Light STP Stop OPN Open CLS Close SWP Swipe PED Pedestrian access OSC Open Stop Close OFF No action Press SET to save the settings or E...

Page 14: ...re a transmitter can be used to complete the pedestrian position setting procedure 12 1 Setting the Pedestrian Position Navigating to Menu 10 4 Set Pedestrian a Press PREV to navigate to Menu 10 b Pre...

Page 15: ...to Close mode and combinations are One Beam only i Safety Beam 1 ii Safety Beam 2 Either Beam i Safety Beam 1 or Safety Beam 2 Combination ii Safety Beam 1 and Safety Beam 2 iii Safety Beam 2 then Saf...

Page 16: ...to activate an optional external relay module RO 1 which in turn is used to switch the load 14 1 Fitting Solenoid Or Magnetic Locks Installthelockmechanismonthegateasperthemanufacturers instructions S...

Page 17: ...local regulations for appropriate disposal of the batteries Recycling all batteries will have other environmental and social benefits Some batteries are less toxic but hazardous for other reasons Lit...

Page 18: ...Section 15 Antenna behind structure gate or fence or not in line of sight Ensure Antenna is in line of sight Section 4 2 Gate does not close with transmitter Safety Beam not working properly Make sure...

Page 19: ...pendix H Maximum startup amps sets maximum permitted starting current of motors 0 0 6 0 5 0 0 1 AMPS 2 9 Appendix H Parameter timed travel Cutout AMPS maximum motor current permitted after startup 0 0...

Page 20: ...D VOLTS Voltage applied to motors when closing 12 24 20 1 VOLTS 6 4 SLOW SPEED VOLTS Voltage applied to motors when slowing down 6 24 8 1 VOLTS 6 5 SLOW TIME The time between slow down and end of cycl...

Page 21: ...ff 7 5 Appendix C OPN INPUT N C OPERATION Selects operating polarity of OPN input Off On Off 7 6 Appendix C STP INPUT N C OPERATION Selects operating polarity of STP input Off On Off 7 7 Appendix C AU...

Page 22: ...EEN 2 Close Lock Time SEC 0 5 2 Close Lock Time SEC 0 5 Fig B 1 Fig B 2 B Viewing and Editing Parameters Appendix Parameter name Parameter value Displays next parameter in list Parameter number in lis...

Page 23: ...gate to be stopped If the STP terminal is held it will prevent the gate from being moved Menu 7 8 AUX Input Is Default to Light however can be changed to Motor Engaged Menu 7 9 Vacation Mode Vacation...

Page 24: ...he transmitter button is stored in the DCB 05V2 s memory and has a function assigned to it a second screen will be displayed that shows the transmitter details along with the button pressed Fig D 4 Th...

Page 25: ...unter which can be set to expire after a number of drive cycles When expired DCB 05V2 will beep at the beginning of each drive cycle and a message will be displayed on the MAIN SCREEN Fig D 7 This too...

Page 26: ...F will prevent the opener responding to that button Available functions VAC Vacation Mode LGT Courtesy Light STP Stop OPN Open CLS Close SWP Swipe PED Pedestrian access OSC Open Stop Close OFF No acti...

Page 27: ...within memory Once located a stored transmitter can be replaced deleted edited copied or if the location is empty a new transmitter can be coded Method 1 Go To The Start Of The List Accessing The List...

Page 28: ...ts steps 2 3 of the BASIC CODE TRANSMITTER PROCEDURE for each transmitter to be coded Coding is terminated by pressing the EXIT button Exiting The List To exit the transmitter list simply press EXIT t...

Page 29: ...af is in the open position c Press SET to confirm or press EXIT to go back and drive the gate open Fig H 4 Automatic Profiling AfterabriefpauseDCB 05V2willautomaticallycloseandopengate several times a...

Page 30: ...to select the correct number and then press SET Selecting Setup Method a DCB 05V2 will now prompt for the setup procedure to be selected There are 2 methods Fig I 2 i DRIVE MOTORS Press SET to continu...

Page 31: ...his Warranty excludes damage resulting from a normal wear and tear b accidental damage c incorrect installation of the Product d blown fuses electrical surges power surges or power spikes e theft fire...

Page 32: ...ode 128 is a trademark of Automatic Technology Australia Pty Ltd No part of this document may be reproduced without prior permission In an ongoing commitment to product quality we reserve the right to...

Reviews: