background image

                                                                                               ASUSTOR NAS Memory Installation Guide


   Page 5 of 9


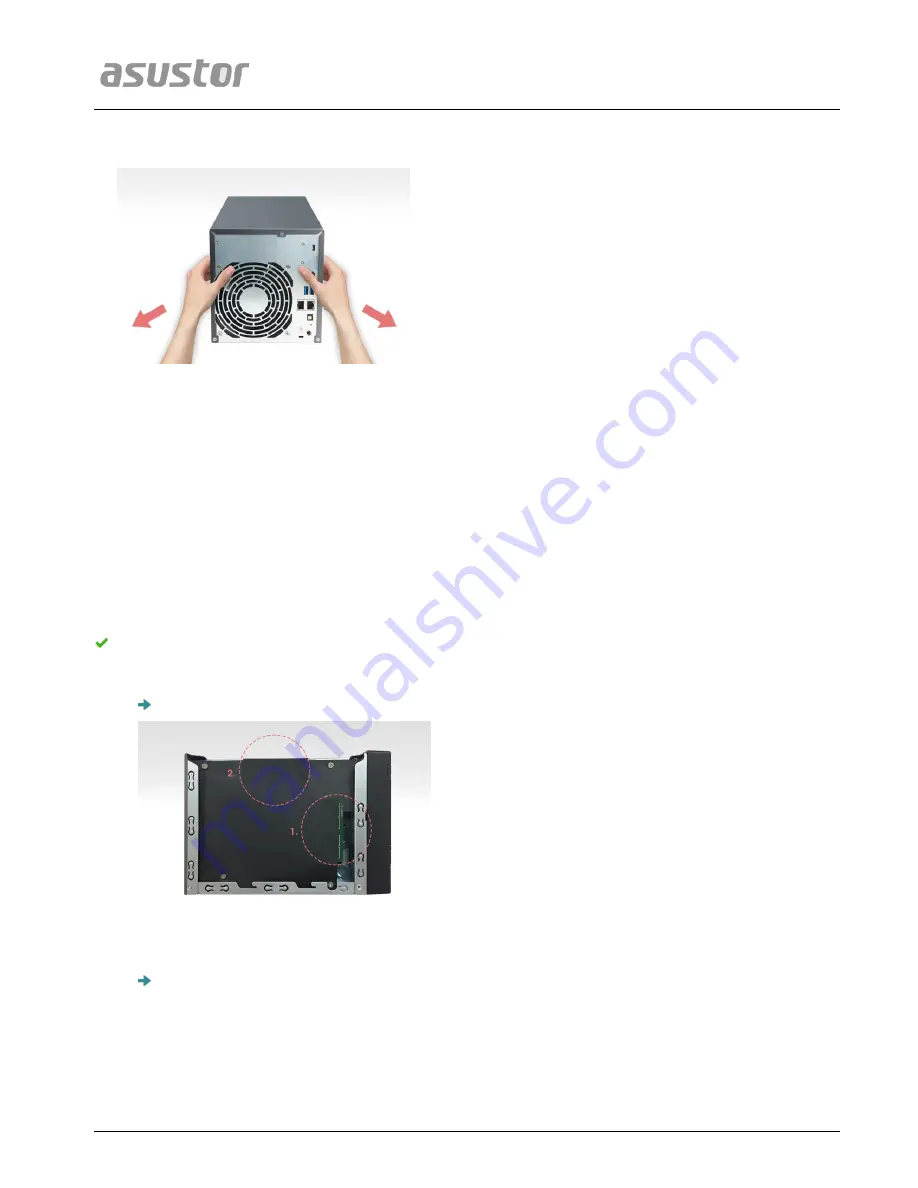
Grip  the  cover  from  both  sides  with  two  hands  and  then  gently  push  it  back  to  remove  it 
from the chassis. 


2.2.


Installing Memory 

When upgrading memory, please note that memory modules of the same size must be used. 
For example, AS63 devices come with two pre-installed 1GB memory modules. When 
upgrading, you must first remove the two 1GB memory modules before installing two 2GB or 
4GB memory modules or a single module. The maximum supported memory is 8GB combined. 

Note: If you decide to upgrade memory, it is recommended that you upgrade to two memory 
modules of the same size for optimal performance. 


When installing a single memory module, follow the steps outlined below. 


Locate the two pre-installed memory modules as indicated in the graphic below. 


For both memory modules, pull back the black protective covering, and then release 
the ejector clips by gently pulling them out to the sides. Remove the memory modules. 

Summary of Contents for AS63 Series

Page 1: ...Memory Installation Guide For ASUSTOR AS63 64 Series NAS Ver 2 7 1 0421 ...

Page 2: ...of Contents 1 Introduction 3 1 1 Notes and Precautions 3 1 2 Parts and Tools Needed 3 2 Installation Guide 4 2 1 Removing the Cover 4 2 2 Installing Memory 5 2 3 Replacing the Cover 8 3 Appendix 9 3 1 Troubleshooting 9 3 2 Contact ASUSTOR Technical Support 9 ...

Page 3: ...module or a connection mistake In this case a repair fee will be charged Be careful not to injure your hands or fingers with sharp edges of the memory module inner components or circuit boards of your NAS ASUSTOR does not guarantee that third party memory modules will work in your NAS Be sure to turn off your NAS and peripherals and disconnect all attachments and connection cables before adding or...

Page 4: ... n G Gu ui id de e 2 1 Removing the Cover Shutdown the NAS by selecting Shut down from the ADM User Menu Disconnect all cables and devices connected to the NAS including the power cord Use a screwdriver to loosen the three screws found on the rear of the NAS as shown in the illustration ...

Page 5: ...1GB memory modules before installing two 2GB or 4GB memory modules or a single module The maximum supported memory is 8GB combined Note If you decide to upgrade memory it is recommended that you upgrade to two memory modules of the same size for optimal performance When installing a single memory module follow the steps outlined below Locate the two pre installed memory modules as indicated in the...

Page 6: ...carefully push down and then back on the memory module until it clicks into place You should be able to hear an audible click When installing two memory modules follow the steps outlined below Locate the two pre installed memory modules as indicated in the graphic below For both memory modules pull back the black protective covering and then release the ejector clips by gently pulling them out to ...

Page 7: ...e in a new memory module as shown in the graphic below making sure that each memory module s connectors are fully inserted into the slot Using two fingers carefully push down and then back on the memory module until it clicks into place You should be able to hear an audible click ...

Page 8: ...Memory Installation Guide Page 8 of 9 2 3 Replacing the Cover 1 Replace the cover and tighten the three screws that were removed previously 2 Reconnect all cables including the power cord and then start up the NAS ...

Page 9: ...u have used memory that is compatible with the system Also please reinstall the memory in order to confirm that it has been installed properly 3 If your NAS still does not operate normally please remove the newly installed memory module and then restart the NAS to see if it is able to operate normally 4 If the previous steps have not solved your problem please contact your local dealer or ASUSTOR ...

Reviews: