background image

1-20

Chapter 1: Product introduction

1.9 

Jumpers


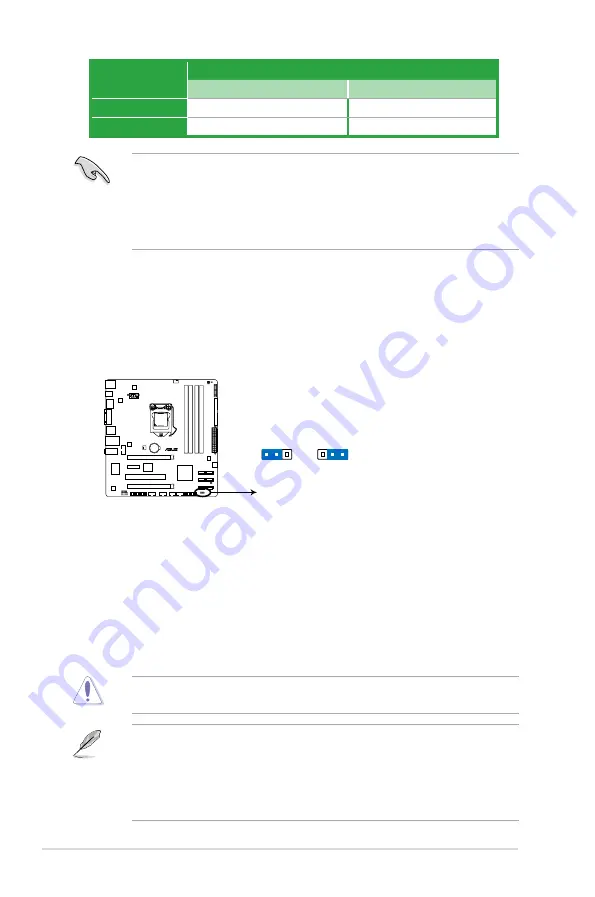
Clear RTC RAM (3-pin CLRTC)

This jumper allows you to clear the Real Time Clock (RTC) RAM in CMOS. You can 

clear the CMOS memory of date, time, and system setup parameters by erasing 

the CMOS RTC RAM data. The onboard button cell battery powers the RAM data in 

CMOS, which include system setup information such as system passwords.

Except when clearing the RTC RAM, never remove the cap on CLRTC jumper default 

position. Removing the cap will cause system boot failure!

•  If the steps above do not help, remove the onboard battery and move the jumper again 

to clear the CMOS RTC RAM data. After clearing the CMOS, reinstall the battery.

•  You do not need to clear the RTC when the system hangs due to overclocking. For 

system failure due to overclocking, use the CPU Parameter Recall (C.P.R.) feature. Shut 

down and reboot the system, then the BIOS automatically resets parameter settings to 

default values.

To erase the RTC RAM:
1.  Turn OFF the computer and unplug the power cord.
2.  Move the jumper cap from pins 1-2 (default) to pins 2-3. Keep the cap on pins 2-3 

for about 5-10 seconds, then move the cap back to pins 1-2.

3.  Plug the power cord and turn ON the computer.
4.  Hold down the 

<Del>

 key during the boot process and enter BIOS setup to re-enter 

data.

•  In single VGA card mode, use the PCIe 2.0 x16_1 slot (blue) for a PCI Express x16 

graphics card to get better performance.

•  We recommend that you provide sufficient power when running CrossFireX™ mode. 

See page 1-25 for details.

•  Connect a chassis fan to the motherboard connector labeled CHA_FAN when using 

multiple graphics cards for better thermal environment.

VGA configuration

PCI Express operating mode
PCIe x16_1

PCIe x16_2

Single VGA/PCIe card

x16 (Recommended for single VGA card)

N/A

Dual VGA/PCIe card

x16

x4

P8H67-M

P8H67-M Clear RTC RAM

1 2

2 3

Normal

(Default)

Clear RTC

CLRTC

Summary of Contents for P8H67-M LE

Page 1: ...Motherboard P8H67 M ...

Page 2: ...planation and to the owners benefit without intent to infringe Offer to Provide Source Code of Certain Software This product may contain copyrighted software that is licensed under the General Public License GPL and under the Lesser General Public License Version LGPL The GPL and LGPL licensed code in this product is distributed without any warranty Copies of these licenses are included in this pr...

Page 3: ... 5 3 Motherboard layout 1 7 1 5 4 Layout contents 1 7 1 6 Central Processing Unit CPU 1 8 1 6 1 Installing the CPU 1 8 1 6 2 Installing the CPU heatsink and fan 1 11 1 6 3 Uninstalling the CPU heatsink and fan 1 12 1 7 System memory 1 13 1 7 1 Overview 1 13 1 7 2 Memory configurations 1 14 1 7 3 Installing a DIMM 1 18 1 7 4 Removing a DIMM 1 18 1 8 Expansion slots 1 19 1 8 1 Installing an expansio...

Page 4: ...S BIOS Updater 2 4 2 2 BIOS setup program 2 7 2 3 Main menu 2 11 2 3 1 System Language 2 11 2 3 2 System Date 2 11 2 3 3 System Time 2 11 2 3 4 Security 2 11 2 4 Ai Tweaker menu 2 13 2 4 1 Ai Overclock Tuner 2 13 2 4 2 Memory Frequency 2 14 2 4 3 EPU Power Saving Mode 2 14 2 4 4 GPU Boost 2 14 2 4 5 DRAM Timing Control 2 14 2 4 6 CPU Power Management 2 14 2 4 7 CPU Offset Mode Sign 2 15 2 4 8 DRAM...

Page 5: ...ure 2 24 2 6 2 CPU Chassis Fan Speed 2 24 2 6 3 CPU Q Fan Control 2 25 2 6 4 Chassis Q Fan Control 2 25 2 6 5 CPU Voltage 3 3V Voltage 5V Voltage 12V Voltage 2 26 2 6 6 Anti Surge Support 2 26 2 7 Boot menu 2 27 2 7 1 Bootup NumLock State 2 27 2 7 2 Full Screen Logo 2 27 2 7 3 Option ROM Messages 2 28 2 7 4 Setup Mode 2 28 2 7 5 Boot Option Priorities 2 28 2 7 6 Boot Override 2 28 2 8 Tools menu 2...

Page 6: ...nt from that to which the receiver is connected Consult the dealer or an experienced radio TV technician for help The use of shielded cables for connection of the monitor to the graphics card is required to assure compliance with FCC regulations Changes or modifications to this unit not expressly approved by the party responsible for compliance could void the user s authority to operate this equip...

Page 7: ...peration safety Before installing the motherboard and adding devices on it carefully read all the manuals that came with the package Before using the product ensure that all cables are correctly connected and the power cables are not damaged If you detect any damage contact your dealer immediately To avoid short circuits keep paper clips screws and staples away from connectors slots sockets and ci...

Page 8: ...uct and software updates 1 ASUS websites The ASUS website provides updated information on ASUS hardware and software products Refer to the ASUS contact information 2 Optional documentation Your product package may include optional documentation such as warranty flyers that may have been added by your dealer These documents are not part of the standard package Typography Bold text Indicates a menu ...

Page 9: ...tics of individual CPUs Some hyper DIMMs only support one DIMM per channel Refer to Memory QVL for details Refer to www asus com for the Memory QVL Qualified Vendors Lists When you install a total memory of 4GB capacity or more Windows 32 bit operating system may only recognize less than 3GB We recommend a maximum of 3GB system memory if you are using a Windows 32 bit operating system Expansion sl...

Page 10: ...s GPU Boost Turbo V Auto Tuning Adopt Fast Mode ASUS Hybrid Switches MemOK ASUS Protect 3 0 technology ASUS EPU Anti Surge protection LOW EMI solution ASUS Quiet Thermal Solution ASUS Fanless Design PCH Heatsink Solution ASUS EZ DIY ASUS CrashFree BIOS 3 ASUS O C Profile ASUS EZ Flash 2 ASUS MyLogo 2 Internal connectors 4 x USB 2 0 1 1 connectors support additional 8 USB 2 0 1 1 ports 1 x IDE conn...

Page 11: ...t 6 x USB 2 0 1 1 ports 3 x Audio jacks BIOS features 32 Mb Flash ROM EFI BIOS PnP DMI v2 0 WfM2 0 SMBIOS v2 6 ACPI v2 0a Manageability WOL by PME WOR by PME WOR by Ring Accessories 1 x UltraDMA 133 100 cable 2 x Serial ATA 6 0 Gb s cables 1 x I O shield User Manual Support DVD Drivers ASUS Update ASUS Utilities Anti virus software OEM version Form factor MicroATX form factor 9 6 in x 9 2 in 24 5 ...

Page 12: ...xii ...

Page 13: ...processors in LGA1155 package with memory and PCI Express controllers integrated to support 2 channel 4 DIMMs DDR3 memory and 16 PCI Express 2 0 lanes This provides great graphics performance Intel Second Generation Core i7 Core i5 Core i3 processors are among the most powerful and energy efficient CPUs in the world 1 1 Welcome Thank you for buying an ASUS P8H67 M motherboard The motherboard deliv...

Page 14: ... performance True Serial ATA 6Gb s support The Intel H67 Express Chipset natively supports the Serial ATA SATA interface delivering up to 6 0 Gb s data transfer PCI Express 2 0 support This motherboard supports PCI Express 2 0 devices for double speed and bandwidth which enhances system performance S PDIF out connector at the back I O This motherboard provides convenient connectivity to external h...

Page 15: ...makes overclock with just a few clicks away Moreover the ASUS OC profiles in TurboV provides the best O C settings in different scenarios Auto Tuning Auto Tuning is an intelligent tool that automates overclocking to achieve a total system level up This tool also provides stability testing Even O C beginners can achieve extreme yet stable overclocking results with Auto Tuning GPU Boost GPU Boost ov...

Page 16: ... using the bundled support DVD or USB flash disk that contains the latest BIOS file ASUS EZ Flash 2 ASUS EZ Flash 2 is a utility that allows you to update the BIOS without using an OS based utility C P R CPU Parameter Recall The BIOS C P R feature automatically restores the CPU default settings when the system hangs due to overclocking failure C P R eliminates the need to open the system chassis a...

Page 17: ...bject or a metal object such as the power supply case to avoid damaging them due to static electricity Hold components by the edges to avoid touching the ICs on them Whenever you uninstall any component place it on a grounded antistatic pad or in the bag that came with the component Before you install or remove any component ensure that the ATX power supply is switched off or the power cord is det...

Page 18: ...u physical injury and damage motherboard components 1 5 1 Placement direction When installing the motherboard ensure that you place it into the chassis in the correct orientation The edge with external ports goes to the rear part of the chassis as indicated in the image below 1 5 2 Screw holes Place six screws into the holes indicated by circles to secure the motherboard to the chassis Do not over...

Page 19: ...DIF_O2 VGA 2 1 5 3 4 6 9 8 7 11 10 1 12 14 13 15 16 17 Connectors Jumpers Slots LED Page Connectors Jumpers Slots LED Page 1 ATX power connectors 24 pin EATXPWR 8 pin EATX12V 1 25 10 Standby Power LED SB_PWR 1 31 2 Serial port connectors 10 1 pin COM1 1 24 11 Serial ATA connectors 7 pin SATA3G1 4 7 pin SATA6G1 2 1 23 3 Intel CPU socket 1 8 12 Clear RTC RAM 3 pin CLRTC 1 20 4 CPU and Chassis fan co...

Page 20: ...he damage is shipment transit related Keep the cap after installing the motherboard ASUS will process Return Merchandise Authorization RMA requests only if the motherboard comes with the cap on the LGA1155 socket The product warranty does not cover damage to the socket contacts resulting from incorrect CPU installation removal or misplacement loss incorrect removal of the PnP cap 1 6 1 Installing ...

Page 21: ...b only The CPU fits in only one correct orientation DO NOT force the CPU into the socket to prevent bending the connectors on the socket and damaging the CPU Gold triangle mark Alignment keys CPU notches 5 Position the CPU over the socket ensuring that the gold triangle is on the bottom left corner of the socket and then fit the socket alignment keys into the CPU notches PnP cap ...

Page 22: ...retention tab 6 Apply some Thermal Interface Material to the exposed area of the CPU that the heatsink will be in contact with ensuring that it is spread in an even thin layer Some heatsinks come with pre applied thermal paste If so skip this step The Thermal Interface Material is toxic and inedible DO NOT eat it If it gets into your eyes or touches your skin wash it off immediately and seek profe...

Page 23: ...ure that you have installed the motherboard to the chassis before you install the CPU fan and heatsink assembly The type of CPU heatsink and fan assembly may differ but the installation steps and functions should remain the same The illustration above is for reference only To install the CPU heatsink and fan 1 Place the heatsink on top of the installed CPU ensuring that the four fasteners match th...

Page 24: ...his connector 1 6 3 Uninstalling the CPU heatsink and fan To uninstall the CPU heatsink and fan 1 Disconnect the CPU fan cable from the connector on the motherboard 2 Rotate each fastener counterclockwise 3 Pull up two fasteners at a time in a diagonal sequence to disengage the heatsink and fan assembly from the motherboard A A B B A A B B CPU_FAN CPU FAN PWM CPU FAN IN CPU FAN PWR GND P8H67 M P8H...

Page 25: ...on a DDR2 DIMM socket DDR3 modules are developed for better performance with less power consumption The figure illustrates the location of the DDR3 DIMM sockets Channel Sockets Channel A DIMM_A1 and DIMM_A2 Channel B DIMM_B1 and DIMM_B2 4 Carefully remove the heatsink and fan assembly from the motherboard 5 Rotate each fastener clockwise to ensure correct orientation when reinstalling P8H67 M P8H6...

Page 26: ... dual channel configuration Any excess memory from the higher sized channel is then mapped for single channel operation According to Intel CPU specification DIMM voltage below 1 65V is recommended to protect the CPU Always install DIMMs with the same CAS latency For optimum compatibility we recommend that you obtain memory modules from the same vendor Due to the memory address limitation on 32 bit...

Page 27: ...66CL9T 3GBNQ 3GB 3 x 1GB SS 9 9 9 24 1 5 1 6V G SKILL F3 10600CL9D 2GBNQ 1GB DS G SKILL G SKILL F3 10600CL8D 4GBHK XMP 4GB 2x2GB DS 8 8 8 21 1 5 1 6V G SKILL F3 10666CL8D 4GBECO XMP 4GB 2x2GB DS 8 8 8 8 24 XMP 1 35V G SKILL F3 10666CL7T 6GBPK XMP 6GB 3x2GB DS 7 7 7 18 1 5 1 6V G SKILL F3 10666CL7D 8GBRH XMP 8GB 2 x 4GB DS 7 7 7 21 1 5V GEIL GET316GB1333C9QC 16GB 4x4GB DS 9 9 9 24 1 5V GEIL GV32GB1...

Page 28: ...sung SEC 913 HCH9 K4B1G0846E SAMSUNG M378B5673FH0 CH9 2GB DS SAMSUNG K4B1G0846F SAMSUNG M378B5273CH0 CH9 4GB DS SAMSUNG K4B2G0846C Super Talent W1333UA1GH 1GB SS HYNIX H5TQ1G83TFR 9 Super Talent W1333UB2GS 2GB DS Samsung K4B1G0846F 9 Super Talent W1333UB4GS 4GB DS Samsung K4B2G0846C Super Talent W1333UX6GM 6GB 3x2GB DS Micron 0BF27D9KPT 9 9 9 24 1 5V Transcend TS256MLK64V3U 2GB DS Micron 9GF27D9KP...

Page 29: ... 16FF 2GB DS Micron 9HF22D9KPT 7 ELPIDA EBJ10UE8EDF0 AE F 1GB SS ELPIDA J1108EDSE DJ F 1 35V low voltage ELPIDA EBJ11UD8BAFA AE E 1GB DS Elpida J5308BASE AC E ELPIDA EBJ21UE8EDF0 AE F 2GB DS ELPIDA J1108EDSE DJ F 1 35V low voltage KINGSTON KVR1066D3N7 1G 1GB SS KTC D1288JPNDPLD9U 7 1 5V KINGSTON KVR1066D3N7 2G 2GB DS ELPIDA J1108BDSE DJ F 7 1 5V KINGSTON KVR1066D3N7 4G 4GB DS Hynix H5TQ2G83AFR 7 1...

Page 30: ...nstall a DIMM 1 Unlock a DIMM socket by pressing the retaining clip outward 2 Align a DIMM on the socket such that the notch on the DIMM matches the DIMM slot key on the socket Support the DIMM lightly with your fingers when pressing the retaining clip The DIMM might get damaged when it flips out with extra force Ensure to unplug the power supply before adding or removing DIMMs or other system com...

Page 31: ...you removed earlier 6 Replace the system cover 1 8 2 Configuring an expansion card After installing the expansion card configure it by adjusting the software settings 1 Turn on the system and change the necessary BIOS settings if any See Chapter 2 for information on BIOS setup 2 Assign an IRQ to the card 3 Install the software drivers for the expansion card When using PCI cards on shared slots ens...

Page 32: ... Shut down and reboot the system then the BIOS automatically resets parameter settings to default values To erase the RTC RAM 1 Turn OFF the computer and unplug the power cord 2 Move the jumper cap from pins 1 2 default to pins 2 3 Keep the cap on pins 2 3 for about 5 10 seconds then move the cap back to pins 1 2 3 Plug the power cord and turn ON the computer 4 Hold down the Del key during the boo...

Page 33: ... player or other audio sources 4 Line Out port lime This port connects to a headphone or a speaker In the 4 6 and 8 channel configurations the function of this port becomes Front Speaker Out 5 Microphone port pink This port connects to a microphone Refer to the audio configuration table below for the function of the audio ports in a 2 4 6 or 8 channel configuration Audio 2 4 6 or 8 channel configu...

Page 34: ...orts connect to USB 2 0 1 1 devices 1 10 2 Internal connectors 1 Front panel audio connector 10 1 pin AAFP This connector is for a chassis mounted front panel audio I O module that supports either High Definition Audio or AC 97 audio standard Connect one end of the front panel audio I O module cable to this connector P8H67 M P8H67 M Front panel audio connector AAFP PIN 1 GND PRESENCE SENSE1_RETUR ...

Page 35: ..._TXP4 RSATA_TXN4 GND RSATA_RXP4 RSATA_RXN4 GND GND RSATA_TXP1 RSATA_TXN1 GND RSATA_RXP1 RSATA_RXN1 GND GND RSATA_TXP2 RSATA_TXN2 GND RSATA_RXP2 RSATA_RXN2 GND P8H67 M P8H67 M SATA connectors 3 CPU and Chasis fan connectors 4 pin CPU_FAN 3 pin CHA_FAN Connect the fan cables to the fan connectors on the motherboard making sure that the black wire of each cable matches the ground pin of the connector...

Page 36: ...al port bracket COM1 is purchased separately P8H67 M P8H67 M Serial port COM1 connector PIN 1 COM1 5 LPT connector 26 1 pin LPT The LPT Line Printing Terminal connector supports devices such as a printer LPT standardizes as IEEE 1284 which is the parallel port interface on IBM PC compatible computers P8H67 M P8H67 M Parallel Port Connector PIN 1 LPT STB PD0 PD1 PD2 PD3 PD4 PD5 PD6 PD7 ACK BUSY PE ...

Page 37: ...l not boot up We recommend that you use a PSU with higher power output when configuring a system with more power consuming devices or when you intend to install additional devices The system may become unstable or may not boot up if the power is inadequate If you are uncertain about the minimum power supply requirement for your system refer to the Recommended Power Supply Wattage Calculator at htt...

Page 38: ...oing so will damage the motherboard The USB 2 0 module is purchased separately P8H67 M P8H67 M USB2 0 connectors USB 5V USB_P12 USB_P12 GND NC USB 5V USB_P11 USB_P11 GND USB1112 PIN 1 USB 5V USB_P14 USB_P14 GND NC USB 5V USB_P13 USB_P13 GND USB1314 PIN 1 USB 5V USB_P10 USB_P10 GND NC USB 5V USB_P9 USB_P9 GND USB910 PIN 1 USB 5V USB_P8 USB_P8 GND NC USB 5V USB_P7 USB_P7 GND USB78 PIN 1 8 Digital au...

Page 39: ...nnector Single device Cable Select or Master Black Two devices Cable Select Master Black Slave Gray Master Master Black or gray Slave Slave Pin 20 on the IDE connector is removed to match the covered hole on the Ultra DMA cable connector This prevents incorrect insertion when you connect the IDE cable Use the 80 conductor IDE cable for Ultra DMA 133 100 IDE devices If any device jumper is set as C...

Page 40: ...ED cable to this connector The IDE LED lights up or flashes when data is read from or written to the HDD System warning speaker 4 pin SPEAKER This 4 pin connector is for the chassis mounted system warning speaker The speaker allows you to hear system beeps and warnings ATX power button soft off button 2 pin PWRSW This 2 pin connector is for the system power button Reset button 2 pin RESET This 2 p...

Page 41: ...ertificates passwords and data A TPM system also helps enhance network security protects digital identities and ensures platform integrity P8H67 M P8H67 M TPM Connector PIN 1 TPM GND S_SMBCLIK_MAIN S_SMBCLIK_MAIN F_LAD2 F_LAD1 GND F_SERIRQ GND C_PCICLK_TPM F_FRAME S_PLTRST F_LAD3 3V F_LAD0 3V 3VSB GND S_PWRDWN The TPM module is purchased separately ...

Page 42: ...test one set of failsafe settings If the test fails the system reboots and test the next set of failsafe settings The blinking speed of the DRAM_LED increases indicating different test processes Due to memory tuning requirement the system automatically reboots when each timing set is tested If the installed DIMMs still fail to boot after the whole tuning process the DRAM_LED lights continuously Re...

Page 43: ...r plugging in any motherboard component The illustration below shows the location of the onboard LED 2 DRAM LED DRAM LED checks the DRAM in sequence during motherboard booting process If an error is found the LED next to the error device will continue lighting until the problem is solved This user friendly design provides an intuitional way to locate the root problem within a second SB_PWR ON Stan...

Page 44: ...t DVD information The Support DVD that comes with the motherboard package contains the drivers software applications and utilities that you can install to avail all motherboard features If Autorun is NOT enabled in your computer browse the contents of the Support DVD to locate the file ASSETUP EXE from the BIN folder Double click the ASSETUP EXE to run the DVD The following screen is for reference...

Page 45: ... and then click ASUS Update from the popup menu The ASUS Update main screen appears From the list select either of the following methods Updating from the Internet a Select Update BIOS from the Internet then click Next b Select the ASUS FTP site nearest you to avoid network traffic then click Next c From the FTP site select the BIOS version that you wish to download then click Next 2 1 1 ASUS Upda...

Page 46: ...utility Before you start using this utility download the latest BIOS file from the ASUS website at www asus com To update the BIOS using EZ Flash 2 1 Insert the USB flash disk that contains the latest BIOS file to the USB port 2 Enter the Advanced Mode of the BIOS setup program Go to the Tool menu to select ASUS EZ Flash Utility and press Enter to enable it Flash Info MODEL P8H67 M VER 0301 DATE 1...

Page 47: ...to the optical drive or the USB flash drive that contains the BIOS file to the USB port 3 The utility automatically checks the devices for the BIOS file When found the utility reads the BIOS file and enters ASUS EZ Flash 2 utility automatically 4 The system requires you to enter BIOS Setup to recover BIOS setting To ensure system compatibility and stability we recommend that you press F5 to load d...

Page 48: ...cess The succeeding utility screens are for reference only The actual utility screen displays may not be same as shown Before updating BIOS 1 Prepare the motherboard support DVD and a USB flash drive in FAT32 16 format and single partition 2 Download the latest BIOS file and BIOS Updater from the ASUS website at http support asus com and save them on the USB flash drive NTFS is not supported under...

Page 49: ...SB flash drive is not write protected and has at least 4096KB free space to save the file 1 At the FreeDOS prompt type bupdater o filename and press Enter The filename is any user assigned filename with no more than eight alphanumeric characters for the filename and three alphanumeric characters for the extension ASUSTek BIOS Updater for DOS V1 07 Current ROM Update ROM Note Saving BIOS PATH A BOA...

Page 50: ...o select the BIOS file and press Enter BIOS Updater checks the selected BIOS file and prompts you to confirm BIOS update Are you sure to update BIOS Yes No 4 Select Yes and press Enter When BIOS update is done press ESC to exit BIOS Updater Restart your computer DO NOT shut down or reset the system while updating the BIOS to prevent system boot failure For BIOS Updater version 1 04 or later the ut...

Page 51: ...assis Press the power button to turn the system off then back on Do this option only if you failed to enter BIOS Setup using the first two options The BIOS setup screens shown in this section are for reference purposes only and may not exactly match what you see on your screen Ensure that a USB mouse is connected to your motherboard if you want to use the mouse to control the BIOS setup program Th...

Page 52: ...nced Mode Temperature Voltage Fan Speed CPU 113 0ºF 45 0ºC CPU 1 248V 5V 5 160V CPU_FAN 4485RPM CHA_FAN1 N A MB 75 2ºF 40 0ºC 3 3V 3 344V 12V 12 248V English EFI BIOS Utility EZ Mode Monday 11 08 2010 Normal Quiet Performance Energy Saving System Performance Boot Menu F8 Default F5 Use the mouse to drag or keyboard to navigate to decide the boot priority Boot Priority Exits the BIOS setup program ...

Page 53: ...ing the basic system configuration Ai Tweaker For changing the overclocking settings Advanced For changing the advanced system settings Monitor For displaying the system temperature power status and changing the fan settings Boot For changing the system boot configuration Tool For configuring options for special functions Exit For selecting the exit options and loading default settings Navigation ...

Page 54: ...uration options for that item Scroll bar A scroll bar appears on the right side of a menu screen when there are items that do not fit on the screen Press the Up Down arrow keys or Page Up Page Down keys to display the other items on the screen Navigation keys At the bottom right corner of the menu screen are the navigation keys for the BIOS setup program Use the navigation keys to select items in ...

Page 55: ...urity settings If you have forgotten your BIOS password erase the CMOS Real Time Clock RTC RAM to clear the BIOS password See section 1 9 Jumpers for information on how to erase the RTC RAM The Administrator or User Password items on top of the screen show the default Not Installed After you set a password these items show Installed Main Ai Tweaker Advanced Monitor Boot Tool Exit EFI BIOS Utility ...

Page 56: ...hen prompted to create confirm the password After you clear the password the Administrator Password item on top of the screen shows Not Installed User Password If you have set a user password you must enter the user password for accessing the system The User Password item on top of the screen shows the default Not Installed After you set a password this item shows Installed To set a user password ...

Page 57: ...General Help F2 Previous Values F5 Optimized Defaults F10 Save ESC Exit EFI BIOS Utility Advanced Mode 2 4 1 Ai Overclock Tuner Auto Allows you to select the CPU overclocking options to achieve the desired CPU internal frequency Select any of these preset overclocking configuration options Auto Loads the optimal settings for the system Manual Allows you to individually set overclocking parameters ...

Page 58: ...his item appears only when The EPU Power Saving Mode is set to Enabled and allows you to set power saving mode Configuration options Auto Light Power Saving Mode Medium Power Saving Mode Max Power Saving Mode 2 4 4 GPU Boost GPU Boost accelerates the integrated GPU for extreme graphics performance Configuration options OK Cancel 2 4 5 DRAM Timing Control The sub items in this menu allow you to set...

Page 59: ...o Enabled Long Duration Power Limit Auto Use to adjust the value Long Duration Maintained Auto Use to adjust the value Short Duration Power Limit Auto Use to adjust the value Primary Plane Current Limit Auto Use to adjust the value Secondary Plane Current Limit Auto Use to adjust the value Some of the following items are adjusted by typing the desired values using the numeric keypad and press Ente...

Page 60: ...nterval 2 4 10 CPU PLL Voltage Auto Allows you to set the CPU PLL voltage The values range from 1 80V to 1 90V with a 0 1V interval 2 4 11 PCH Voltage Auto Allows you to set the Platform Controller Hub voltage The values range from 0 735V to 1 685V with a 0 005V interval The values of the CPU Offset Voltage DRAM Voltage VCCIO Voltage CPU PLL Voltage and PCH Voltage items are labeled in different c...

Page 61: ...ced menu items Incorrect field values can cause the system to malfunction 2 5 Advanced menu The Advanced menu items allow you to change the settings for the CPU and other system devices Trusted Computing CPU Configuration System Agent Configuration PCH Configuration SATA Configuration USB Configuration Onboard Devices Configuration APM 2 5 1 Trusted Computing This item appears only when a TPM modu...

Page 62: ... in each processor package Configuration options All 1 2 3 Limit CPUID Maximum Disabled Enabled Allows legacy operating systems to boot even without support for CPUs with extended CPUID functions Disabled Disables this function Execute Disable Bit Enabled Enabled Enables the No Execution Page Protection Technology Disabled Forces the XD feature flag to always return to zero 0 Intel Virtualization ...

Page 63: ... Enabled Allows you to disable or enable the CPU C6 report to OS Configuration options Enabled Disabled 2 5 3 System Agent Configuration The System Agent Configuration menu allows you to change the northbridge chipset settings Initiate Graphic Adapter PEG PCI Allows you to decide which graphics controller to use as the primary boot device Configuration options iGPU PCI iGPU PCI PEG PEG iGPU PEG PC...

Page 64: ...Serial ATA features that increases storage performance on random workloads by allowing the drive to internally optimize the order of commands RAID Mode Set to RAID Mode when you want to create a RAID configuration from the SATA hard disk drives Serial ATA Controller 0 Enhanced This item appears only when you set the SATA Mode item to IDE Mode Disabled Disables the SATA function Enhanced Set to Enh...

Page 65: ...stems without an EHCI hand off feature Disabled Disables the function 2 5 7 Onboard Devices Configuration HD Audio Controller Enabled Enabled Enables the High Definition Audio Controller Disabled Disables the controller The following two items appear only when you set the HD Audio Controller item to Enabled Front Panel Type HD Allows you to set the front panel audio connector AAFP mode to legacy A...

Page 66: ...lows you to enable or disable the serial port COM Configuration options Enabled Disabled Change Settings IO 3F8h IRQ 4 Allows you to select the Serial Port base address Configuration options IO 3F8h IRQ 4 IO 2F8h IRQ 3 IO 3E8h IRQ 4 IO 2E8h IRQ 3 Parallel Port Configuration The sub items in this menu allow you to set the parallel port configuration Parallel Port Enabled Allows you to enable or dis...

Page 67: ...By PS 2 Mouse Disabled Disabled Disables the Power On by a PS 2 mouse Enabled Enables the Power On by a PS 2 mouse This feature requires an ATX power supply that provides at least 1A on the 5VSB lead Power On By PCI Disabled Disabled Disables the PME to wake up from S5 by PCI devices Enabled Allows you to turn on the system through a PCI LAN or modem card This feature requires an ATX power supply ...

Page 68: ... if you do not wish to display the detected speed Scroll down to display the following items Main Ai Tweaker Advanced Monitor Boot Tool Exit Version 2 00 1201 Copyright C 2010 American Megatrends Inc CPU Temperature Select Screen Select Item Enter Select Change Opt F1 General Help F2 Previous Values F5 Optimized Defaults F10 Save ESC Exit EFI BIOS Utility Advanced Mode CPU Temperature 45ºC 113ºF M...

Page 69: ... set CPU Fan Profile to Manual CPU Upper Temperature 70ºC Use the and keys to adjust the upper limit of the CPU temperature The values range from 20ºC to 75ºC CPU Fan Max Duty Cycle 100 Use the and keys to adjust the maximum CPU fan duty cycle The values range from 20 to 100 When the CPU temperature reaches the upper limit the CPU fan will operate at the maximum duty cycle CPU Lower Temperature 20...

Page 70: ...from 40ºC to 90ºC Chassis Fan Max Duty Cycle 100 Use the and keys to adjust the maximum chassis fan duty cycle The values range from 60 to 100 When the chassis temperature reaches the upper limit the chassis fan will operate at the maximum duty cycle Chassis Lower Temperature 40ºC Displays the lower limit of the chassis temperature CPU Fan Min Duty Cycle 60 Use the and keys to adjust the minimum c...

Page 71: ...and allows you to set the waiting time for the system to display the post report Configuration options 1 sec 2 sec 3 sec 4 sec 5 sec 6 sec 7 sec 8 sec 9 sec 10 sec Until Press ESC Main Ai Tweaker Advanced Monitor Boot Tool Exit Version 2 00 1201 Copyright C 2010 American Megatrends Inc Select the keyboard NumLock state Select Screen Select Item Enter Select Change Opt F1 General Help F2 Previous V...

Page 72: ...OS setup program 2 7 5 Boot Option Priorities These items specify the boot device priority sequence from the available devices The number of device items that appears on the screen depends on the number of devices installed in the system To select the boot device during system startup press F8 when ASUS Logo appears To access Windows OS in Safe Mode do any of the following Press F5 when ASUS Logo ...

Page 73: ...rofile This item allows you to store or load multiple BIOS settings The Setup Profile Status items show Not Installed if no profile is created DO NOT shut down or reset the system while updating the BIOS to prevent the system boot failure We recommend that you update the BIOS file only coming from the same memory CPU configuration and BIOS version Save to Profile Allows you to save the current BIO...

Page 74: ...he Exit menu to ensure the values you selected are saved When you select this option or if you press F10 a confirmation window appears Select Yes to save changes and exit Discard Changes Exit This option allows you to exit the Setup program without saving your changes When you select this option or if you press Esc a confirmation window appears Select Yes to discard changes and exit ASUS EZ Mode T...

Page 75: ...510 739 3777 Fax 1 510 608 4555 Web site usa asus com Technical Support Telephone 1 812 282 2787 Support fax 1 812 284 0883 Online support support asus com ASUS COMPUTER GmbH Germany and Austria Address Harkort Str 21 23 D 40880 Ratingen Germany Fax 49 2102 959911 Web site www asus de Online contact www asus de sales Technical Support Telephone Component 49 1805 010923 Telephone System Notebook Ee...

Page 76: ... 302 326 3 V1 3 1 2007 09 EN 301 357 2 V1 3 1 2006 05 2006 95 EC LVD Directive EN 60950 1 2001 A11 2004 EN 60950 1 2006 EN60065 2002 A1 2006 EN 60950 1 2006 A11 2009 2009 125 EC ErP Directive Regulation EC No 1275 2008 EN 62301 2005 Regulation EC No 642 2009 EN 62301 2005 Regulation EC No 278 2009 EN 62301 2005 CE marking Declaration Date Nov 7 2010 Year to begin affixing CE marking 2010 Position ...

Reviews: