background image

5-9

ASUS V-Series P5V900

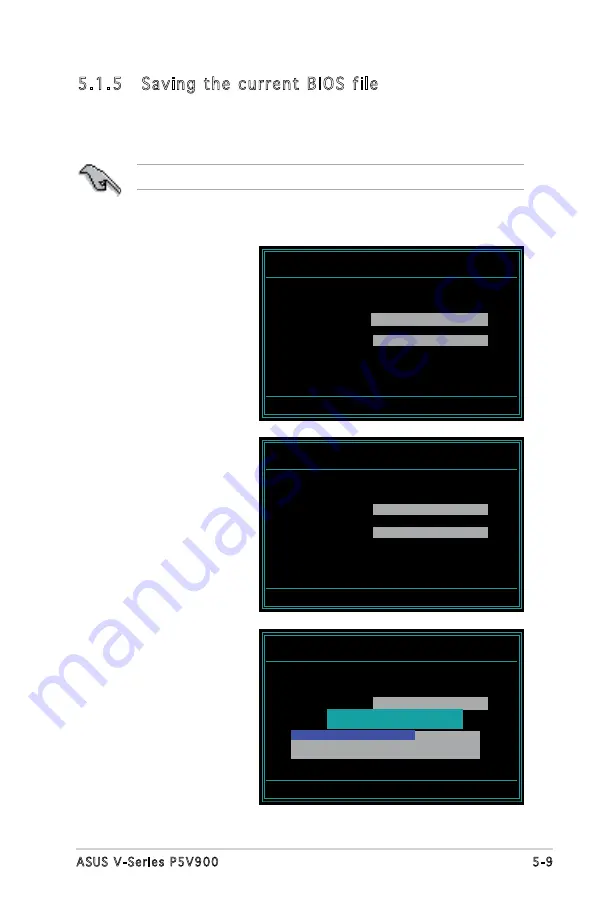
4.  The utility saves the 

current BIOS file to the 

floppy disk, then returns 

to the BIOS flashing 

process.

3.  Type a filename for 

the current BIOS file in 

the Save current BIOS 

as field, then press 

<Enter>.

To save the current BIOS file using the AwardBIOS Flash Utility:

1.   Follow steps 1 to 6 of 

the previous section.

2.  Press <Y> when the 

utility prompts you to 

save the current BIOS 

file. The following screen 

appears.

5.1.5  Saving the current BIOS file

You can use the AwardBIOS Flash Utility to save the current BIOS file. You 

can load the current BIOS file when the BIOS file gets corrupted during the 

flashing process. 

AwardBIOS Flash Utility for ASUS V1.17

(C) Phoenix Technologies Ltd. All Rights Reserved

 Message:


For P4M900-8237A-P5VD2-VM      DATE:11/12/2006

Flash Type - Winbond W39V040C/FC (4MB) 

File Name to Program: 

V-P5V900.bin


Save current BIOS as:            

AwardBIOS Flash Utility for ASUS V1.17

(C) Phoenix Technologies Ltd. All Rights Reserved

 Message: 

Please Wait!


For P4M900-8237A-P5VD2-VM      DATE:11/12/2006

Flash Type - Winbond W39V040C/FC (4MB) 

File Name to Program:  

V-P5V900.bin


Checksum: 

Save current BIOS as:         

AwardBIOS Flash Utility for ASUS V1.17

(C) Phoenix Technologies Ltd. All Rights Reserved

Message:


Please Wait!

For P4M900-8237A-P5VD2-VM       DATE:11/12/2006

Flash Type - Winbond W39V040C/FC (4MB) 

File Name to Program:   

V-P5V900.bin


Now Backup System BIOS to

                       File!

Make sure that the floppy disk has enough disk space to save the file.

Summary of Contents for P5V900

Page 1: ...V Series P5V900 ASUS PC Desktop Barebone R R ...

Page 2: ...TICULAR PURPOSE IN NO EVENT SHALL ASUS ITS DIRECTORS OFFICERS EMPLOYEES OR AGENTS BE LIABLE FOR ANY INDIRECT SPECIAL INCIDENTAL OR CONSEQUENTIAL DAMAGES INCLUDING DAMAGES FOR LOSS OF PROFITS LOSS OF BUSINESS LOSS OF USE OR DATA INTERRUPTION OF BUSINESS AND THE LIKE EVEN IF ASUS HAS BEEN ADVISED OF THE POSSIBILITY OF SUCH DAMAGES ARISING FROM ANY DEFECT OR ERROR IN THIS MANUAL OR PRODUCT SPECIFICAT...

Page 3: ... 2 4 1 Overview 2 4 2 4 2 Installing the CPU 2 4 2 4 3 Installing the CPU fan and heatsink assembly 2 6 2 5 Installing a DIMM 2 8 2 5 1 Memory configurations 2 8 2 5 2 Installing a DDR2 DIMM 2 11 2 5 3 Removing a DDR2 DIMM 2 11 2 6 Expansion slots 2 12 2 6 1 Installing an expansion card 2 12 2 6 2 Configuring an expansion card 2 12 2 6 3 PCI Express x1 slot 2 14 2 6 4 PCI slots 2 14 2 6 5 PCI Expr...

Page 4: ...Chapter 4 Motherboard Info 4 1 Introduction 4 2 4 2 Motherboard layout 4 2 4 3 Jumpers 4 3 4 4 Connectors 4 6 Chapter 5 BIOS Information 5 1 Managing and updating your BIOS 5 2 5 1 1 ASUS Update utility 5 2 5 1 2 Creating a bootable floppy disk 5 5 5 1 3 ASUS EZ Flash 2 utility 5 6 5 1 4 AwardBIOS Flash utility 5 7 5 1 5 Saving the current BIOS file 5 9 5 1 6 ASUS CrashFree BIOS 2 utility 5 10 5 2...

Page 5: ...5 19 5 3 6 Installed Memory 5 19 5 3 7 Usable Memory 5 19 5 4 Advanced menu 5 19 5 4 1 CPU Configuration 5 20 5 4 2 Chipset 5 21 5 4 3 PCIPnP 5 22 5 4 4 Onboard Device Configuration 5 23 5 4 5 USB Configuration 5 24 5 5 Power menu 5 25 5 5 1 ACPI Suspend Type 5 25 5 5 2 ACPI APIC Support 5 25 5 5 3 APM Configuration 5 26 5 5 4 Hardware Monitor 5 28 5 6 Boot menu 5 30 5 6 1 Boot Device Priority 5 3...

Page 6: ... harmful interference to radio or television reception which can be determined by turning the equipment off and on the user is encouraged to try to correct the interference by one or more of the following measures Reorient or relocate the receiving antenna Increase the separation between the equipment and receiver Connect the equipment to an outlet on a circuit different from that to which the rec...

Page 7: ... contact your dealer immediately To avoid short circuits keep paper clips screws and staples away from connectors slots sockets and circuitry Avoid dust humidity and temperature extremes Do not place the product in any area where it may become wet Place the product on a stable surface If you encounter technical problems with the product contact a qualified service technician or your retailer Lithi...

Page 8: ...s including introduction on the front and rear panel and internal components 2 Chapter 2 Basic installation This chapter provides step by step instructions on how to install components in the system 3 Chapter 3 Starting up This chapter helps you power up the system and install drivers and utilities from the support CD 4 Chapter 4 Motherboard information This chapter gives information about the mot...

Page 9: ...n to aid in completing a task Where to find more information Refer to the following sources for additional information and for product and software updates 1 ASUS Websites The ASUS websites worldwide provide updated information on ASUS hardware and software products Refer to the ASUS contact information 2 Optional Documentation Your product package may include optional documentation such as warran...

Page 10: ...r the following items If any of the items is damaged or missing contact your retailer immediately Item description 1 ASUS V Series P5V900 barebone system with ASUS motherboard 300 W peak PFC power supply unit ASUS chassis 2 Cable AC power cable 3 Support CD 4 User guide ...

Page 11: ...pter 1 System introduction This chapter gives a general description of the ASUS V Series P5V900 The chapter lists the system features including introduction on the front and rear panel and internal components ...

Page 12: ... 775 land package This motherboard supports CPUs with the latest Intel CPU technology including Dual core EIST and HyperThreading The system supports up to 4 GB of system memory using DDR2 667 533 400 DIMMs High resolution graphics via integrated graphics controller or PCI Express x16 slot Serial ATA USB 2 0 and 6 channel audio feature the system and take you ahead in the world of power computing ...

Page 13: ...button to reboot the system without turning off the power 5 HDD LED This LED lights up when data is read from or written to the hard disk drive 6 USB 2 0 ports These Universal Serial Bus 2 0 USB 2 0 ports are available for connecting USB 2 0 devices such as a mouse printer scanner camera PDA and others 7 Headphone port This Line In green port connects a headphone with a stereo mini plug 8 Micropho...

Page 14: ...is for the power cable and plug 2 Voltage selector This switch allows you to adjust the system input voltage according to the voltage supply in your area See the section Voltage selector on page 1 6 before adjusting this switch 3 PS 2 mouse port This green 6 pin connector is for a PS 2 mouse 4 PS 2 keyboard port This purple 6 pin connector is for a PS 2 keyboard 10 11 12 1 2 4 6 7 8 9 3 14 15 13 ...

Page 15: ...ayer or other audio sources 12 Power supply unit fan vent This vent is for the PSU fan that provides ventilation inside the power supply unit 13 Chassis fan vent This vent is for the fan that provides ventilation inside the system chassis 14 LAN RJ 45 port This port allows Gigabit connection to a Local Area Network LAN through a network hub 15 Expansion slot covers Remove these covers when install...

Page 16: ...e appropriate system input voltage according to the voltage supply in your area If the voltage supply in your area is 100 127 V set this switch to 115 V If the voltage supply in your area is 200 240 V set this switch to 230 V Setting the switch to 115V in a 230V environment or 230V in a 115V environment will seriously damage the system 115V 230V Voltage selector ...

Page 17: ...beled for your reference Proceed to Chapter 2 for instructions on installing additional system components 1 Front panel cover 2 5 25 inch optical drive bays 3 Hard disk drive bay 4 Floppy disk drive bay 5 Power supply unit 6 CPU socket 7 DIMM sockets 8 ASUS motherboard 9 Chassis fan 10 PCI Express x16 slot 11 PCI Express x1 slot 12 PCI slots 13 Metal bracket lock 6 1 2 3 4 13 11 9 7 8 5 12 10 ...

Page 18: ...1 Chapter 1 System introduction ...

Page 19: ...R R Chapter 2 Basic installation This chapter provides step by step instructions on how to install components in the system ...

Page 20: ... sleep mode or in soft off mode and not powered OFF Unplug the power cable from the power outlet and make sure that the standby power LED is OFF before installing any system component Use a grounded wrist strap or touch a safely grounded object or a metal object such as the power supply case before handling components to avoid damaging them due to static electricity Hold components by the edges to...

Page 21: ...hooks disengage from the chassis tab holes Set the side cover aside 3 Locate the front panel assembly hooks then lift them until they disengage from the chassis 4 Swing the front panel assembly to the right until the hinge like tabs on the right side of the assembly are exposed 5 Remove the front panel assembly then set aside 1 1 2 2 4 3 4 4 3 3 Chassis tab holes Air duct 4 ...

Page 22: ...rd components ASUS will shoulder the cost of repair only if the damage is shipment transit related Keep the cap after installing the motherboard ASUS will process Return Merchandise Authorization RMA requests only if the motherboard comes with the cap on the LGA775 socket The product warranty does not cover damage to the socket contacts resulting from incorrect CPU installation removal or misplace...

Page 23: ...and forefinger to a 100º angle 4A then push the PnP cap from the load plate window to remove 4B 5 Position the CPU over the socket making sure that the gold triangle is on the bottom left corner of the socket then fit the socket alignment key into the CPU notch Gold triangle mark Alignment key CPU notch Load plate PnP cap 4A 4B 3 ...

Page 24: ...fessional medical help 2 4 3 Installing the CPU fan and heatsink assembly The Intel Pentium 4 LGA775 processor requires a specially designed heatsink and fan assembly to ensure optimum thermal condition and performance When you buy a boxed Intel Pentium 4 processor the package includes the CPU fan and heatsink assembly If you buy a CPU separately make sure that you use only Intel certified multi d...

Page 25: ...ed CPU making sure that the four fasteners match the holes on the motherboard 3 When the fan and heatsink assembly is in place connect the CPU fan cable to the connector on the motherboard A B B 2 Push down two fasteners at a time in a diagonal sequence to secure the heatsink and fan assembly in place Do not forget to connect the CPU fan connector Hardware monitoring errors can occur if you fail t...

Page 26: ...e and size DDR2 memory modules Install only ASUS certified memory modules Refer to the DDR2 Qualified Vendors List on the next page for details Always install DIMMs with the same CAS latency For optimum compatibility we recommend that you obtain memory modules from the same vendor 2 5 1 Memory configurations You may install up to 4 GB system memory using 256 MB 512 MB 1 GB and 2GB DDR2 DIMMs R 240...

Page 27: ...AB 5C E SS EBE51UD8ABFA 5C E V V 1024MB ELPIDA E5108AB 5C E DS EBE11UD8ABFA 5C E V V 256MB Apacer E5116AB 5C E SS 78 81077 420 V V 512MB KINGMAX E5108AE 5C E SS KLBC28F A8EB4 V V 1024MB KINGMAX E5108AE 5C E DS KLBD48F A8EB4 V V 512MB KINGMAX KKEA88E4AAK 37 SS KLBC28F A8KE4 V V 1024MB KINGMAX 5MB22D9DCN DS KLBD48F A8ME4 V V 256MB CENTURY K4T56083QF GCD5 SS 25V6S8SSD5F4 K43 V V 512MB CENTURY E5108AB...

Page 28: ...SS HYMP564U64AP8 Y4 V V 1024MB Hynix HY5PS12821AFP Y4 DS HYMP512U64AP8 Y4 V V 256MB ELPIDA E2508AB 6E E SS EBE25UC8ABFA 6E E V V 512MB ELPIDA E5108AE 6E E SS EBE51UD8AEFA 6E E V V 512MB A DATA AD29608A8B 3EG SS M20AD5Q3H3163J1C52 V V 512MB A DATA AD29608A8A 3EG SS M2OAD5G3H3166I1C52 V V 512MB crucial Heat Sink Package SS BL6464AA663 8FD V V 1024MB crucial Heat Sink Package DS BL12864AA663 16FD V V...

Page 29: ... clips snap back in place and the DIMM is properly seated 1 Unlock a DDR2 DIMM socket by pressing the retaining clips outward 2 Align a DIMM on the socket such that the notch on the DIMM matches the break on the socket Locked Retaining Clip Make sure to unplug the power supply before adding or removing DIMMs or other system components Failure to do so may cause severe damage to both the motherboar...

Page 30: ...se Keep the screw for later use 4 Align the card connector with the slot and press firmly until the card is completely seated on the slot 5 Secure the card to the chassis with the screw you removed earlier 6 Replace the system cover Make sure to unplug the power cord before adding or removing expansion cards Failure to do so may cause you physical injury and damage motherboard components 2 6 2 Con...

Page 31: ...der for PCI steering 6 Floppy Disk Controller 7 Printer Port LPT1 8 System CMOS Real Time Clock 9 IRQ holder for PCI steering 10 IRQ holder for PCI steering 11 IRQ holder for PCI steering 12 PS 2 Compatible Mouse Port 13 Numeric Data Processor 14 Primary IDE Channel 15 Secondary IDE Channel IRQ assignments for this motherboard A B C D E F G H PCI slot 1 shared PCI slot 2 shared PCI Express x16 slo...

Page 32: ...6 3 PCI Express x1 slot This motherboard supports PCI Express x1 network cards SCSI cards and other cards that comply with the PCI Express specifications The figure shows a network card installed on the PCI Express x1 slot 2 6 5 PCI Express x16 slot This motherboard supports PCI Express x16 graphic cards that comply with the PCI Express specifications The figure shows a graphics card installed on ...

Page 33: ... 5 25 inch drive bay and carefully push the optical drive into the bay until its screw holes align with the holes on the bay as shown 4 Secure the optical drive with two screws on both sides of the bay 4 4 3 IDE ribbon cable Power cable 5 Connect a power cable from the power supply to the power connector at the back of the optical drive 6 Connect one end of the IDE ribbon cable to the IDE interfac...

Page 34: ...nnect the other end of the IDE ribbon cable to the secondary IDE connector labeled SEC_IDE on the motherboard See page 4 7 for the location of this connector 8 Remove the dummy drive slot cover from the front panel 9 Replace the front panel ...

Page 35: ...l ATA or IDE hard disk drive s To install a Serial ATA hard disk drive 4 Secure the drive with two screws on both sides 4 4 3 1 Place the chassis upright 2 Use a screw driver to remove the HDD drive slot metal plate cover 3 With the HDD label side up carefully insert the drive into the 3 5 inch bay and push the drive into the bay until its screw holes align with the holes on the drive bay ...

Page 36: ...ne end of the Serial ATA cable to the SATA connector at the back of the drive then connect the other end to a Serial ATA connector on the motherboard See page 4 6 for the location of the Serial ATA connectors 6 Connect a 15 pin Serial ATA power plug from the power supply unit to the 15 pin power connector at the back of the drive OR Connect a 4 pin female power plug from the power supply unit to t...

Page 37: ...evice before connecting the IDE cable and power plug Refer to the HDD documentation on how to set the drive as a Master device If you will install two IDE hard disk drives configure the other device as Slave 3 Connect the gray interface of the IDE ribbon cable to the IDE connector on the drive 4 If you install two IDE hard disk drives connect the black interface of the IDE ribbon cable to the IDE ...

Page 38: ...s align with the holes on the bay 3 Secure the floppy disk drive with two screws on both sides 4 Connect the floppy disk drive signal cable to the signal connector at the back of the drive 3 3 2 5 Connect the other end of the signal cable to the floppy disk drive connector on the motherboard See page 4 6 for the location of the floppy disk drive connector 6 Connect a 4 pin power cable from the pow...

Page 39: ... chassis cover LED cables Connect the reset button power switch power LED and HDD LED cables to their respective leads in the system panel connector on the motherboard HDD LED Power LED Power Switch Reset button R System Panel Connector Requires an ATX power supply NEL PLED PWR 5V Speaker Ground RESET Ground Reset Ground Ground PWRSW PLED IDE_LED IDE_LED IDE_LED PLED SPEAKER PA I ...

Page 40: ...to remove the 3 5 drive bay cover To reinstall the front panel assembly and side cover 1 Insert the front panel assembly hinge like tabs to the holes on the right side of the chassis 2 Swing the front panel assembly to the left then insert the hooks to the chassis until the front panel assembly fits in place 3 Insert the six side cover hooks into the chassis tab holes 4 Push the side cover to the ...

Page 41: ...R R Chapter 3 Starting up This chapter helps you power up the system and install drivers and utilities from the support CD ...

Page 42: ...se motherboard settings and hardware options vary use the setup procedures presented in this chapter for general reference only Refer to your OS documentation for more information Screen display and driver options may not be the same for different operating system versions The contents of the support CD are subject to change at any time without notice Visit the ASUS website for updates Windows XP ...

Page 43: ...install Click an icon to display support CD motherboard information ASUS InstAll Installation Wizard for Drivers Automatically installs all the necessary drivers for this motherboard VIA 4 in 1 Chipset Drivers Installs the VIA 4 in 1 driver VIA Chrome9 HC IGP Display Driver Installs the VIA Chrome9 HC IGP Display Driver SoundMAX ADI1986A Audio Driver Installs the SoundMAX AD1986A Audio Driver Befo...

Page 44: ...eep your computer in healthy operating condition ASUS Update The ASUS Update utility allows you to update the motherboard BIOS in a Windows environment This utility requires an Internet connection either through a network or an Internet Service Provider ISP See page 5 8 for details ASUS Screen Saver Installs the ASUS screen saver Adobe Reader V7 0 Installs the Adobe Acrobat Reader V7 0 that allows...

Page 45: ...Make VIA VT8237 RAID Driver Disk Make the VIA VT8237 RAID Driver Disk 3 3 4 Manual Intel LGA775 CPU install User s Manual Install the Intel LGA775 CPU install user manual VIA VT8237 RAID User s Manual Install the VIA VT8237 RAID user manual ...

Page 46: ...3 Chapter 3 Starting up 3 3 5 ASUS Contact information Click the Contact tab to display the ASUS contact information You can also find this information on the inside front cover of this user guide ...

Page 47: ...run feature Click to close the Preference panel 2 Click the Utilities tab then click ASUS PC Probe II 3 Follow the screen instructions to complete installation Launching PC Probe II You can launch the PC Probe II right after installation or anytime from the Windows desktop To launch the PC Probe II from the Windows desktop click Start All Programs ASUS PC Probe II The PC Probe II main window appea...

Page 48: ...ge window Shows Hides the Preference section Minimizes the application Closes the application Sensor alert When a system sensor detects a problem the main window right handle turns red as the illustrations below show When displayed the monitor panel for that sensor also turns red Refer to the Monitor panels section for details Preferences You can customize the application using the Preference sect...

Page 49: ...p click the arrow down button of the Scheme options then select another position from the list box Click OK when finished Moving the monitor panels All monitor panels move together using a magnetic effect If you want to detach a monitor panel from the group click the horseshoe magnet icon You can now move or reposition the panel independently Adjusting the sensor threshold value You can adjust the...

Page 50: ... displays various Windows management information Click an item from the left panel to display on the right panel Click the plus sign before WMI Information to display the available information You can enlarge or reduce the browser size by dragging the bottom right corner of the browser DMI browser Click to display the DMI Desktop Management Interface browser This browser displays various desktop a...

Page 51: ...memory usage Click to display the Usage browser CPU usage The CPU tab displays real time CPU usage in line graph representation If the CPU has an enabled Hyper Threading two separate line graphs display the operation of the two logical processors Hard disk drive space usage The Hard Disk tab displays the used and available hard disk drive space The left panel of the tab lists all logical drives Cl...

Page 52: ...ensor threshold values The Config window has two tabs Sensor Threshold and Preference The Sensor Threshold tab enables you to activate the sensors or to adjust the sensor threshold values The Preference tab allows you to customize sensor alerts change temperature scale or enable the Q Fan feature Loads the default threshold values for each sensor Applies your changes Cancels or ignores your change...

Page 53: ...R R Chapter 4 Motherboard introduction This chapter gives information about he motherboard that comes with the system This chapter includes the motherboard layout jumper settings and connector locations ...

Page 54: ... 9 6in 4Mb BIOS VIA VT8237A VIA P4M900 DDR2 DIMM1 64 bit 240 pin module DDR2 DIMM2 64 bit 240 pin module LGA775 CPU_FAN Super I O CD AUX EATXPWR R FLOPPY PRI_IDE SEC_IDE SATA2 SATA1 BUZZER CLRTC CHASSIS PANEL COM2 USB56 USB78 PCI2 PCI1 PCIEX1_1 PCIEX16 CHA_FAN AAFP SB_PWR SPDIF_OUT AD1985A ICS6305863 XSW4 XSW3 XSW2 XSW1 USBPW34 USBPW12 KBPWR LAN2_USB34 AUDIO VGA PS 2KBMS T Mouse B Keyboard USB12 A...

Page 55: ...e the RTC RAM 1 Turn OFF the computer and unplug the power cord 2 Remove the battery 3 Move the jumper cap from pins 1 2 default to pins 2 3 Keep the cap on pins 2 3 for about 5 10 seconds then move the cap back to pins 1 2 4 Re install the battery 5 Plug the power cord and turn ON the computer 6 Hold down the Del key during the boot process and enter BIOS setup to re enter data Except when cleari...

Page 56: ...nd USBPWR34 jumpers are for the rear USB ports The USBPWR56 and USBPWR78 jumper is for the internal USB connectors that you can connect to additional USB ports The USB device wake up feature requires a power supply that can provide 500mA on the 5VSB lead for each USB port otherwise the system would not power up The total current consumed must NOT exceed the power supply capability 5VSB whether und...

Page 57: ...wish to wake up the computer when you press a key on the keyboard the default is the Space Bar This feature requires an ATX power supply that can supply at least 1A on the 5VSB lead and a corresponding setting in the BIOS R Keyboard Power Setting 1 2 2 3 Default 5V 5VSB KBPWR 4 XSW 3 pin XSW1 2 3 4 R XSW Setting 3 2 2 1 XSW1 4 PCIEX1_SLOT Default E_SATA SATA_RAID1 ...

Page 58: ...ve Connector NOTE Orient the red markings on the floppy ribbon cable to PIN 1 PIN 1 FLOPPY 2 Serial ATA connectors 7 pin SATA1 SATA2 These connectors are for the Serial ATA signal cables for Serial ATA hard disk drives Important notes on Serial ATA You must install Windows 2000 Service Pack 4 or the Windows XP Service Pack1 before using Serial ATA hard disk drives When using the connectors in Stan...

Page 59: ... match the covered hole on the Ultra DMA cable connector This prevents incorrect insertion when you connect the IDE cable Use the 80 conductor IDE cable for Ultra DMA 133 100 66 IDE devices If any device jumper is set as Cable Select make sure all other device jumpers have the same setting Drive jumper setting Mode Cable of device s Cable connector Single device Cable Select or Master Black Two de...

Page 60: ... pin CHA_FAN The fan connectors support cooling fans of 350 mA 740 mA 8 88 W max or a total of 1 A 2 22 A 26 64 W max at 12V Connect the fan cables to the fan connectors on the motherboard making sure that the black wire of each cable matches the ground pin of the connector Do not forget to connect the fan cables to the fan connectors Insufficient air flow inside the system may damage the motherbo...

Page 61: ... GND 12V DC GND 12V DC Do not forget to connect the 4 pin ATX 12 V power plug otherwise the system will not boot Use of a PSU with a higher power output is recommended when configuring a system with more power consuming devices The system may become unstable or may not boot up if the power is inadequate Make sure that your power supply unit PSU can provide at least the minimum power required by yo...

Page 62: ...al audio connector 4 1 pin SPDIF_OUT This connector is for an additional Sony Philips Digital Interface S PDIF port s Connect the S PDIF module cable to this connector then install the module to a slot opening at the back of the system chassis The S PDIF module is purchased separately R Digital Audio Connector 5V SPDIFOUT GND SPDIF_OUT R Front Panel Audio Connector SENSE2_RETUR PORT1L PORT1R PORT2...

Page 63: ...d or replaced The signal is then generated as a chassis intrusion event By default the pins labeled Chassis Signal and Ground are shorted with a jumper cap Remove the jumper cap only when you intend to use the chassis intrusion detection feature R Intrusion Connector CHASSIS 5VSB_MB Chassis Signal GND Default 11 Serial port connector 10 1 pin COM2 This connector is for a serial COM port Connect th...

Page 64: ...HDD Activity LED Connect the HDD Activity LED cable to this connector The IDE LED lights up or flashes when data is read from or written to the HDD Power Soft off button 2 pin PWRSW This connector is for the system power button Pressing the power button turns the system ON or puts the system in SLEEP or SOFT OFF mode depending on the BIOS settings Pressing the power switch for more than four secon...

Page 65: ... R R Chapter 5 BIOS setup This chapter tells how to change system settings through the BIOS Setup menus and describes the BIOS parameters ...

Page 66: ... Flash utilities Installing ASUS Update To install ASUS Update 1 Place the support CD in the optical drive The Drivers menu appears 2 Click the Utilities tab then click Install ASUS Update VX XX XX 3 The ASUS Update utility is copied to your system 5 1 1 ASUS Update utility The ASUS Update is a utility that allows you to manage save and update the motherboard BIOS in Windows environment The ASUS U...

Page 67: ...ext Updating the BIOS through the Internet To update the BIOS through the Internet 1 Launch the ASUS Update utility from the Windows desktop by clicking Start Programs ASUS ASUSUpdate ASUSUpdate The ASUS Update main window appears 2 Select Update BIOS from the Internet option from the drop down menu then click Next ...

Page 68: ...te BIOS from a file option from the drop down menu then click Next 4 From the FTP site select the BIOS version that you wish to download Click Next 5 Follow the screen instructions to complete the update process The ASUS Update utility is capable of updating itself through the Internet Always update the utility to avail all its features 3 Locate the BIOS file from the Open window then click Open 4...

Page 69: ... Click File from the menu then select Format A Format 3 1 2 Floppy Disk window appears e Select Create an MS DOS startup disk from the format options field then click Start Windows 2000 environment To create a set of boot disks for Windows 2000 a Insert a formatted high density 1 44 MB floppy disk into the drive b Insert the Windows 2000 CD to the optical drive c Click Start then select Run d From...

Page 70: ...en drives by pressing Tab before the correct file is found Then press Enter 3 You can launch the EZ Flash 2 by two methods 1 Insert the floppy disk USB flash disk that contains the BIOS file to the floppy disk drive or the USB port Press Alt F2 during POST to display the following This function can support devices such as USB flash disk or floppy disk with FAT 32 16 12 format only Do not shut down...

Page 71: ...ppy disk you created earlier 4 When the A appears replace the bootable floppy disk with the floppy disk containing the new BIOS file and the Award BIOS Flash Utility 5 At the prompt type awdflash then press Enter The Award BIOS Flash Utility screen appears AwardBIOS Flash Utility for ASUS V1 17 C Phoenix Technologies Ltd All Rights Reserved Message Please input File Name For P4M900 8237A P5VD2 VM ...

Page 72: ...utility displays a Flashing Complete message indicating that you have successfully flashed the BIOS file Remove the floppy disk then press F1 to restart the system AwardBIOS Flash Utility for ASUS V1 17 C Phoenix Technologies Ltd All Rights Reserved F1 Reset For P4M900 8237A P5VD2 VM DATE 11 12 2006 Flash Type Winbond W39V040C FC 4MB File Name to Program V P5V900 bin Flashing Complete Press F1 to ...

Page 73: ...the flashing process AwardBIOS Flash Utility for ASUS V1 17 C Phoenix Technologies Ltd All Rights Reserved Message For P4M900 8237A P5VD2 VM DATE 11 12 2006 Flash Type Winbond W39V040C FC 4MB File Name to Program V P5V900 bin Save current BIOS as AwardBIOS Flash Utility for ASUS V1 17 C Phoenix Technologies Ltd All Rights Reserved Message Please Wait For P4M900 8237A P5VD2 VM DATE 11 12 2006 Flash...

Page 74: ...IOS from the support CD 1 Turn on the system 2 Insert the motherboard support CD to the optical drive 3 The utility displays the following message and automatically checks the CD for the BIOS file 4 Restart the system after the utility completes the updating process DO NOT shut down or reset the system while updating the BIOS Doing so can cause system boot failure Award BootBlock BIOS v1 0 Copyrig...

Page 75: ...utines If you wish to enter Setup after POST reboot the system by doing any of the following procedures Restart using the OS standard shut down procedure Press Ctrl Alt Del simultaneously Press the reset button on the system chassis Press the power button to turn the system off then back on Using the power button reset button or the Ctrl Alt Del keys to force reset from a running operating system ...

Page 76: ... 2 ST380817AS HDD SMART Monitoring Enabled Installed Memory 512MB Usable Memory 447MB 5 2 2 Menu bar The menu bar on top of the screen has the following main items Main For changing the basic system configuration Advanced For changing the advanced system settings Power For changing the advanced power management APM configuration Boot For changing the system boot configuration Exit For selecting th...

Page 77: ...kets and is highlighted when selected To change the value of a field select it then press Enter to display a list of options 5 2 3 Legend bar At the bottom of the Setup screen is a legend bar The keys in the legend bar allow you to navigate through the various setup menus The following table lists the keys found in the legend bar with their corresponding functions Navigation Key Function F1 Displa...

Page 78: ...B 5 2 7 Pop up window Select a menu item then press Enter to display a pop up window with the configuration options for that item F1 Help Select Item Change Value F5 Setup Defaults ESC Exit Select Menu Enter Select SubMenu F10 Save and Exit Phoenix Award BIOS CMOS Setup Utility Main Advanced Power Boot Exit Select Menu Item Specific Help 5 2 8 General help At the top right corner of the menu scree...

Page 79: ...DE Master None Primary IDE Slave None Secondary IDE Master None Secondary IDE Slave None SATA1 None SATA2 None HDD SMART Monitoring Disabled Installed Memory 512MB Usable Memory 447MB 5 3 Main menu When you enter the BIOS Setup program the Main menu screen appears giving you an overview of the basic system information Refer to section 4 2 1 BIOS menu screen for information on the menu screen items...

Page 80: ...tion options Disabled Auto Primary IDE Master Slave Auto Select Auto to automatically detect an IDE hard disk drive If automatic detection is successful the BIOS automatically fills in the correct values for the remaining fields on this sub menu If the hard disk was already formatted on a previous system the setup BIOS may detect incorrect parameters Select Manual to manually enter the IDE hard di...

Page 81: ...ic detection of an IDE hard disk drive Select CHS for this item if you set the IDE Primary Master Slave to Manual Configuration options CHS LBA Large Auto Before attempting to configure a hard disk drive make sure you have the correct configuration information supplied by the drive manufacturer Incorrect settings may cause the system to fail to recognize the installed hard disk After entering the ...

Page 82: ...the sector addressing mode Configuration options Large Auto F1 Help Select Item Change Value F5 Setup Defaults ESC Exit Select Menu Enter Select SubMenu F10 Save and Exit Phoenix Award BIOS CMOS Setup Utility Main Select Menu Item Specific Help Selects the type of fixed disk connected to the system First SATA Master Extended IDE Drive Auto Access Mode Auto Capacity 0 MB Cylinder 0 Head 0 Landing Z...

Page 83: ...urable Landing Zone Shows the number of landing zone per track This item is not configurable Sector Shows the number of sectors per track This item is not configurable After entering the IDE hard disk drive information into BIOS use a disk utility such as FDISK to partition and format new IDE hard disk drives This is necessary so that you can write or read data from the hard disk Make sure to set ...

Page 84: ...ns TM 1 TM 2 Thermal Monitor 1 On die throtting Thermal Monitor 2 Ratio VID transition Limit CPUID MaxVal Disabled Configuration options Disabled Enabled Enhanced C1 C1E Enabled The process will lower the core to bus ratio and VID when physcial pprocess enter an enhance C1 state Configuration options Disabled Enabled Execute Disable Bit Enabled When disabled forces the XD feature flag to always re...

Page 85: ...enu Item Specific Help Chipset Primary Display Adapter PCI E VGA Share Memory Size 64M Phoenix Award BIOS CMOS Setup Utility Advanced Primary Display Adapter PCI E Select which graphics controller to use as the primary boot device Configuration options PCI PCI E VGA Share Memory Size 64M Sets the VGA Share Memory Size Configuration options Disabled 16M 32M 64M ...

Page 86: ...ns Auto Manual The item IRQ Resources becomes user configurable when you set Resources Controlled By to Manual IRQ Resources IRQ Resources IRQ 5 assigned to PCI Device IRQ 7 assigned to PCI Device IRQ 9 assigned to PCI Device IRQ 10 assigned to PCI Device IRQ 11 assigned to PCI Device IRQ 14 assigned to PCI Device IRQ 15 assigned to PCI Device Phoenix Award BIOS CMOS Setup Utility Advanced Select ...

Page 87: ...nfiguration options Enabled Disabled Serial Port1 Address 3F8 IRQ4 Enable Disable the bootrom of the onboard LAN Configuration options Enabled Disabled F1 Help Select Item Change Value F5 Setup Defaults ESC Exit Select Menu Enter Select Sub menu F10 Save and Exit Select Menu Item Specific Help Press Enter to set Onboard Device Configuration SATA Controller Enabled SATA Controller Mode IDE HDA Cont...

Page 88: ... address Configuration options Disabled 378 IRQ7 278 IRQ5 3BC IRQ7 Parallel Port Mode Bi Directional Select parallel port mode Configuration options Normal EPP ECP Bi Directional ECP Mode Use DMA 3 Select ECP Mode use DMA Configuration options 1 3 5 4 5 USB Configuration USB Controller Enabled Enable or disable USB 1 1 and 2 0 controller Configuration options Disabled Enabled USB 2 0 Controller En...

Page 89: ...port Enabled Allows you to enable or disable the Advanced Configuration and Power Interface ACPI support in the Application Specific Integrated Circuit ASIC When set to Enabled the ACPI APIC table pointer is included in the RSDT pointer list Configuration options Disabled Enabled Select Menu Item Specific Help Press Enter to select whether or not to restart the system after AC power loss F1 Help S...

Page 90: ...guration options Disabled Enabled Power Up By PS 2 Keyboard Disabled Enable or disable Power up by PS 2 Keyboard function Configuration options Disabled Enabled Power On By PCI PCIE Devices Disabled Enable or disable Power on by PCI Devices function Configuration options Disabled Enabled Power on By External Modem Disabled Enable or disable Power on By External Modem function Configuration options...

Page 91: ...State PWR Button 4 secs Instant Off When sets to Instant Off the system will go to Soft off instantly when power button pressed for less than 4 seconds When sets to Suspend the system will go to Suspend when power button is pressed Configuration options Suspend Instant Off HPET Support Enabled Allows you to enable or disable HPET support Configuration options Enabled Disabled ...

Page 92: ...Item Change Value F5 Setup Defaults ESC Exit Select Menu Enter Select SubMenu F10 Save and Exit Q Fan Controller Enabled Disable or Enable the Q Fan controller Configuration options Disabled Enabled Vcore Voltage Enabled Sets the Vcore Voltage Configuration options 1 29V Ignored 3 3V Voltage 5V Voltage 12V Voltage The onboard hardware monitor automatically detects the voltage output through the on...

Page 93: ...5 29 ASUS V Series P5V900 CPU Fan Speed warning 800 RPM Allows you to disable or set the CPU fan warning speed Configuration options Disabled 800 RPM 1200 RPM 1600 RPM ...

Page 94: ...faults ESC Exit Select Menu Enter Select Sub menu F10 Save and Exit 5 6 1 Boot Device Priority Select Menu Item Specific Help Select Your Boot Device Priority Boot Device Priority 1st Boot Device Hard Disk 2nd Boot Device CDROM 3rd Boot Device CDROM 4th Boot Device Disabled Phoenix Award BIOS CMOS Setup Utility Boot 1st 4th Boot Device These items specify the boot device priority sequence from the...

Page 95: ...etup Utility Boot Case Open Warning Enabled Allows you to enable or disable the Case Open Warning feature Configuration options Disabled Enabled Quick Boot Enabled Allows the system to skip certain tests while booting This will decrease the time needed to boot the system Configuration options Disabled Enabled Boot Up Floppy Seek Disabled Allows the system to test floppy drives to determine whether...

Page 96: ...Disk Key 5 6 3 Security Select Menu Item Specific Help Security Supervisor Password Clear User Password Clear Password Check Setup Phoenix Award BIOS CMOS Setup Utility Boot Supervisor Password User Password These fields allow you to set passwords To set a password 1 Select an item then press Enter 2 Type in a password using a combination of a maximum of eight 8 alpha numeric characters then press...

Page 97: ...word before entering the BIOS setup or the system Select Setup to require the password before entering the BIOS Setup Select System to require the password before entering the system Configuration options Setup System 5 8 Exit menu The Exit menu items allow you to load the optimal or failsafe default values for the BIOS items and save or discard your changes to the BIOS items Phoenix Award BIOS CM...

Page 98: ...nd Password the BIOS asks for a confirmation before exiting ASUS EZ Flash 2 Press Enter to run ASUS EZ Flash 2 utility Load Setup Defaults This option allows you to load the default values for each of the parameters on the Setup menus When you select this option or if you press F5 a confirmation window appears Select YES to load default values Select Exit Save Changes or make other changes before ...

Reviews: