background image

2

Safety Statements

Federal Communications Commission Statement

This device complies with FCC Rules Part 15. Operation is subject to the following two conditions:

• This device may not cause harmful interference, and
• This device must accept any interference received, including interference that may cause undesired

operation.

This equipment has been tested and found to comply with the limits for a class B digital device, pursuant
to Part 15 of the Federal Communications Commission (FCC) rules. These limits are designed to provide
reasonable protection against harmful interference in a residential installation. This equipment generates,
uses, and can radiate radio frequency energy and, if not installed and used in accordance with the instruc-
tions, may cause harmful interference to radio communications. However, there is no guarantee that inter-
ference will not occur in a particular installation. If this equipment does cause harmful interference to
radio or television reception, which can be determined by turning the equipment off and on, the user is
encouraged to try to correct the interference by one or more of the following measures:

• Reorient or relocate the receiving antenna.
• Increase the separation between the equipment and receiver.
• Connect the equipment into an outlet on a circuit different from that to which the receiver is connected.
• Consult the dealer or an experienced radio/TV technician for help.

Reprinted from the Code of Federal Regulations #47, part 15.193, 1993. Washington DC: Office of the
Federal Register, National Archives and Records Administration, U.S. Government Printing Office.

Power Safety Requirement

Products with electrical current ratings up to 6A and weighing more than 3Kg must use approved power
cords greater than or equal to: H05VV-F, 3G, 0.75mm

2

 or H05VV-F, 2G, 0.75mm

2

.

Canadian Department of Communications Statement

This digital apparatus does not exceed the Class B limits for radio noise emissions from digital apparatus
set out in the Radio Interference Regulations of the Canadian Department of Communications.

This Class B digital apparatus complies with Canadian ICES-003.

(Cet appareil numérique de la classe B est conforme à la norme NMB-003 du Canada.)

WARNING!  The use of a shielded-type power cord is required in order to meet FCC
emission limits and to prevent interference to the nearby radio and television recep-
tion.  It is essential that only the supplied power cord be used. Use only shielded
cables to connect I/O devices to this equipment. You are cautioned that changes or
modifications not expressly approved by the party responsible for compliance could
void your authority to operate the equipment.

Summary of Contents for L5G

Page 1: ...Product Name Notebook PC Hardware Manual Revision 1 E1402 Release Date September 2003 Notebook PC Hardware User s Manual ...

Page 2: ...ent and receiver Connect the equipment into an outlet on a circuit different from that to which the receiver is connected Consult the dealer or an experienced radio TV technician for help Reprinted from the Code of Federal Regulations 47 part 15 193 1993 Washington DC Office of the Federal Register National Archives and Records Administration U S Government Printing Office Power Safety Requirement...

Page 3: ...ngaben des Herstellers German ADVARSELI Lithiumbatteri Eksplosionsfare ved fejlagtig håndtering Udskiftning må kun ske med batteri af samme fabrikat og type Levér det brugte batteri tilbage til leverandøren Danish VARNING Explosionsfara vid felaktigt batteribyte Använd samma batterityp eller en ekvivalent typ som rekommenderas av apparattillverkaren Kassera använt batteri enligt fabrikantens instr...

Page 4: ...ironments DO NOT operate during a gas leak DO NOT expose to strong magnetic or electrical fields DONOTexposetoextremetemperatures above 50 C 122 F or to direct sunlight Do not block the fan vents DO NOT place on uneven or unstable work surfaces Seek servicing if the casing has been damaged DO NOT place or drop objects on top and do not shove any foreign objects into the Notebook PC DO NOT press or...

Page 5: ...ches Safety Statements Charge Your Batteries If you intend to use battery power be sure to fully charge your battery pack and any optional battery packs before going on long trips Remember that the power adapter charges the battery pack as long as it is plugged into the computer and an AC power source Be aware that it takes much longer to charge the battery pack when the Notebook PC is in use Airp...

Page 6: ...6 Danish Dutch English Finnish French German Greek Italian Portuguese Spanish Swedish CTR 21 Approval for Notebook PC with built in Modem Safety Statements ...

Page 7: ...shock from lightning Do not use the Notebook PC in the vicinity of a gas leak Required for UL 1642 covering primary nonrechargeable and secondary rechargeable lithium bat teries for use as power sources in products These batteries contain metallic lithium or a lithium alloy or a lithium ion and may consist of a single electrochemical cell or two or more cells connected in series parallel or both t...

Page 8: ...ms 27 Support Software 27 Power Connection 28 Powering ON The Notebook PC 30 The Power On Self Test POST 30 Power Management Stand By Hibernate 31 Restarting or Rebooting 31 Powering OFF the Notebook PC 31 Power Management Stand By Hibernate 31 Power Management Stand By Hibernate 31 Restarting or Rebooting 33 Powering OFF the Notebook PC 33 Using the Keyboard 33 Colored Hot Keys 33 Instant Launch ...

Page 9: ...onnection Example 49 Network Connection 50 Network Connection Example 50 IR Wireless Communication 51 Guidelines for using IR communication 51 Enabling Infrared 51 AC Power System 52 AC Power System 52 Battery Power System 52 Charging the Battery Pack 52 Battery Power System 52 Charging the Battery Pack 52 Using Battery Power 53 Power Management Modes 55 Full Power Mode Maximum Performance 55 ACPI...

Page 10: ... Communication Cable Optional 59 USB Keyboard Mouse Optional 60 Television or Projection Device 60 Optional Connections 61 Monitor Out Connection 61 External Audio Connections 61 IEEE1394 Connection 62 Printer Connection 62 Securing Your Notebook PC Optional 62 Internal Modem Compliancy 63 Glossary 65 Notebook PC Information 70 Contents ...

Page 11: ...11 1 Introducing the Notebook PC About This User s Manual Notes For This Manual ...

Page 12: ...ual was created using Macintosh versions of Adobe PageMaker 6 52 Adobe Photoshop 5 5 Adobe Illustrator 8 0 and Macromedia Freehand 8 0 1 The body text type used in this manual is Times MAC or Times New Roman Windows and headings are Helvetica MAC or Arial Windows A few notes and warnings in bold are used throughout this guide that you should be aware of in order to complete certain tasks safely an...

Page 13: ...13 2 Knowing the Parts Top Side Bottom Side Front Side Left Side Right Side Rear Side ...

Page 14: ...pening do not force the display panel down to the table or else the hinges may break Never lift the Notebook PC by the display panel Display Panel Touchpad Buttons Keyboard Touchpad Power Switch Instant Keys Status Indicators CD Control Buttons see section 3 Touchpad Lock LED NOTE See Front Side for information on opening the LCD panel ...

Page 15: ...e display panel functions the same as a desktop monitor The Notebook PC uses an active matrix TFT LCD which provides excellent viewing like that of desktop monitors Unlike desktop monitors the LCD panel does not produce any radiation or flickering so it is easier on the eyes Display Panel Care The LCD screen is very delicate and requires careful handling Pay attention to the following precautions ...

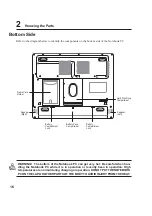
Page 16: ...eful when han dling the Notebook PC while it is in operation or recently been in operation High temperatures are normal during charging or operation DO NOT PUT THE NOTEBOOK PC ON THE LAP OR OTHER PARTS OF THE BODY TO AVOID INJURY FROM THE HEAT Name Card Holder Battery Pack Compartment Battery Compartment Lock Hard Disk Drive Compartment Battery Compartment Lock Speaker Left Speaker Right ...

Page 17: ...k drive is secured in a compartment under a metal plate Hard disk drive upgrades are to be done by authorized service centers or dealers only Battery Pack The battery pack is contained in a compartment covered by a door and locked by two tabs Usage details are described in the battery section later in this manual Audio Speaker Left Right The built in speakers allow you to hear audio without additi...

Page 18: ...nel forward or backward to a comfortable viewing angle CD Control Buttons described in section 3 Infrared Port Infrared Port IrDA The infrared IrDA communication port allows convenient wireless data communication with infra red equipped devices or computers This allows easy wireless synchronization with PDAs or mobile phones and even wireless printing to printers If your office supports IrDA netwo...

Page 19: ... modems hard disk drives printers monitors and scanners connected in a series up to 12Mbits sec USB 1 1 and 480Mbits sec USB 2 0 USB allows many devices to run simulta neously on a single computer with peripherals such as USB keyboards and some newer monitors acting as additional plug in sites or hubs USB supports hot swapping of devices so that peripherals can be connected or disconnected while t...

Page 20: ...d Emergency Eject The optical drive eject is an electronic eject button for opening the tray You can also eject the optical drive tray through any CD VCD DVD software player or by right clicking the optical drive in Win dows My Computer The emergency eject is used to eject the optical drive tray in case the elec tronic eject does not work Do not use the emergency eject in place of the electronic e...

Page 21: ...ically disables the built in speakers PC Card PCMCIA Socket Supports 16 bit 23 bit CardBus type I II PCMCIA 2 1 cards This allows accommodation of Note book PC expansion options such as memory cards memory card readers SCSI Smart Cards ISDN GSM PHS BlueTooth and wireless network adapters SPDIF Output Jack SPDIF Out This jack provides connection to SPDIF Sony Philips Digital Interface compliant dev...

Page 22: ... in modem does not support the voltage used in digital phone systems Do not connect the modem port to a digital phone system or else damage will occur to the Notebook PC Kensington Lock Port Shutdown Button Modem Port LAN Port Parallel Port USB Ports Monitor Port TV Out Port Serial Port RS232 2 0 USB Ports 1 1 2 0 Universal Serial Bus USB supports many USB compatible devices such as keyboards poin...

Page 23: ...tandard VGA compatible device such as a monitor or pro jector to allow viewing on a larger external display TV Out Port For times when you need a really big display try the TV Out function TV Out allows a high definition connection to a television or video projection device using a Super VHS S Video cable not pro vided An adapter is provided for use with RCA inputs available on all standard video ...

Page 24: ...24 ...

Page 25: ...e Battery Pack Operating Systems Power Connection Powering ON The Notebook PC Power Management Stand By and Hibernate Restarting or Rebooting Powering OFF The Notebook PC Using the Keyboard Instant Launch Keys and Status Indicators ...

Page 26: ...ttempt to remove the battery pack while the Notebook PC is turned ON as this may result in the loss of working data To install the battery pack 1 Open the battery compartment door by prying both tabs with your finger nails 2 Lift the battery compartment door using the tabs 3 Insert the battery pack at an angle as shown in the illustration 4 Push the battery pack down lightly until it clicks into p...

Page 27: ...ve a shelf life it is not recommended to buy extras for storing Operating Systems This Notebook PC may offer depending on territory its customers the choice of a pre installed operating system such as Microsoft Windows 2000 or Windows XP The choices and languages will depend on the territory The levels of hardware and software support may vary depending on the installed operating system The stabil...

Page 28: ...nAC outlet preferably with surge protection and then connect the DC plug to the Notebook PC Connecting the AC DC adapter to the AC outlet first allows you to test theAC outlet s power and the AC DC converter itself for compatibility problems before connecting the DC power to the Notebook PC The green power LED on the adapter lights up if the power is within accepted ranges TIP You can buy travel k...

Page 29: ...ee prong plug is provided you must use a grounded AC outlet or use a properly grounded adapter to ensure safe operation of the Notebook PC 1 Connect this end of the power cord to the AC DC converter 2 Plug the AC Power Cord into an electrical outlet 110V 240V AC DC Converter 3 Connect the DC Power Plug to the Notebook PC ...

Page 30: ...g program 1 right click any hard disk drive icon in My Computer 2 choose Properties 3 click the Tools tab 4 click Check Now 5 select a hard disk drive 6 select Thorough to also check for physical damages and 7 click Start Third party disk utilities such as Symantec s Norton Disk Doctor can also perform the same functions but with greater ease and more features Powering ON The Notebook PC The Noteb...

Page 31: ...pplications and ask if you want to save your work if any are not saved Stand by is the same as Suspend to RAM STR This function stores your current data and status in RAM while many components are turned OFF Because RAM is vola tile it requires power to keep refresh the data To operate select Start Shut down and Stand by Hibernate is the same as Suspend to Disk STD and stores your current data and...

Page 32: ... see below for emer gency shutdown procedure The screens are different depending on your security settings Powering OFF the Notebook PC For operating systems equipped with ACPI Win dows 2000 XP the Notebook PC can be pow ered OFF by using Start Shut Down Turn off orShut down For operating systems without proper power management DOS Windows NT you must power OFF the Notebook PC by holding the power...

Page 33: ...creases the display brightness Open Sun Icon F6 Increases the display brightness LCD Icon F7 Toggles the display panel ON and OFF This also stretches your screen area on certain models to fill the entire display when using low resolution modes LCD Monitor Icons F8 Toggles between the Notebook PC s LCD display and an external monitor in this series Notebook PC LCD External Monitor Both TV Out This ...

Page 34: ...g this button will launch your programmed software application while Windows is running Power4 Gear Modes When you are using an AC adapter the Power4 Gear button will switch between two modes as shown below When you remove the AC adapter the Power4 Gear button will switch between three modes as shown below When you remove or apply the AC adapter Power4 Gear will automatically shift you up or down ...

Page 35: ...reless LAN Indicator Depending on Model Lights when the internal wireless LAN is enabled This indicator only functions on Notebook PC mod els equipped with an internal wireless LAN Drive Activity Indicator Indicates that the Notebook PC is accessing one or more storage device s such as the hard disk The light flashes proportional to the access time Number Lock Indicates that number lock Num Lk is ...

Page 36: ...enables disables the NumLock on both key boards simultaneously To disable the numeric keypad while keeping the keypad on an external key board activated press the keys on the Notebook PC NOTE The large bold characters and symbols are printed here for your reference They are not labeled on the keyboard as shown here Microsoft Windows Keys There are two special Windows keys on the keyboard as descri...

Page 37: ...th Number Lock OFF press and one of the cursor keys shown below For example Fn 8 for up Fn K for down Fn U for left and Fn O for right With Number Lock ON use Shift and one of the cursor keys shown below For example Shift 8 for up Shift K for down Shift U for left and Shift O for right NOTE The large bold characters and symbols are printed here for your reference They are not labeled on the keyboa...

Page 38: ...er Indicator When the Notebook PC is OFF an LED shows when the CD player is turned ON by using the CD Power switch 2 CD Player Power Switch Turns ON or OFF the Audio DJ CD player while the Notebook PC is OFF 3 CD Skip to Previous Track Rewind Audio Volume Down CD The first push will restart current track The second push will skip to the previous track Audio Hold down to decrease audio volume Works...

Page 39: ...Optical Drive PC Card PCMCIA Socket Flash Memory Card Reader Modem and Network Connections IR Wireless Communication AC Power System Battery Power System Power Management Modes System Memory Expansion Hard Disk Drive Upgrades Processor Upgrades ...

Page 40: ...ms displayed on the screen with the use of your fingertip The following illustrations demonstrate proper use of the touchpad Moving the cursor Place your finger in the center of the touchpad and do the following to move the cursor Up Slide your finger forward Left Slide you finger to the left Down Slide your finger backward Right Slide your finger to the right Touchpad Usage Illustrations press an...

Page 41: ... You can set the double click speed using the Windows Control Panel Mouse The following 2 examples produce the same results press the left button twice and release lightly but rapidly strike the touchpad twice press the left cursor button and release lightly but rapidly strike the touchpad Clicking Tapping With the cursor over an item press the left button or use your fingertip to touch the touchp...

Page 42: ...oving the cursor to the desired location then release the button Or you can simply double tap on the item and hold while dragging the item with your fingertip The following 2 examples produce the same results hold left button and slide finger on touchpad lightly strike the touchpad twice sliding finger on touchpad during second strike Dragging Clicking Dragging Tapping NOTE Asoftware controlled sc...

Page 43: ...no obstructions that may get jammed un der the drive s tray 3 Hold the disc by the edge and face the disc s printed side up Push down on both sides of the disc s center until the disc snaps onto the hub The hub should be higher than the disc when correctly mounted 4 Slowly push the drive s tray back in The drive will begin reading the table of contents TOC on the disc When the drive stops the disc...

Page 44: ...neration of optical disc storage technology The DVD specification supports discs with capacities from 4 7GB to 17GB and access rates up to 22 16MBytes s The Notebook PC s DVD ROM drive is only single sided double sided DVD 8 5GB and higher requires manually reversing the disc in order to access the reverse side DVD is essentially a bigger faster CD that can hold video as well as audio and computer...

Page 45: ...ted by the motion picture industry to satisfy a need to protect against unlawful content duplication Although the design rules imposed on CSS licensors are many one rule that is most relevant is play back restrictions on regionalized content In order to facilitate geographically staggered movie re leases DVD video titles are released for specific geographic regions as defined in Region Defini tion...

Page 46: ... CardBus support allows PC Cards and their hosts to use 32 bit bus mastering and operate at speeds of up to 33MHz transferring data in burst modes comparable with PCI s 132MB sec By comparison the standard 16 bit PC Card bus can handle only 20MB sec Since the Notebook PC is equipped with CardBus broader and faster data pathway it can handle bandwidth hungry operations such as 100Mbps Fast Ethernet...

Page 47: ...a PC Card PCMCIA To remove the PC card first remove all cables or adapters attached to the PC card then double click the PC card icon on the Windows taskbar and stop the PC card you want to remove 1 Insert the PC card with the connector side first and label side up Standard PC cards will be flush with the Notebook PC when fully in serted Be sure the PC card is level when inserting 2 Carefully conn...

Page 48: ... two or four wires only two wires telephone line 1 is used by the modem and should have an RJ 11 connector on both ends Connect one end to the modem port and the other end to an analog telephone wall socket the ones found in residential buildings Once the driver is setup the modem is ready to use Modem and Network Connections The built in modem and network model comes with both an RJ 11 and an RJ ...

Page 49: ...or else damage will occur Modem Connection Example This is an example of the Notebook PC connected to a telephone jack for use with the built in modem CAUTION For electrical safety concerns only connect disconnect the telephone cable when the power cord is connected DO NOT use the modem during an electrical storm Only use telephone cables rated 26AWG see Glossary or higher Telephone cable with RJ ...

Page 50: ...tware default is to use the fastest setting so no user intervention is required Twisted Pair Cable The cable used to connect the Ethernet card to a host generally a Hub or Switch is called a straight through Twisted Pair Ethernet TPE The end connectors are called RJ 45 connectors which are not compatible with RJ 11 telephone connectors If connecting two computers together without a hub in between ...

Page 51: ...o Infrared communication ports should not exceed 15 The distance between the Notebook PC s IR and target device IR should not exceed 12 inches 30 cm Do not move either the Notebook PC or the other device during transmission of data An error may occur if IR transmission is conducted with high levels of noise or vibration Avoid direct sunlight flashing incandescent light florescent light and other i...

Page 52: ...y to accurately report the amount of charge percentage left in the battery Additional battery packs are optional and can be purchased separately through a Notebook PC retailer Before using the Notebook PC on battery power for the first time check the battery icon in the Windows task bar to make sure that the battery is fully charged Charging the battery takes a few hours when the Notebook PC is po...

Page 53: ... when the battery power is de pleted Suspend to Disk STD is not the same as power OFF STD requires a small amount of power and will fail if no power is available due to complete battery deple tion or no power supply e g removing both the power adapter and battery pack NOTE If you ignore the low battery warning eventually the Notebook PC enters sus pend mode Windows default uses STR WARNING Never a...

Page 54: ...ode the Power LED remains ON If you are conscious of both system performance and power consumption select Maximum Performance instead of disabling all power management features ACPI Advanced Configuration and Power Management ACPI was developed by Intel Microsoft and Toshiba especially for Windows and later to control power management and Plug and Play features ACPI is the new standard in power ma...

Page 55: ...t Power Savings In addition to reducing the CPU clock this mode puts devices including the LCD backlight in their lower active state The Notebook PC enters Stand by mode low priority when the system remains idle for a specified amount of time The timeout can be set through Windows power management higher priority To resume system operation press any key Power State Summary STATE ENTRY EVENT EXIT E...

Page 56: ... or impact The hard disk drive is the most sensitive component of the Notebook PC and will likely be the first or only component that is damaged if the Notebook PC is dropped Processor Upgrades This Notebook PC features an upgradable processor for faster performance Visit an authorized service center or retailer for upgrades WARNING End user removal of the CPU or hard disk drive will void the warr...

Page 57: ...57 Appendix Optional Accessories Optional Connections Internal Modem Compliancy Glossary Notebook PC Information ...

Page 58: ...se items if desired come as optional items to complement your Notebook PC USB Hub Optional Attaching an optional USB hub will increase your USB ports and allow you to quickly connect or disconnect many USB peripherals through a single cable ...

Page 59: ...ut supports any computer Notebook or Desktop with a USB port Wireless LAN Cardbus Card Wireless LAN USB USB Flash Memory Optional A USB flash memory device can replace the slow 1 44MB floppy disk by with up to 128MB in high speed durable storage that is compatible with all computers using the USB port USB Communication Cable Optional Attaching optional USB communication cables be tween computers t...

Page 60: ...C s built in keyboard and touchpad Optional Accessories Cont These items if desired come as optional items to complement your Notebook PC Television or Projection Device For times when you need a really big display try the TV Out function TV Out allows a high defini tion connection to a television or video projection device using a Super VHS S Video cable not provided An adapter is provided for us...

Page 61: ...simultaneously allowing others to view the external monitor For large audiences try you can connect a video projector to this port Optional Connections These items if desired may be purchased from third parties External Audio Connections The Notebook PC provides easy access for con necting a stereo headphone or multichannel am plifier mono microphone and a stereo audio source just like on many per...

Page 62: ...onnection This Notebook PC provides a parallel port that al lows you to connect inkjet laser dye printers and other parallel devices One or more USB printers can be simultaneously used on any USB port For system and hard disk drive security see BIOS setup Security Athird party lock such as the ones by Kensington can be used to secure your Note book PC physically to an unmovable object The cable wr...

Page 63: ...g if provided is by means of dual tone multifrequency signalling Network Compatibility Declaration Statement to be made by the manufacturer to the Notified Body and the vendor This declaration will indicate the networks with which the equipment is designed to work and any notified networks with which the equipment may have inter working difficulties Network Compatibility Declaration Statement to b...

Page 64: ...o Poland No Not Applicable Portugal No Not Applicable Spain No Not Applicable Sweden Yes No Switzerland Yes No United Kingdom Yes No This information was copied from CETECOM and is supplied without liability For updates to this table you may visit http www cetecom de technologies ctr_21 html 1 National requirements will apply only if the equipment may use pulse dialling manufacturers may state in ...

Page 65: ...0 11 0 0095 1810 28 0 12 0 011 1520 33 36 0 13 0 013 1300 40 35 0 14 0 015 1120 45 0 15 0 018 970 54 34 0 16 0 020 844 60 0 17 0 023 757 68 33 0 18 0 026 676 75 0 19 0 028 605 85 32 0 20 0 031 547 93 30 0 25 0 049 351 147 29 0 30 0 071 243 212 27 0 35 0 096 178 288 26 0 40 0 13 137 378 25 0 45 0 16 108 477 Gauge Diam Area R I 3A mm2 AWG mm mm2 ohm km mA 24 0 50 0 20 87 5 588 0 55 0 24 72 3 715 0 6...

Page 66: ...pting the CPU Bus master IDE driver and bus master IDE hard disk drives are required to support bus master IDE mode Byte Binary Term One byte is a group of eight contiguous bits Abyte is used to represent a single alphanumeric character punctuation mark or other symbol Clock Throttling Chipset function which allows the processor s clock to be stopped and started at a known duty cycle Clock throttl...

Page 67: ...losely placed Notebook PCs and even send files to each other without a network Kensington Locks Kensington locks or compatible allow the Notebook PC to be secured usually using a metal cable and lock that prevent the Notebook PC to be removed from a fixed object Some security products may also include a motion detector to sound an alarm when moved LPT Port Line Printer Port Logical device name res...

Page 68: ...sing the function keys The timeout setting of both Hard Disk and Video can be set by the BIOS Setup The Power LED blinks when the Notebook PC is in STR mode In STD mode the Notebook PC will appear to be powered OFF System Disk A system disk contains the core file of an operating system and is used to boot up the operating system Twisted Pair Cable The cable used to connect the Ethernet card to a h...

Page 69: ...69 Appendix A ...

Page 70: ...city ________________ 2nd Hard Disk Drive Manufacturer ___________________Capacity ________________ BIOS Version _______________________________________ Date ________________ Accessories _______________________________ Serial Number ________________ Accessories _______________________________ Serial Number ________________ Software Operating System ________________________________ Version ________...

Reviews: