


ASUS H97-PRO
4-9
Chapter 4
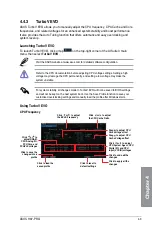
4.4.3
TurboV EVO
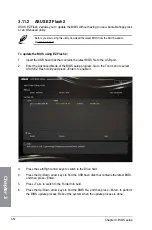
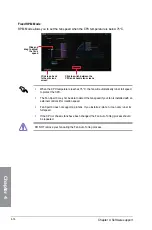
ASUS TurboV EVO allows you to manually adjust the CPU frequency, CPU Cache and Core
frequencies, and related voltages for an enhanced system stability and boost performance.
It also provides the Auto Tuning function that offers automatic and easy overclocking and
system level up.
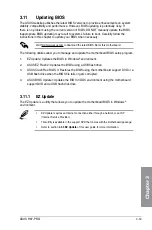
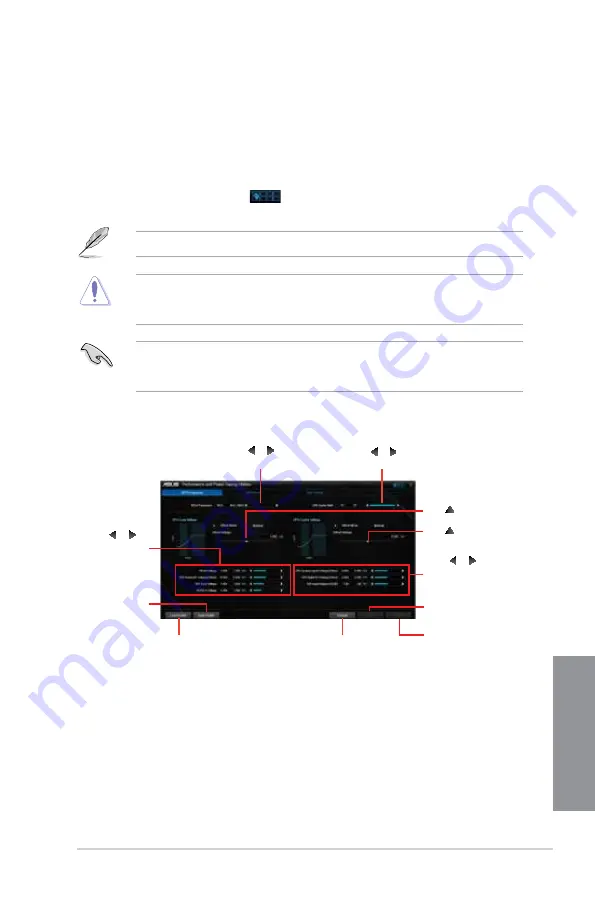
Launching TurboV EVO
To launch TurboV EVO, click or tap
on the top-right corner of the AI Suite 3 main
menu, then select
TurboV EVO
.
Visit the ASUS website at www.asus.com for detailed software configuration.
Refer to the CPU documentation before adjusting CPU voltage settings. Setting a high
voltage may damage the CPU permanently, and setting a low voltage may make the
system unstable.
For system stability, all changes made in TurboV EVO will not be saved to BIOS settings
and will not be kept on the next system boot. Use the Save Profile function to save your
customized overclocking settings and manually load the profile after Windows starts.
Click or to adjust
CPU System Agent, CPU
Digital I/O, and CPU
Input (VCCIN) voltages
Click or to adjust
the CPU Cache Ratio
Click or to adjust
the BCLK Frequency
Click to undo all the
changes
Click to apply all the
changes
Click to load the
saved profile
Click to save the
changes into a
profile
Click to reset to
default settings
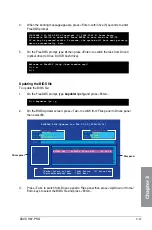
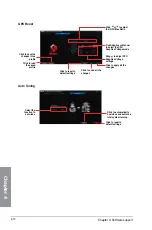
Using TurboV EVO
CPU Frequency
Drag to adjust CPU
Core Voltage offset
Drag to adjust CPU
Cache Voltage offset
Click or to
adjust DRAM,
CPU Analog I/O,
PCH Core, and
PCHVLX voltages
Summary of Contents for H-97-PRO
Page 1: ...Motherboard H97 PRO ...
Page 38: ...1 24 Chapter 1 Product introduction Chapter 1 ...
Page 43: ...ASUS H97 PRO 2 5 Chapter 2 To uninstall the CPU heatsink and fan assembly ...
Page 44: ...2 6 Chapter 2 Basic installation Chapter 2 To remove a DIMM 2 1 4 DIMM installation ...
Page 45: ...ASUS H97 PRO 2 7 Chapter 2 2 1 5 ATX Power connection OR ...
Page 46: ...2 8 Chapter 2 Basic installation Chapter 2 2 1 6 SATA device connection OR OR ...
Page 54: ...2 16 Chapter 2 Basic installation Chapter 2 ...
Page 134: ...4 22 Chapter 4 Software support Chapter 4 ...
Page 148: ...A 6 Appendices Appendices ...