background image

4

ASUS CRW-5224A-U User’s Manual

FCC/CDC Statements

Federal Communications Commission Statement

This device complies with FCC Rules Part 15. Operation is subject to the following
two conditions:

This device may not cause harmful interference, and

This device must accept any interference received including interference that
may cause undesired operation.

This equipment has been tested and found to comply with the limits for a Class B
digital device, pursuant to Part 15 of the FCC Rules. These limits are designed to
provide reasonable protection against harmful interference in a residential
installation. This equipment generates, uses and can radiate radio frequency
energy and, if not installed and used in accordance with manufacturer’s
instructions, may cause harmful interference to radio communications. However,
there is no guarantee that interference will not occur in a particular installation. If
this equipment does cause harmful interference to radio or television reception,
which can be determined by turning the equipment off and on, the user is
encouraged to try to correct the interference by one or more of the following
measures:

Reorient or relocate the receiving antenna.

Increase the separation between the equipment and receiver.

Connect the equipment to an outlet on a circuit different from that to which the
receiver is connected.

Consult the dealer or an experienced radio/TV technician for help.

WARNING!  The use of shielded cables for connection of the
monitor to the graphics card is required to assure compliance with
FCC regulations. Changes or modifications to this unit not
expressly approved by the party responsible for compliance could
void the user’s authority to operate this equipment.

Canadian Department of Communications Statement

This digital apparatus does not exceed the Class B limits for radio noise emissions
from digital apparatus set out in the Radio Interference Regulations of the
Canadian Department of Communications.

This class B digital apparatus complies with Canadian ICES-003.

Summary of Contents for External CD-RW CRW-5224A-U

Page 1: ...1 52x 24x 52x CD RW Drive CRW 5224A U External CD RW User s Manual ...

Page 2: ...warranty or service will not be extended if 1 the product is repaired modified or altered unless such repair modification of alteration is authorized in writing by ASUS or 2 the serial number of the product is defaced or missing The product name and revision number are both printed on the product itself Manual revisions are released for each product design represented by the digit before and after...

Page 3: ...ts 14 Setting the Jumper Terminals 15 Installing the CD RW Drive 16 Connecting the Drive Cables 18 Installing CRW 5224A U driver 18 Checking the drive in the System Properties 20 Properly unplugging CRW 5224A U device 21 CD RW Drive Basics 22 Placing a Disc into the Drive 22 Ejecting a Disc from the Drive 23 Using the Emergency Eject Pinhole 24 Using Compact Discs 25 Cleaning a Disc 25 Handling a ...

Page 4: ...ipment does cause harmful interference to radio or television reception which can be determined by turning the equipment off and on the user is encouraged to try to correct the interference by one or more of the following measures Reorient or relocate the receiving antenna Increase the separation between the equipment and receiver Connect the equipment to an outlet on a circuit different from that...

Page 5: ...NTERNATIONAL America Address 6737 Mowry Avenue Mowry Business Center Building 2 Newark CA 94560 USA General Fax 1 510 608 4555 General Email tmd1 asus com Technical Support Support Fax 1 510 608 4555 General Support 1 502 933 8713 Notebook Support 1 877 918 ASUS 2787 Web Site www asus com Support Email tsd asus com ASUS COMPUTER GmbH Germany and Austria Address Harkortstr 25 40880 Ratingen BRD Ger...

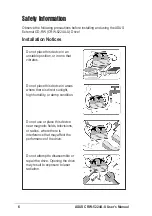
Page 6: ...emble or repair the drive Opening the drive may result to exposure to laser radiation Do not use or place this device near magnetic fields televisions or radios where there is interference that may affect the performance of the drive Do not place this device in areas where there is direct sunlight high humidity or damp condition Do not place this device in an unstable position or in one that vibra...

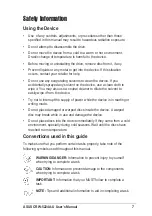
Page 7: ...to dilute the solvent to easily wipe it from the device Try not to interrupt the supply of power while the device is in reading or writing mode Do not place damaged or warped discs inside the device A warped disc may break while in use and damage the device Do not place discs into the device immediately if they came from a cold environment specially during cold seasons Wait until the discs have re...

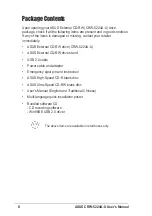
Page 8: ...r retailer immediately ASUS External CD RW drive CRW 5224A U ASUS External CD RW drive stand USB 2 0 cable Power cable and adapter Emergency eject pin and instruction ASUS High Speed CD R blank disc ASUS Ultra Speed CD RW blank disc User s Manual English and Traditional Chinese Multi language quick installation poster Bundled software CD CD recording software Win98SE USB 2 0 driver The above items...

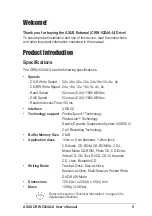
Page 9: ...DAE Speed 52x max CAV 7800 KB Sec Random Access Time 100 ms Interface USB 2 0 Technology support FlextraSpeedTM Technology FlextraLinkTM Technology Double Dynamic Suspension System II DDSS II CAV Recording Technology Buffer Memory Size 2 MB Application discs 12cm or 8 cm diameter 1 2mm thick CD Audio CD ROM CD ROM XA CD I Mixed Mode CD ROM Photo CD CD Extra Video CD CD Text DVCD CD G Karaoke CD I ...

Page 10: ...justment based on the recording media In addition to the fact that there are low and high quality recording media various other factors such as dye layer temperature humidity dust fingerprints etc affect the recording characteristics of CD R and CD RW discs Due to these factors some discs may not be able to stand the high speed capabilities of the latest CD RW drives The FlextraSpeed technology so...

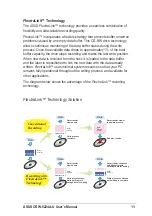
Page 11: ...to link the new data with the data already written FlextraLink uses minimal system resources so that your PC remains fully operational throughout the writing process and available for other applications The diagram below shows the advantage of the FlextraLink recording technology FlextraLink Technology Solution Data transfer slows down Buffer Memory Write process continues Write Data Data Data tra...

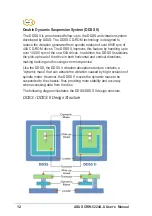
Page 12: ... new 50X drives In addition the DDSS II stabilizes the pick up head of the drive in both horizontal and vertical directions making tracking and focusing even more precise Like the DDSS the DDSS II vibration absoption structure contains a dynamic mass that can absorb the vibration caused by high revolution of spindle motor However the DDSS II moves the dynamic mass to be suspended to the chassis th...

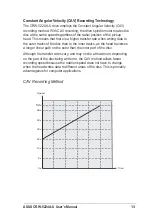
Page 13: ... when writing data to the outer tracks of the disc than to the inner tracks as the head traverses a longer linear path on the outer than the inner part of the disc Although the transfer rates vary and may not be at maximum depending on the part of the disc being written to the CAV method allows faster recording speed because the rotation speed does not have to change when the head writes data to d...

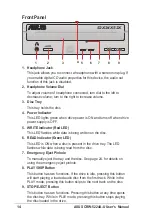
Page 14: ...written on the disc 6 READ Indicator Green LED This LED is ON when a disc is present in the drive tray The LED flashes while data is being read from the disc 7 Emergency Eject Pinhole To manually eject the tray and the disc See page 24 for details on using the emergency eject pinhole 8 PLAY SKIP Button This button has two functions If the drive is idle pressing this button will start playing a loa...

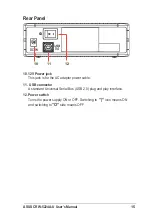
Page 15: ...2 10 12V Power jack This jack is for the AC adaptor power cable 11 USB connector A standard Universal Serial Bus USB 2 0 plug and play interface 12 Power switch Turns the power supply ON or OFF Switching to icon means ON and switching to O side means OFF ...

Page 16: ...e that your computer system meets the following requirements IBM compatible Pentium II 333 MHz or higher PC Windows 98SE ME 2000 XP operating system At least 64MB RAM 128MB recommended Do not use damaged or warped disc in the CD RW drive The disc may break apart during use and cause potential body injury or damage to your drive ...

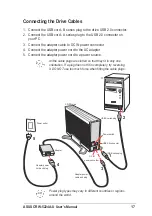
Page 17: ...ter 5 Connect the adapter power cord to a power source All the cable plugs are slotted so that they fit in only one orientation If a plug does not fit in completely try reversing it DO NOT use too much force when fitting the cable plugs Power plug types may vary in different countries or regions around the world 3 USB A series plug 2 Adapter power 4 cord and plug 5 USB 2 0 connector Power switch A...

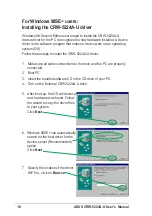
Page 18: ...s to install the CRW 5224A U driver 1 Make sure all cable connections to the drive and the PC are properly connected 2 Boot PC 3 Insert the bundled software CD in the CD drive of your PC 4 Turn on the External CRW 5224A U drive 5 After boot up the OS will detect a new hardware was found Follow the wizard to copy the driver files to your system Click Next 7 Specify the location of the driver INF fi...

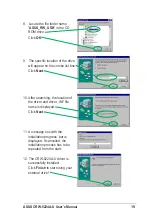
Page 19: ...he combo list box Click Next 10 After searching the location of the driver and driver INF file name is displayed Click Next 11 A message box with the installation progress bar is displayed If cancelled the installation process has to be repeated from the start 12 The CRW 5224A U driver is successfully installed Click Finish to start using your external drive ...

Page 20: ...llow these steps to check the computer system properties 1 Right click My Computer icon on your desktop 2 On the pop up menu click Properties 3 Click the Device Manager tab on the system properties dialogue box 4 Click on CD ROM from the list Screen display may vary depending on the operating system OS version ASUS CRW 5224A drive name should appear here ...

Page 21: ...ur CRW 5224A U drive from the PC 5 The screen display will go back to the Unplug or Eject Hardware dialogue box Click on Close 1 Locate the Unplug or Eject Hardware icon found in the taskbar Double click on the icon 2 Select the name of the hardware device ASUS CRW 5224A to unplug Click Stop 3 Confirm the device to be stopped Again select the name of the device you want to unplug Click OK 4 The de...

Page 22: ...asics Placing a Disc into the Drive 1 Press the eject button on the front of the drive to eject the tray 2 When the drive tray ejects out of the drive place the disc on the tray with the label side facing out HORIZONTAL VERTICAL HORIZONTAL VERTICAL ...

Page 23: ... the disc from the tray 3 Press the drive eject button or lightly push the center of the drive tray to load the tray back into the drive HORIZONTAL HORIZONTAL VERTICAL If you are using a 12 cm disc place it on the tray making sure that it fits the outer circular border This border helps hold the disc in place If you are using an 8 cm disc place it on the inner circular border on the tray However 8...

Page 24: ...nd remove the disc Follow these steps to eject the drive tray using the emergency pinhole 1 Insert the eject pin that came with the drive package You may also use a paper clip or any pointed rod small enough to fit into the emergency pinhole HORIZONTAL VERTICAL HORIZONTAL VERTICAL Use the manual method only as a last resort when the eject button does not work Make sure that you have turned off you...

Page 25: ...s section when using compact discs These instructions will help you avoid damaging the discs and your CD RW drive Cleaning a Disc Spray the disc with compressed air for about five seconds to get rid of the dust on a disc Handling a Disc Hold a disc by the edges Do not touch the disc surface ...

Page 26: ... edges 6 surfaces Acoustic Access mode 41 5 dB TYP Read mode 44 5 dB TYP Microphone located 50cm in front of the drive 120 cm above the drive at 30o angle Reliability MTBF 100 000 power on hours ODC Read 20 of power on time ODC Write 1 of power on time Mean Time To Repair MTTR 30 minutes Electrical and Audio Specifications Power Source Input Linear Voltage 100 240 V AC Input Linear Frequency 50 60...

Reviews: