background image

EB1037 PC

9

English

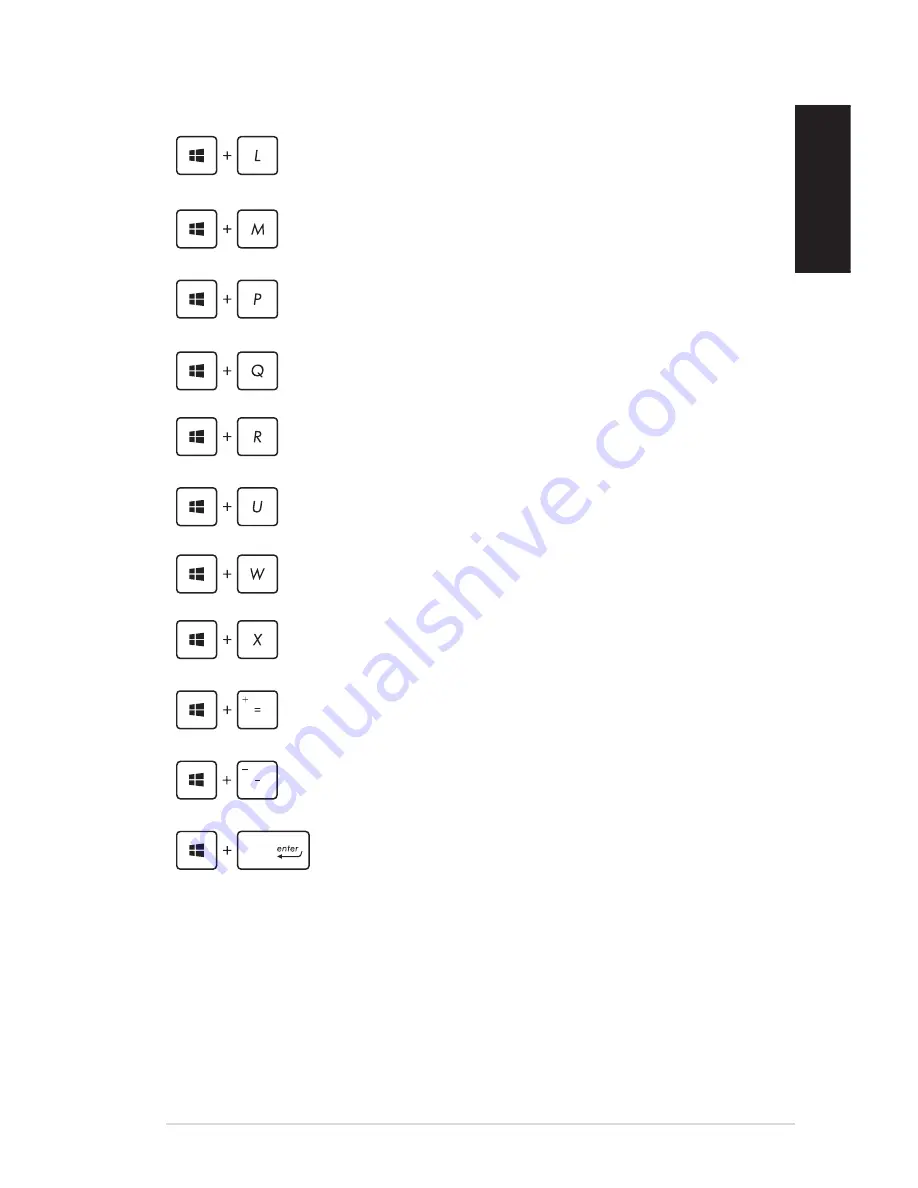
Activates the Lock screen

Minimizes all currently active windows

Launches the 

Project

 pane

Opens the 

Everywhere

 option from the 

Search


charm

Opens the 

Run

 window

Opens 

Ease of Access Center

Opens the 

Everywhere

 option from the 

Search


charm

Opens a context menu of the Start button

Launches the magnifier icon and zooms in your screen

Zooms out your screen

Opens the 

Narrator

 Settings

Summary of Contents for EB1037

Page 1: ...English EB1037 User Manual X ...

Page 2: ...RUED AS A COMMITMENT BY ASUS ASUS ASSUMES NO RESPONSIBILITY OR LIABILITY FOR ANY ERRORS OR INACCURACIES THAT MAY APPEAR IN THIS MANUAL INCLUDING THE PRODUCTS AND SOFTWARE DESCRIBED IN IT Copyright 2013 ASUSTeK COMPUTER INC All Rights Reserved LIMITATION OF LIABILITY Circumstances may arise where because of a default on ASUS part or other liability you are entitled to recover damages from ASUS In e...

Page 3: ...nting your PC on the stand 14 Installing your PC to a monitor 15 Using your PC 19 Connecting to an external display 19 Connecting to a USB device 19 Connecting the wireless antenna 20 Turning on your PC 21 Configuring the audio output via an HDMI device 22 Chapter 3 Working withWindows 8 1 System requirements 24 Starting for the first time 25 Windows 8 1 lock screen 25 Windows UI 26 Start Screen 2...

Page 4: ... the BIOS Setup 41 Quickly enter the BIOS 42 Chapter 4 Connecting to the Internet Connecting on Windows 7 43 Wireless connection 43 Wired connection 44 Connecting on Windows 8 1 49 Wi Fi connection 49 Wired connection 50 Chapter 5 Recovering your system Recovery options on Windows 7 52 Using the Recovery Partition 52 Recovery options on Windows 8 1 54 Removing everything and reinstalling Windows 5...

Page 5: ... using your PC Chapter 3 Working with Windows 8 1 This chapter provides an overview of using Windows 8 1 in your PC Chapter 4 Connecting to the Internet This chapter provides information on connecting your PC to a wired or Wi Fi network Chapter 5 Recovering your system This chapter provides recovery options for your PC Appendices This section includes notices and safety statements for your PC NOTE...

Page 6: ...wed to complete a task NOTE This message contains additional information and tips that can help complete tasks WARNING This message contains important information that must be followed to keep you safe while performing certain tasks and prevent damage to your PC s data and components Bold text Indicates a menu or an item to select Italic This indicates sections that you can refer to in this manual...

Page 7: ...plenty of space around the system for ventilation Never insert objects of any kind into the ventilation openings Use this product in environments with ambient temperatures between 0 C and 35 C If you use an extension cord make sure that the total ampere rating of the devices plugged into the extension cord does not exceed its ampere rating Care during use Do not walk on the power cord or allow any...

Page 8: ...y Warning CAUTION Danger of explosion if battery is incorrectly replaced Replace only with the same or equivalent type recommended by the manufacturer Dispose of used batteries according to the manufacturer s instructions DO NOT throw the PC in municipal waste This product has been designed to enable proper reuse of parts and recycling This symbol of the crossed out wheeled bin indicates that the ...

Page 9: ...s fail or malfunction during normal and proper use within the warranty period bring the warranty card to the ASUS Service Center for replacement of the defective components X EB1037 AC adapter Power cord Antenna Warranty card Quick Installation Guide QIG Stand optional VESA mount and screw pack optional Keyboard Mouse optional ...

Page 10: ...dware Setup Getting to know your PC Front view Memory card slot The built in memory card reader enables your PC to read and write data to and from MMC SD SDHC SDXC cards Power switch The power switch allows powering ON and OFF the system ...

Page 11: ...s and hard disk drives USB allows many devices to run simultaneously on a single computer with some peripheral acting as additional plug in sites or hubs Microphone jack The microphone jack is designed to connect the microphone used for video conferencing voice narrations or simple audio recordings Headphone Audio S PDIF Out jack The stereo headphone jack 3 5mm is used to connect the system s audi...

Page 12: ...12 EB1037 PC English Rear view Wireless antenna jack The jack is used to connect the supplied wireless antenna to enhance wireless signal reception ...

Page 13: ... supports a standard Ethernet cable for connection to a local network Display Monitor Output The 15 pin D sub monitor port supports a standard VGA compatible device such as a monitor or projector to allow viewing on a larger external display Power input DC 19V The supplied power adapter converts AC power to DC power for use with this jack Power supplied through this jack supplies power to the PC T...

Page 14: ...nt your PC on the stand 1 Locate the mounting hole at the bottom of your PC 2 Align the stand s mounting hole with the mounting hole on your PC then secure it in place with the stand screw IMPORTANT Ensure that your PC is mounted on its stand before placing it on a stable and flat surface stand screw X ...

Page 15: ...o a monitor To install your PC to a monitor 1 Secure the VESA mount to your monitor with four screws bundled with your VESA mount kit NOTE Your monitor must comply with VESA75 or VESA100 standard The PC can be mounted on an ASUS VS228H monitor ...

Page 16: ...e your PC into the VESA mount as shown NOTE Ensure that the ASUS trademark on the rotation wheel of the VESA mount is set to its customary position when putting in the PC so that the machine can rotate properly ASUS trademark PC VESA mount ...

Page 17: ... English 3 Secure the PC and the VESA mount assembly with a stand screw Ensure that the PC is firmly attached to the VESA mount NOTE Use the stand screw bundled with the stand stand screw PC and VESA mount assembly ...

Page 18: ...wheel A then rotate the PC and VESA mount assembly accordingly B IMPORTANT Set the rotation wheel upright when the system is in use Please take note of the cables connected to the PC while operating the rotation wheel To prevent hazards from loosened cables the wheel is designed to rotate no more than 90 clock counterclock wise 1 2 3 rotation wheel PC and VESA mount assembly lever switch ...

Page 19: ... an HDMI or a VGA cable to an external display and the other end of the cable to your PC s HDMI or VGA port Connecting to a USB device Connect USB devices like wired wireless keyboards mouse devices and printers to the USB ports on your PC NOTE The keyboard varies with country or region X ...

Page 20: ...English Connecting the wireless antenna Connect the wireless antenna to your PC to enhance the wireless signal Ensure that the wireless antenna is in an upright position 90o angle to get the best wireless reception ...

Page 21: ...n use unplug the power adapter or switch off the power button to save on power consumption Adjust the power management settings in the Window Control Panel This is to ensure that your PC is set to a low power consumption mode and is fully operational at the same time X ...

Page 22: ...via an HDMI device 1 Do any of the following based on your PC s operating system On Windows 7 Right click the Volume Mixer icon on the Windows notification area and click Playback devices On Windows 8 1 a From the Start screen click Desktop to launch the Desktop Mode NOTE For more details refer to the section Start screen under Using Windows 8 1 b Right click the Volume Mixer icon on the Windows t...

Page 23: ...ect Stereo and click Next 2 From the Playback screen select Digital Audio HDMI 3 Click Configure and the Speaker Setup window pops up 5 Tick the Front left and right option and click Next 6 Click Finish to exit the speaker setup ...

Page 24: ...om windows 8 tutorial Chapter 3 Working with Windows 8 1 NOTE The operating system varies with country or region System requirements To facilitate a smoother transition from your previous operating system read the system requirements below before upgrading to Windows 8 1 Processor 1GHz or faster RAM 1GB 32 bit or 2 GB 64 bit Hard disk space 16 GB 32 bit or 20 GB 64 bit Graphics card Microsoft Dire...

Page 25: ...or using Windows and click Accept 3 Follow the next onscreen instructions to configure the following basic items Personalize Wireless Settings Sign in to your PC 4 Once you are done configuring the basic items the Windows 8 1 video tutorial appears Watch this tutorial to learn more about Windows 8 1 functionalities 5 The Start screen appears after successfully signing in to your user account Windo...

Page 26: ...after successfully signing in to your user account It helps organize all the programs and applications you need in just one place NOTE Actual apps shown onscreen may vary per model The following screenshot is for reference only Windows apps These are apps pinned on the Start screen and displayed on tiled format for easy access NOTE Some apps require signing in to your Microsoft account before they...

Page 27: ...glish Hotspots on the Start screen Hotspots Onscreen hotspots allow you to launch programs and access the settings of your PC The functions in these hotspots can be activated using your mouse Hotspots on a running app ...

Page 28: ...rt screen NOTE You can also press the Windows key on your keyboard to go back to the Start screen From the Start screen Hover your mouse pointer then click to go back to that app top Hover your mouse pointer until it changes to a hand icon Drag then drop the app to a new location NOTE This hotspot function only works on a running app or when you want to use the Snap feature For more details refer ...

Page 29: ...be accessed from the Start screen while on Desktop mode and on any app that is currently open onscreen Start button on the Start screen NOTE The actual color of your Start button varies depending on the display settings you chose for your Start screen Hover your mouse pointer over the left corner of your Start screen or any opened app to call out the Start button ...

Page 30: ...rs as a box filled with quick access to some of the programs inside Windows 8 1 when you right click on the Start button The context menu also includes the following shut down options for your PC sign out sleep shut down restart Start button on Desktop mode ...

Page 31: ...e and customize the arrangement of your apps onscreen To customize the settings of your Start screen 1 Launch the Desktop 2 Right click anywhere on the taskbar except on the Start button to launch the Taskbar and Navigation properties window 3 Select the Navigation tab then tick the options you want to use 4 Click Apply to save the new settings then exit ...

Page 32: ...e the arrow keys to browse through the apps Press to launch your selected app Customizing apps from the Start screen You can move resize or unpin apps from the Start screen using the following steps Moving apps To move an app point and drag it to a new location Resizing apps Right click the app to activate its settings bar then tap and select an app tile size Unpinning apps To unpin an app from th...

Page 33: ...n drop the app to the bottom of the screen to close it From the running app s screen press Accessing the Apps screen Aside from the apps already pinned on your Start screen you can also open other applications through the Apps screen NOTE Actual apps shown onscreen may vary per model The following screenshot is for reference only Horizontal scroll bar ...

Page 34: ...ard Using your mouse click the button Using your keyboard from the Start screen press then press Pinning more apps on the Start screen 1 Launch the All Apps screen 2 Right click on the apps that you want to pin on the Start screen 3 Click on the icon to pin the selected apps on the Start screen ...

Page 35: ...s and provide quick access for customizing the settings of your PC Launching the Charm bar NOTE When called out the Charm bar initially appears as a set of white icons The image above shows how the Charm bar looks like once activated Use your PC s mouse or keyboard to launch the Charm bar Move your mouse pointer on the upper or lower right corner of the screen Press Charm Bar ...

Page 36: ...ites or email Start This tool reverts the display back to the Start screen From the Start screen you can also use this to revert back to a recently opened app Devices This tool allows you to access and share files with the devices attached to your PC such as an external display or printer Settings This tool allows you to access the PC settings of your PC Inside the Charm bar ...

Page 37: ... steps to activate Snap using your PC s mouse or keyboard Using your mouse 1 Launch the app you wish to snap 2 Hover the mouse point on the top side of your screen 3 Once the pointer changes to a hand icon drag then drop the app to the left or right side of the display panel 4 Launch another app This app is automatically placed on the available pane Snap bar ...

Page 38: ...omatically placed on the available pane Other keyboard shortcuts Using the keyboard you can also use the following shortcuts to help you launch applications and navigate Windows 8 Switches between the Start screen and the last running app Launches the desktop Launches the This PC window on Desktop mode Opens the File option from the Search charm Opens the Share charm Opens the Settings charm ...

Page 39: ...oject pane Opens the Everywhere option from the Search charm Opens the Run window Opens Ease of Access Center Opens the Everywhere option from the Search charm Opens a context menu of the Start button Launches the magnifier icon and zooms in your screen Zooms out your screen Opens the Narrator Settings ...

Page 40: ...t down If your PC is unresponsive press and hold the power button for at least four 4 seconds until your PC turns off To shut down your PC using Desktop mode launch the desktop then press alt f4 to launch the Shut Down window Select Shut Down from the drop down list then select OK Putting your PC to sleep You activate sleep mode on your PC using the following procedures Press the Power button once...

Page 41: ...mance Do not change the default BIOS settings except in the following circumstances An error message appears on the screen during the system bootup and requests you to run the BIOS Setup You have installed a new system component that requires further BIOS settings or update WARNING Inappropriate BIOS settings may result to instability or boot failure We strongly recommend that you change the BIOS ...

Page 42: ...wer button for at least four seconds to shut down your PC then press the power button again to turn your PC back on and press F2 during POST When your PC is off disconnect the power cord from your PC s power connector Reconnect the power cord and press the power button to turn on your PC Press F2 during POST NOTE POST Power On Self Test is a series of software controlled diagnostic tests that run ...

Page 43: ...ARNING For security concerns DO NOT connect to an unsecured network 2 Select the wireless access point you want to connect to from the list and click Connect to build the connection 3 When connecting you may have to enter a password 4 After a connection has been established the connection is shown on the list 5 You can see the wireless network icon in the Notification area NOTES If you cannot find...

Page 44: ... or static IP network connection NOTE For more details refer to the next sections Wired connection 1 Use a network RJ 45 cable to connect your PC to a DSL cable modem or a local area network LAN Modem RJ 45 cable X DSL Cable Modem RJ 45 cable LAN X LAN ...

Page 45: ...ion To configure your IP PPPoE network connection 1 Click the network icon in the Windows Notification area and select Open Network and Sharing Center 2 Click Change adapter settings in the left blue pane 3 Right click Local Area Connection and select Properties ...

Page 46: ...on 4 TCP IPv4 and click Properties 5 Configure the type of IP address for network configuration 5 a To configure using a dynamic IP address a 1 Click Obtain an IP address automatically and click OK a 2 Proceed to Step 6 if you are using PPPoE connection ...

Page 47: ...t up a new connection or network 5 b To configure using a static IP address b 1 Click Use the following IP address b 2 Enter the IP address Subnet mask and Gateway from your service provider b 3 If needed enter the preferred DNS Server address and alternative address b 4 When done click OK 8 Select Broadband PPPoE and click Next ...

Page 48: ...the configuration 11 Click the network icon in the taskbar and click the connection you just created 12 Enter your user name and password Click Connect to connect to the Internet 9 Enter your User name and Password and Connection name Click Connect ...

Page 49: ... bar click and click the 3 Select a wireless network from the list of available Wi Fi connections 4 Click Connect to start the network connection NOTE You may be prompted to enter a security key to connect to a secured wireless network 5 Optional To enable sharing between your PC and other wireless enabled systems click Yes Click No if you do not want to enable the sharing function ...

Page 50: ...ction using a network cable 1 Connect one end of the network cable RJ 45 to your PC s LAN port and the other end to the DSL cable modem or a local area network LAN port 2 Launch the Desktop 3 From the Windows taskbar right click the network icon then click Open Network and Sharing Center 4 In the Network and Sharing Center window click Change adapter settings Modem RJ 45 cable X RJ 45 cable LAN X ...

Page 51: ...net mask and Default gateway from your service provider b 3 If needed you can also type the preferred DNS server address and alternate DNS server address then click OK b 4 Proceed to step 8 8 Return to the Network and Sharing Center window then click Set up a new connection or network 9 Select Connect to the Internet then click Next 10 Click Broadband PPPoE 11 Key in your User name Password and Co...

Page 52: ...ting system drivers and utilities installed on your PC at the factory Recovering the OS to the factory default partition F9 Recovery WARNING DO NOT delete the partition named RECOVERY The recovery partition is created at the factory and cannot be restored by the user if deleted Take your system to an authorized ASUS service center if you have problems with the recovery process To recover the OS to...

Page 53: ...kup To back up the factory default environment data to a USB drive F9 Backup 1 Press F9 during bootup 2 Select Windows setup EMS Enabled when this item appears and press Enter 3 Select the language and click Next 4 Select Recover the OS to the Default Partition and click Next 5 Select Backup the Factory Environment to a USB Drive and click Next 6 Connect a USB storage device to your PC to start th...

Page 54: ...l lose all your data on the selected USB storage device or on the selected partition Ensure that you back up your important data 9 When the back up is completed successfully click Reboot to restart the system Removing everything and reinstalling Windows The Remove everything and reinstall Windows option in PC Settings restores your PC to its original factory settings To do this IMPORTANT Back up a...

Page 55: ... applied to insulate the device except on the areas where the I O ports are located Federal Communications Commission Statement This device complies with Part 15 of the FCC Rules Operation is subject to the following two conditions This device may not cause harmful interference and This device must accept any interference received including interference that may cause undesired operation This equi...

Page 56: ...structions and the antenna s used for this transmitter must be installed to provide a separation distance of at least 20 cm from all persons and must not be co located or operating in conjunction with any other antenna or transmitter End users and installers must be provide with antenna installation instructions and transmitter operating conditions for satisfying RF exposure compliance Declaration...

Page 57: ...e 2446 5 2483 5 MHz band Use outdoors on public property is not permitted In the departments listed below for the entire 2 4 GHz band Maximum authorized power indoors is 100mW Maximum authorized power outdoors is 10mW Departments in which the use of the 2400 2483 5 MHz band is permitted with an EIRP of less than 100mW indoors and less than 10mW outdoors 01 Ain 02 Aisne 03 Allier 05 Hautes Alpes 08...

Page 58: ...ian Department of Communications This class B digital apparatus complies with Canadian ICES 003 IC Radiation Exposure Statement for Canada This equipment complies with IC radiation exposure limits set forth for an uncontrolled environment To maintain compliance with IC RF exposure compliance requirements please avoid direct contact to the transmitting antenna during transmitting End users must fol...

Page 59: ...4 108 EC Electromagnetic compatibility and 2006 95 EC Low voltage directive CE marking for devices with wireless LAN Bluetooth This equipment complies with the requirements of Directive 1999 5 EC of the European Parliament and Commission from 9 March 1999 governing Radio and Telecommunications Equipment and mutual recognition of conformity is for class II device Wireless Operation Channel for Diff...

Page 60: ...andard and the power management feature is enabled by default The monitor and computer are automatically set to sleep after 15 and 30 minutes of user inactivity To wake your computer click the mouse or press any key on the keyboard Please visit http www energy gov powermanagement for detail information on power management and its benefits to the environment In addition please visit http www energy...

Page 61: ...EB1037 PC 61 English ...

Page 62: ...eb site http usa asus com Technical Support Telephone 1 812 284 0883 Support fax 1 812 282 2787 Online support http support asus com techserv techserv aspx ASUS COMPUTER GmbH Germany and Austria Address Harkort Str 21 23 40880 Ratingen Germany Fax 49 2102 959931 Web site http www asus com de Online contact http eu rma asus com sales Technical Support Telephone 49 2102 5789555 Support Fax 49 2102 9...

Reviews: