background image


INSTALLATION 


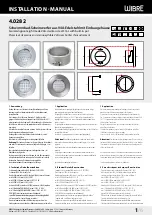
The underwater light kit consists of the following components: 

  Underwater Light METEOR LSR0640EQ 

  4 x fixing screw 5.5x50 with wallplugs 

  Operating Instructions with Declaration of Conformity and Warranty conditions 


The METEOR LSR0640EQ has to be installed on a flat surface on the pool wall under water line. 

Do not try to install the underwater pool light while the pool is filled with water. 

When the installation is finished briefly test the underwater light prior to fill the pool with water. 

The installation have to be realized by a qualified personnel.  


SEALING GROOVE

SCREW 5.5X50

SEALING


Note: 


Avoid using the underwater pool light out of the water – submerge before lighting. 


Wall preparation 

To fix the underwater pool light with screws 5.5x50 the diameter of holes drilled into the wall has to 

be 8mm. 

The diameter of the hole for cable gland drilled through the wall has to be 10mm. 


Sealing 

Before inserting the cable with gland through the hole the sealant has to be used into the grooves, 

around the four fixing holes and around the gland in the rear surface of the underwater pool light. 

The sealant can be on silicon basis but the best solution is MS polymer sealant. 


Fixing 

The underwater light has to be fixed with four screws 5.5x50 with wallplugs. 


Note: 


Do not overtighten the screws as this can result in underwater pool light damage. 


Earthing 

The underwater pool light has to be earthed by using a pre-tinned green wire with a yellow stripe a 

minimum of 8 AWG (8.36 mm

2

). The wire has to be connected to the underwater pool light by the 

help of one fixing screw 5.5x50. 


Summary of Contents for METEOR LSR0640EQ Series

Page 1: ...METEOR LSR0640EQ UNDERWATER POOL LIGHT Operating Instructions...

Page 2: ...e 3 Features 3 Precautions 3 Components and Connectors 4 Installation 5 Controls 7 Appearance 9 Technical Specifications 9 Warranty 10 _________________________________________________________________...

Page 3: ...MX512 Control of Multi Color versions Polarity Protection Transient Protection Thermal Protection Wide Range Power Supply Low Power Consumption Simple Installation Optional Accessories for Different P...

Page 4: ...al window 2 Underwater pool light casing Stainless steel casing with fixing holes and cable gland 3 Cable The 4 pole multi core cable to connect the 12 24Vdc power supply and optional remote control o...

Page 5: ...ll preparation To fix the underwater pool light with screws 5 5x50 the diameter of holes drilled into the wall has to be 8mm The diameter of the hole for cable gland drilled through the wall has to be...

Page 6: ...ool white W warm white WW blue B or green G models To remotely turn on and turn off the underwater pool light the simple switch not included can be used and connected to the CONTROL wires by a 2 pole...

Page 7: ...color or mode of lighting When the light is turned off press the momentary switch for 2 seconds Setting the Custom Color At the selected Rainbow Color Spectrum mode press the momentary switch shortly...

Page 8: ...8 DMX512 control The built in ASTEL protocol enables the network connection to control the lights with the standard DMX512 protocol by using optional LXU01 interface...

Page 9: ...ens angle 60 standard Optical window High grade polycarbonate glass Luminous flux max 950 lm ASTEL protocol default address 1 Operating temperature 10 C 50 C Casing Stainless steel SAE316L Protection...

Page 10: ...nt will be repaired or replaced at the Warrantor s option without charge and returned to the Purchaser at the Warrantor s expense d no refund of the purchase price will be granted to the Purchaser unl...

Page 11: ...11...

Page 12: ...12 ASTEL d o o Dutovlje 138 6221 Dutovlje Slovenia Tel 386 5 7310771 386 5 7310772 Fax 386 5 7310789 E mail info astel lighting com Web www astel lighting com...

Reviews: