background image

1 3

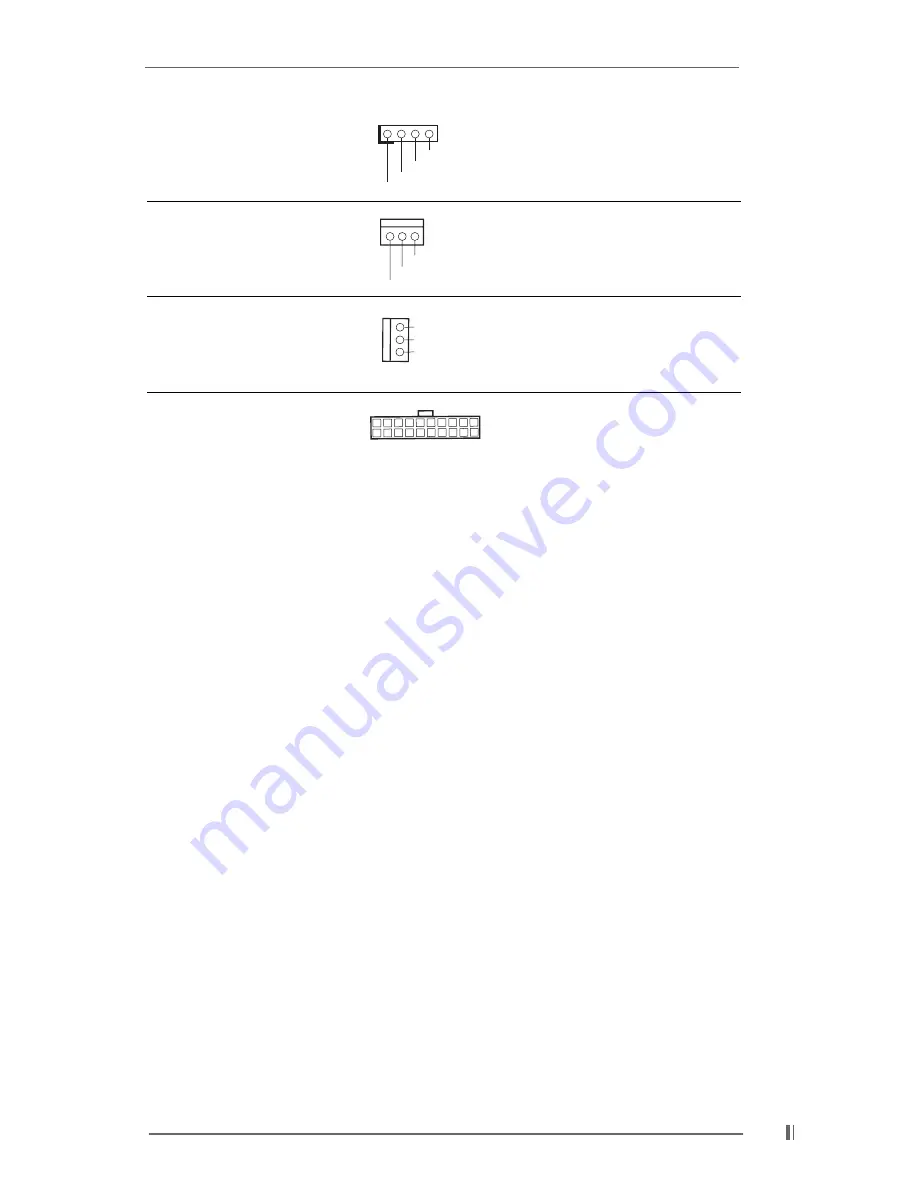
Speaker connector

This connector allows you to

(4-pin SPEAKER 1)

attach to an external speaker.

(see p.6 item 15)

Chassis fan connector

Connect the fan cable to the

(3-pin CHA_FAN1)

connector matching the black

(see p.6 item 9)

wire to the ground pin.

CPU fan connector

Connect the fan cable to the

(3-pin CPU_FAN1)

connector matching the black

(see p.6 item 3)

wire to the ground pin.

ATX power connector

Connect an ATX power

(20-pin ATXPWR1)

supply to the connector.

(see p.6 item 1)

+5V

DUMMY

DUMMY

SPEAKER

1

GND

+12V

CHA_FAN_SPEED

CPU_FAN_SPEED

GND
+12V

Summary of Contents for PE PRO-HT

Page 1: ...1 PE Pro HT User Manual Version 1 0 Published January 2003 Copyright 2003 ASRock INC All rights reserved ...

Page 2: ... to change without notice and should not be constructed as a commitment by ASRock ASRock assumes no responsibility for any errors or omissions that may appear in this manual With respect to the contents of this manual ASRock does not provide warranty of any kind either expressed or implied including but not limited to the implied warran ties or conditions of merchantability or fitness for a partic...

Page 3: ...s Setup 10 2 8 Connectors 11 3 BIOS Setup 14 3 1 BIOS Setup Utility 14 3 1 1 BIOS Menu Bar 14 3 1 2 Legend Bar 14 3 2 Main Menu 15 3 3 Advanced Security Power Boot and Exit Menus 17 4 Software Support 18 4 1 Installing Operating System 18 4 2 Support CD Information 18 4 2 1 Running Support CD 18 4 2 2 Drivers Menu 18 4 2 3 Utilities Menu 18 4 2 4 ASRock PC DIY Live Demo Program 18 4 2 5 Contact In...

Page 4: ...r IDE devices 1 x ATA 66 100 133 1 cable for floppy drive 1 x ribbon cable 1 ASRock I O shield 1 2 Specifications Platform ATX form factor 12 x 9 6 30 5 x 24 4 cm CPU Socket 478 for Intel Pentium 4 Celeron processor Chipsets North Bridge SiS 645DXHT chipsets standard FSB 533 MHz supports Hyper Threading Technology see CAUTION 1 South Bridge Supports USB 2 0 ATA 133 Clock Generator 100 MHz 200MHz M...

Page 5: ...ents Supports jumperfree SMBIOS 2 3 1 support OS Microsoft Windows 98SE ME 2000 XP compliant CAUTION 1 About the setting of Hyper Threading Technology please check page 19 2 While CPU overheat is detected the system will automatically shutdown Please check if the CPU fan on the motherboard functions properly before you resume the system To improve heat dissipation remember to spray thermal grease ...

Page 6: ...h Memory 24 Internal audio connectors CD1 Black 12 System panel connector PANEL1 25 AGP slot 13 USB 2 0 header USB45 SiS 645DX Chipset PS2_USB_PWR1 Accelerated Graphics Port PCI 1 PCI 2 PCI 3 PCI 4 PCI 5 30 5cm 12 0 in 24 4cm 9 6 in Audio CODEC AUX1 Mic In GAME AUDIO1 USB01 LAN USB23 Mic in Line out GAME AUDIO1 PARALLEL PORT PS 2 Mouse PS 2 Keyboard COM1 SiS South Bridge Audio1 CPU_FAN1 PANEL 1 SP...

Page 7: ...k I OTM 1 Parallel port 6 Line Out Lime 2 RJ 45 port 7 USB 2 0 ports 3 Game port 8 Serial port COM1 4 Microphone Pink 9 PS 2 keyboard port Purple 5 Line In Light Blue 10 PS 2 mouse port Green 1 2 3 4 5 6 7 8 9 10 ...

Page 8: ...ket before touching any component 2 To avoid damaging the motherboard components due to static electricity NEVER place your motherboard directly on the carpet or the like Also remember to use a grounded wrist strap or touch a safety grounded object before you handle components 3 Hold components by the edges and do not touch the ICs 4 Whenever you uninstall any component place it on a grounded anti...

Page 9: ...CPU and the heatsink are securely fastened and in good contact with each other For proper installation please kindly refer to the instruction manuals of vendors of CPU fan and heatsink 2 5 Installation of Memory Modules DIMM SDRAM Synchronous DRAM DIMM Dual In line Memory Module has 168 pins and DDR Double Data Rate SDRAM DIMM has 184 pins Please make sure to disconnect power supply before adding ...

Page 10: ...ted Installing an expansion card Step 1 Before installing the expansion card read the documentation of the expansion card and make necessary hardware settings for the card Step 2 Remove the system unit cover if your motherboard is already installed in a chassis Step 3 Remove the bracket facing the slot that you intend to use Keep the screw for later use Step 4 Align the card connector with the slo...

Page 11: ... short the solder points for more than 3 seconds by using metal material e g a paper clip Note These solder points allow you to clear the data in CMOS The data in CMOS includes system setup information such as system password date time and system setup parameters 2 8 Connectors Connectors are NOT jumpers DO NOT place jumper caps over these connectors Connector Figure Description FDD connector 33 p...

Page 12: ...connectors allow you 4 pin CD1 4 pin AUX1 CD1 to receive stereo audio input CD1 see p 6 item 24 from sound sources such as AUX1 see p 6 item 23 a CD ROM DVD ROM TV AUX1 tuner card or MPEG card Front panel audio connector This is an interface for front 9 pin AUDIO1 panel audio cable that allows see p 6 item 20 convenient connection and control of audio devices System panel connector This connector ...

Page 13: ... CHA_FAN1 connector matching the black see p 6 item 9 wire to the ground pin CPU fan connector Connect the fan cable to the 3 pin CPU_FAN1 connector matching the black see p 6 item 3 wire to the ground pin ATX power connector Connect an ATX power 20 pin ATXPWR1 supply to the connector see p 6 item 1 5V DUMMY DUMMY SPEAKER 1 GND 12V CHA_FAN_SPEED CPU_FAN_SPEED GND 12V ...

Page 14: ...ugh its various sub menus and select among the predetermined choices Because the BIOS software is constantly being updated the following BIOS setup screens and descriptions are for reference purpose only and may not exactly match what you see on your screen 3 1 1 BIOS Menu Bar The top of the screen has a menu bar with the following selections MAIN Sets up the basic system configuration ADVANCED Se...

Page 15: ...r returns to the upper menu from the current menu Moves cursor up or down between fields Selects menu to the left or right Increases or decreases values Enter Brings up a selected menu for a highlighted field F9 Resets the current screen to its Setup Defaults F10 Saves changes and exits Setup 3 2 Main Menu When you enter the BIOS Setup Utility the following screen appears System Date Month Day Yea...

Page 16: ...eads and sectors per track for the drive Before attempting to configure a hard disk drive make sure you have the correct configuration information supplied by the drive manufacturer Incorrect settings may cause the system to fail to recognize the installed hard disk Auto Select Auto to automatically detect hard disk drive If auto detection is successful the BIOS Setup automatically fills in the co...

Page 17: ...apacity as calculated by the BIOS based on the drive information you entered LBA Mode This allows user to select the LBA mode for a hard disk 512 MB under DOS and Windows for Netware and UNIX user select Off to disable the LBA mode Block Mode Set the block mode to On will enhance hard disk performance by reading or writing more data during each transfer Fast Programmed I O Modes This allows user t...

Page 18: ...n the file ASSETUP EXE from the BIN folder in the Support CD to display the menus 4 2 2 Drivers Menu The Drivers Menu shows the available devices drivers if the system detects installed devices Install the necessary drivers to activate the devices 4 2 3 Utilities Menu The Utilities Menu shows the applications software that the motherboard supports Click on a specific item then follow the installat...

Page 19: ...stability CPU Host Frequency This shows current CPU host frequency of the installed motherboard CPU Ratio Selection CPU Ratio is the multiple that times the frontside bus frequency will equal the core speed of the installed processor Whether the option is open or locked is determined by the installed processor SDRAM Frequency If Auto is selected the motherboard detects the memory module s inserted...

Page 20: ...less your PCI expansion cards specifications require other settings Primary Graphics Adapter This allows you to select PCI or AGP as the primary graphics adapter AMIBIOS SETUP UTILITY VERSION 3 31a Advanced AGP Aperture Size USB Controller USB Device Legacy Support Setup Help F1 Help Esc Previous Menu F9 Setup Defaults F10 Save Exit Change Values Enter Select Sub Menu Select Item Chipset Configura...

Page 21: ...Board IDE To enable either the primary IDE channel or the secondary IDE channel set to Disabled will disable the both Configuration options both Disabled Primary Secondary OnBoard LAN Enable or disable onboard LAN feature OnBoard AC 97 Audio Enable or disable onboard AC 97 audio feature OnBoard MC 97 Modem Enable or disable onboard MC 97 modem feature System Hardware Monitor You can check the stat...

Page 22: ...cters combination If you already have a password you must enter your current password first in order to create a new password AMIBIOS SETUP UTILITY VERSION 3 31a Advanced CPU Temperature M B CPU Fan Speed Vcore 3 30V Temperature Chassis Fan Speed 5 00V 12 00V Setup Help F1 Help Esc Previous Menu F9 Setup Defaults F10 Save Exit Change Values Enter Select Sub Menu Select Item System Hardware Monitor...

Page 23: ... Power On Use this to enable or disable Ring in signals to turn on the system from the power soft off mode PCI Devices Power On Use this to enable or disable PCI devices to turn on the system from the power soft off mode PS 2 Keyboard Power On Use this to enable or disable PS 2 keyboard to turn on the system from the power soft off mode RTC Alarm Power On Use this to enable or disable RTC Real Tim...

Page 24: ... exit the BIOS SETUP Uutility AMIBIOS SETUP UTILITY VERSION 3 31a Main Advanced Security Power Boot Exit Quick Boot Mode Boot Up Num Lock Boot To OS 2 Boot Device Priority Setup Help Off No Enter to enable or disable the quick boot mode F1 Help Esc Exit F9 Setup Defaults F10 Save Exit Change Values Enter Select Sub Menu Select Item Select Menu Disabled AMIBIOS SETUP UTILITY VERSION 3 31a Main Adva...

Page 25: ...any changes to the settings Load Default Settings After you enter the submenu the message Load Default Settings will appear If you press Enter it will load the default values for all the setup configuration Discard Changes After you enter the sub menu the message Load setup original values will appear If you press ENTER original values will be restored All changes are discarded ...

Reviews: