background image

English

30

2.7  M.2_SSD (NGFF) Module Installation Guide

The M.2, also known as the Next Generation Form Factor (NGFF), is a small size and 
versatile card edge connector that aims to replace mPCIe and mSATA. The Ultra M.2 
Socket (M2_1) supports SATA3 6.0 Gb/s module and M.2 PCI Express module up to Gen3
x4 (32 Gb/s) (with Summit Ridge, Raven Ridge and Pinnacle Ridge) or Gen3 x2 (16 Gb/s) 
(with A-Series APU).

Installing the M.2_SSD (NGFF) Module

Step 1

Prepare a M.2_SSD (NGFF) module 
and the screw.

2

1

3

A

B

C

Step 2

Depending on the PCB type and 
length of your M.2_SSD (NGFF) 
module, find the corresponding nut 
location to be used.

No.

1

2

3

Nut Location

A

B

C

PCB Length

4.2cm

6cm

8cm

Module Type

Type 2242

Type2260

Type 2280

Summary of Contents for A320M-DVS R3.0

Page 1: ......

Page 2: ...lied including but not limited to the implied warranties or conditions of merchantability or fitness for a particular purpose In no event shall ASRock its directors officers employees or agents be liable for any indirect special incidental or consequential damages including damages for loss of profits loss of business loss of data interruption of business and the like even if ASRock has been advis...

Page 3: ...ds You are also entitled to have the goods repaired or replaced if the goods fail to be of acceptable quality and the failure does not amount to a major failure If you require assistance please call ASRock Tel 886 2 28965588 ext 123 Standard International call charges apply The terms HDMI and HDMI High Definition Multimedia Interface and the HDMI logo are trademarks or registered trademarks of HDM...

Page 4: ...e CPU Fan and Heatsink 13 2 3 Installing Memory Modules DIMM 21 2 4 Expansion Slots PCI Express Slots 24 2 5 Jumpers Setup 25 2 6 Onboard Headers and Connectors 26 2 7 M 2_SSD NGFF Module Installation Guide 30 Chapter 3 Software and Utilities Operation 34 3 1 Installing Drivers 34 3 2 ASRock Live Update APP Shop 35 3 2 1 UI Overview 35 3 2 2 Apps 36 3 2 3 BIOS Drivers 39 3 2 4 Setting 40 ...

Page 5: ...anced Screen 45 4 4 1 CPU Configuration 46 4 4 2 North Bridge Configuration 47 4 4 3 South Bridge Configuration 48 4 4 4 Storage Configuration 49 4 4 5 Super IO Configuration 50 4 4 6 ACPI Configuration 51 4 4 7 Trusted Computing 52 4 5 Tools 53 4 6 Hardware Health Event Monitoring Screen 55 4 7 Security Screen 56 4 8 Boot Screen 57 4 9 Exit Screen 59 ...

Page 6: ...p 1 1 Package Contents ASRock A320M HD Motherboard Micro ATX Form Factor ASRock A320M HD Quick Installation Guide ASRock A320M HD Support CD 2 x Serial ATA SATA Data Cables Optional 1 x I O Panel Shield Because the motherboard specifications and the BIOS software might be updated the content of this manual will be subject to change without notice In case any modifica tions of this manual occur the...

Page 7: ...67 2400 2133 ECC non ECC un buffered memory AMD Ryzen series CPUs Raven Ridge support DDR4 3200 OC 2933 2667 2400 2133 non ECC un buffered memory AMD 7th Gen A Series APUs support DDR4 2400 2133 ECC non ECC un buffered memory For Ryzen Series CPUs Raven Ridge ECC is only supported with PRO CPUs Please refer to Memory Support List on ASRock s website for more information http www asrock com Please ...

Page 8: ...4K x 2K 4096x2160 24Hz 3840x2160 30Hz Supports D Sub with max resolution up to 2048x1536 60Hz Supports Auto Lip Sync Deep Color 12bpc xvYCC and HBR High Bit Rate Audio with HDMI Port Compliant HDMI monitor is required Supports HDCP with HDMI Port Supports Full HD 1080p Blu ray BD playback with HDMI Port Audio 7 1 CH HD Audio Realtek ALC887 Audio Codec To configure 7 1 CH HD Audio it is required to...

Page 9: ...Gen3 x2 16 Gb s with A Series APU Supports NVMe SSD as boot disks Supports ASRock U 2 Kit Connector 1 x Print Port Header 1 x COM Port Header 1 x TPM Header 1 x Chassis Intrusion and Speaker Header 1 x CPU Fan Connector 4 pin 2 x Chassis Fan Connectors 1 x 4 pin 1 x 3 pin The CPU Fan Connector supports the CPU fan of maximum 1A 12W fan power 1 x 24 pin ATX Power Connector 1 x 4 pin 12V Power Conne...

Page 10: ...amage to the components and devices of your system It should be done at your own risk and expense We are not responsible for possible damage caused by overclocking Hardware Monitor CPU Chassis temperature sensing CPU Chassis Fan Tachometer CPU Chassis Quiet Fan CPU Chassis Fan multi speed control CASE OPEN detection Voltage monitoring 12V 5V 3 3V Vcore OS Microsoft Windows 10 64 bit For the update...

Page 11: ...xpress 3 0 1 COM1 3 4 2 9 5 1 LPT1 USB 2 0 T USB1 B USB2 PS2 Keyboard Mouse CMOS Battery 1 M2_1 Ct3 Ct2 Ct1 USB3_5_6 1 CHA_FAN2 HDLED RESET PLED PWRBTN PANEL1 1 SATA3_1 RoHS 16 18 17 11 12 14 13 15 10 19 20 SPK_CI1 1 USB 3 1 Gen1 T USB1 B USB2 Top LINE IN Center FRONT Bottom MIC IN RJ 45 LAN USB 3 1 Gen1 T USB3 B USB4 TPMS1 1 HDMI1 ATX12V 6 7 8 CLRMOS1 1 SATA3_3 SATA3_4 AMD Promontory A320 SOCKET ...

Page 12: ...USB_3_4 7 USB 2 0 Header USB_5_6 8 SATA3 Connector SATA3_3 9 SATA3 Connector SATA3_4 10 SATA3 Connector SATA3_1 11 SATA3 Connector SATA3_2 12 Clear CMOS Jumper CLRCMOS1 13 System Panel Header PANEL1 14 Chassis Intrusion and Speaker Header SPK_CI1 15 Chassis Fan Connector CHA_FAN2 16 Print Port Header LPT1 17 COM Port Header COM1 18 Front Panel Audio Header HD_AUDIO1 19 TPM Header TPMS1 20 Chassis ...

Page 13: ... Description 1 USB 2 0 Ports USB12 6 USB 3 1 Gen1 Ports USB3_34 2 LAN RJ 45 Port 7 USB 3 1 Gen1 Ports USB3_12 3 Line In Light Blue 8 HDMI Port 4 Front Speaker Lime 9 D Sub Port 5 Microphone Pink 10 PS 2 Mouse Keyboard Port 1 2 4 5 6 7 8 9 10 3 ...

Page 14: ... feature through the audio driver Please set Speaker Configuration to 7 1 Speaker in the Realtek HD Audio Manager Function of the Audio Ports in 7 1 channel Configuration Port Function Light Blue Rear panel Rear Speaker Out Lime Rear panel Front Speaker Out Pink Rear panel Central Subwoofer Speaker Out Lime Front panel Side Speaker Out ...

Page 15: ...al injuries to you and damages to motherboard components In order to avoid damage from static electricity to the motherboard s components NEVER place your motherboard directly on a carpet Also remember to use a grounded wrist strap or touch a safety grounded object before you handle the components Hold components by the edges and do not touch the ICs Whenever you uninstall any components place the...

Page 16: ...A320M HD 11 English 2 1 Installing the CPU Unplug all power cables before installing the CPU 2 1 ...

Page 17: ...English 12 3 ...

Page 18: ... and cooling fan to dissipate heat You also need to spray thermal grease between the CPU and the heatsink to improve heat dissipation Make sure that the CPU and the heatsink are securely fastened and in good contact with each other Installing the CPU Box Cooler SR1 Please turn off the power or remove the power cord before changing a CPU or heatsink 1 2 ...

Page 19: ...English 14 3 4 C P U _ F A N 1 4 pin FAN cable ...

Page 20: ...A320M HD 15 English Installing the AM4 Box Cooler SR2 1 2 ...

Page 21: ...English 16 3 ...

Page 22: ...A320M HD 17 English 4 pin FAN cable 4 C P U _ F A N 1 ...

Page 23: ...English 18 Installing the AM4 Box Cooler SR3 1 2 ...

Page 24: ...A320M HD 19 English 3 4 ...

Page 25: ...terface to the LED control board on the SR3 it requires the AMD utility SR3 Settings Software to control the LED The diagram shown here are for reference only Please refer to page 28 for the orientation of USB Header C P U _ F A N 1 6 U S B 4 pin FAN cable USB 2 0 Header ...

Page 26: ... always need to install identical the same brand speed size and chip type DDR4 DIMM pairs 2 It is unable to activate Dual Channel Memory Technology with only one memory module installed 3 It is not allowed to install a DDR DDR2 or DDR3 memory module into a DDR4 slot otherwise this motherboard and DIMM may be damaged UDIMM Memory Slot Frequency Mhz A1 B1 SR 2400 SR 2400 DR 2400 DR 2400 SR SR 2400 D...

Page 27: ...e rank DIMM 1Rx4 or 1Rx8 on DIMM module label DR Dual rank DIMM 2Rx4 or 2Rx8 on DIMM module label UDIMM Memory Slot Frequency Mhz A1 B1 SR 2667 SR 2667 DR 2667 DR 2667 SR SR 2667 DR DR 2667 UDIMM Memory Slot Frequency Mhz A1 B1 SR 2933 SR 2933 DR 2667 DR 2667 SR SR 2667 DR DR 2400 ...

Page 28: ...A320M HD 23 English 1 2 3 The DIMM only fits in one correct orientation It will cause permanent damage to the motherboard and the DIMM if you force the DIMM into the slot at incorrect orientation ...

Page 29: ... sure that the power supply is switched off or the power cord is unplugged Please read the documentation of the expansion card and make necessary hardware settings for the card before you start the installation CPU PCIE2 Ryzen series CPUs Pinnacle Ridge x16 Ryzen series CPUs Summit Ridge x16 Ryzen series CPUs Raven Ridge x8 Athlon 200GE APU x4 7th A Series APUs x8 For a better thermal environment ...

Page 30: ...the computer and unplug the power cord from the power supply After waiting for 15 seconds use a jumper cap to short pin2 and pin3 on CLRCMOS1 for 5 seconds However please do not clear the CMOS right after you update the BIOS If you need to clear the CMOS when you just finish updating the BIOS you must boot up the system first and then shut it down before you do the clear CMOS action Please be note...

Page 31: ...s front panel The LED is on when the system is operating The LED keeps blinking when the system is in S3 sleep state The LED is off when the system is in S4 sleep state or powered off S5 HDLED Hard Drive Activity LED Connect to the hard drive activity LED on the chassis front panel The LED is on when the hard drive is reading or writing data The front panel design may differ by chassis A front pan...

Page 32: ...his motherboard Each USB 2 0 header can support two ports USB 3 1 Gen1 Header 19 pin USB3_5_6 see p 6 No 5 Besides four USB 3 1 Gen1 ports on the I O panel there is one header on this motherboard Each USB 3 1 Gen1 header can support two ports Front Panel Audio Header 9 pin HD_AUDIO1 see p 6 No 18 This header is for connecting audio devices to the front audio panel SATA3_3 SATA3_4 SATA3_2 SATA3_1 D...

Page 33: ...te the front mic go to the FrontMic Tab in the Realtek Control panel and adjust Recording Volume Chassis Fan Connector 4 pin CHA_FAN1 see p 6 No 20 3 pin CHA_FAN2 see p 6 No 15 Please connect fan cables to the fan connectors and match the black wire to the ground pin CPU Fan Connector 4 pin CPU_FAN1 see p 6 No 2 This motherboard pro vides a 4 Pin CPU fan Quiet Fan connector If you plan to connect ...

Page 34: ...odule TPM system which can securely store keys digital certificates passwords and data A TPM system also helps enhance network security protects digital identities and ensures platform integrity Print Port Header 25 pin LPT1 see p 6 No 16 This is an interface for print port cable that allows convenient connection of printer devices CCTS 1 RRTS 1 DDSR 1 DDTR 1 RRXD1 GND TTXD1 DDCD 1 1 RRI 1 PCIRST ...

Page 35: ...module and M 2 PCI Express module up to Gen3 x4 32 Gb s with Summit Ridge Raven Ridge and Pinnacle Ridge or Gen3 x2 16 Gb s with A Series APU Installing the M 2_SSD NGFF Module Step 1 Prepare a M 2_SSD NGFF module and the screw 2 1 3 A B C Step 2 Depending on the PCB type and length of your M 2_SSD NGFF module find the corresponding nut location to be used No 1 2 3 Nut Location A B C PCB Length 4 ...

Page 36: ... if you are going to use the default nut Otherwise release the standoff by hand A B C Step 4 Peel off the yellow protective film on the nut to be used Hand tighten the standoff into the desired nut location on the motherboard A B C A B C 20o Step 5 Align and gently insert the M 2 NGFF SSD module into the M 2 slot Please be aware that the M 2 NGFF SSD module only fits in one orientation ...

Page 37: ...English 32 NUT1 NUT2 C Step 6 Tighten the screw with a screwdriver to secure the module into place Please do not overtighten the screw as this might damage the module ...

Page 38: ... ADATA SATA ADATA AXNS381E 128GM B Crucial SATA Crucial CT240M500SSD4 240GB ezlink SATA ezlink P51B 80 120GB Intel SATA INTEL 540S SSDSCKKW240H6 240GB Kingston SATA Kingston SM2280S3G2 120G Win8 1 Kingston SATA Kingston RBU SNS8400S3 180GD LITEON SATA LITEON LJH 256V2G 256GB 2260 PLEXTOR SATA PLEXTOR PX 128M6G 2260 128GB PLEXTOR SATA PLEXTOR PX 128M7VG 128GB SanDisk SATA SanDisk X400 SD8SN8U 128G ...

Page 39: ... computer If the Main Menu does not appear automatically locate and double click on the file ASRSETUP EXE in the Support CD to display the menu Drivers Menu The drivers compatible to your system will be auto detected and listed on the support CD driver page Please click Install All or follow the order from top to bottom to install those required drivers Therefore the drivers you install can work p...

Page 40: ...e APP Shop utility You need to be connected to the Internet to download apps from the ASRock Live Update APP Shop 3 2 1 UI Overview Category Panel The category panel contains several category tabs or buttons that when selected the information panel below displays the relative information Information Panel The information panel in the center displays data about the currently selected category and a...

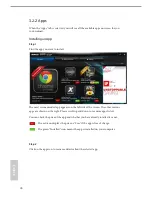
Page 41: ...he left side of the screen The other various apps are shown on the right Please scroll up and down to see more apps listed You can check the price of the app and whether you have already intalled it or not The red icon displays the price or Free if the app is free of charge The green Installed icon means the app is installed on your computer Step 2 Click on the app icon to see more details about t...

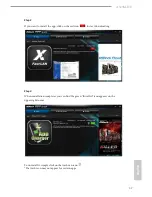
Page 42: ...e app click on the red icon to start downloading Step 4 When installation completes you can find the green Installed icon appears on the upper right corner To uninstall it simply click on the trash can icon The trash icon may not appear for certain apps ...

Page 43: ...ps you have already installed When there is an available new version for your app you will find the mark of New Version appears below the installed app icon Step 1 Click on the app icon to see more details Step 2 Click on the yellow icon to start upgrading ...

Page 44: ...ted you will see a list of recommended or critical updates for the BIOS or drivers Please update them all soon Step 1 Please check the item information before update Click on to see more details Step 2 Click to select one or more items you want to update Step 3 Click Update to start the update process ...

Page 45: ...English 40 3 2 4 Setting In the Setting page you can change the language select the server location and determine if you want to automatically run the ASRock Live Update APP Shop on Windows startup ...

Page 46: ... may also restart by turning the system off and then back on 4 1 1 UEFI Menu Bar The top of the screen has a menu bar with the following selections Main For setting system time date information OC Tweaker For overclocking configurations Advanced For advanced system configurations Tool Useful tools H W Monitor Displays current hardware status Boot For configuring boot settings and boot priority Sec...

Page 47: ...scriptions of each navigation key Navigation Key s Description To change option for the selected items Tab Switch to next function PGUP Go to the previous page PGDN Go to the next page HOME Go to the top of the screen END Go to the bottom of the screen F1 To display the General Help Screen F7 Discard changes and exit the SETUP UTILITY F9 Load optimal default values for all the settings F10 Save ch...

Page 48: ...A320M HD 43 English 4 2 Main Screen When you enter the UEFI SETUP UTILITY the Main screen will appear and display the system overview ...

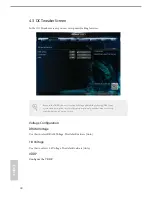
Page 49: ...is to select DRAM Voltage The default value is Auto 1 8 Voltage Use this to select 1 8 Voltage The default value is Auto VDDP Configure the VDDP Because the UEFI software is constantly being updated the following UEFI setup screens and descriptions are for reference purpose only and they may not exactly match what you see on your screen ...

Page 50: ...ng UEFI Configuration Active Page on Entry Select the default page when entering the UEFI setup utility Full HD UEFI When Auto is selected the resolution will be set to 1920 x 1080 if the monitor supports Full HD resolution If the monitor does not support Full HD resolution then the resolution will be set to 1024 x 768 When Disable is selected the resolution will be set to 1024 x 768 directly Sett...

Page 51: ...ltage and memory frequency and lead to system stability or compatibility issue with some memory modules or power supplies Please set this item to Disable if above issue occurs AMD fTPM Switch Use this to enable or disable AMD CPU fTPM SVM Mode When this option is set to Enabled a VMM Virtual Machine Architecture can utilize the additional hardware capabilities provided by AMD V The default value i...

Page 52: ...h Bridge Configuration IOMMU Use this to enable or disable IOMMU The default value of this feature is Disabled Share Memory Configure the size of memory that is allocated to the integrated graphics processor when the system boots up ...

Page 53: ...card is installed Front Panel Enable disable front panel HD audio Deep Sleep Configure deep sleep mode for power saving when the computer is shut down Restore on AC Power Loss Select the power state after a power failure If Power Off is selected the power will remain off when the power recovers If Power On is selected the system will start to boot up when the power recovers ...

Page 54: ... 49 English 4 4 4 Storage Configuration SATA Controller s Enable disable the SATA controllers SATA Mode AHCI Supports new features that improve performance RAID Combine multiple disk drives into a logical unit ...

Page 55: ...al Port Address Select the address of the Serial port Parallel Port Enable or disable the Parallel port Change Settings Select the address of the Parallel port Device Mode Select the device mode according to your connected device PS2 Y Cable Enable the PS2 Y Cable or set this option to Auto ...

Page 56: ...nt Timer for better performance and to pass WHQL tests PS 2 Keyboard Power On Allow the system to be waked up by a PS 2 Keyboard PCIE Devices Power On Allow the system to be waked up by a PCIE device and enable wake on LAN RTC Alarm Power On Allow the system to be waked up by the real time clock alarm Set it to By OS to let it be handled by your operating system ...

Page 57: ...English 52 4 4 7 Trusted Computing Security Device Support Enable to activate Trusted Platform Module TPM security for your hard disk drives ...

Page 58: ... the operating system in RAID mode Instant Flash Save UEFI files in your USB storage device and run Instant Flash to update your UEFI Internet Flash DHCP Auto IP Auto ASRock Internet Flash downloads and updates the latest UEFI firmware version from our servers for you Please setup network configuration before using Internet Flash For BIOS backup and recovery purpose it is recommended to plug in yo...

Page 59: ...Configuration Use this to configure internet connection settings for Internet Flash Internet Setting Enable or disable sound effects in the setup utility UEFI Download Server Select a server to download the UEFI firmware ...

Page 60: ... assign a respective fan speed for each temperature Chassis Fan 1 Setting Select a fan mode for Chassis Fan 1 or choose Customize to set 5 CPU temperatures and assign a respective fan speed for each temperature Chassis Fan 1 Temp Source Select a fan temperature source for Chassis Fan 1 Over Temperature Protection When Over Temperature Protection is enabled the system automatically shuts down when ...

Page 61: ...rd for the administrator account Only the administrator has authority to change the settings in the UEFI Setup Utility Leave it blank and press enter to remove the password User Password Set or change the password for the user account Users are unable to change the settings in the UEFI Setup Utility Leave it blank and press enter to remove the password Secure Boot Enable to support Secure Boot ...

Page 62: ...ice Boot From Onboard LAN Allow the system to be waked up by the onboard LAN Setup Prompt Timeout Configure the number of seconds to wait for the setup hot key Bootup Num Lock Select whether Num Lock should be turned on or off when the system boots up Boot Beep Select whether the Boot Beep should be turned on or off when the system boots up Please note that a buzzer is needed Full Screen Logo Enab...

Page 63: ... ROM only Select Legacy only to run those that support legacy option ROM only Select Do not launch to not execute both legacy and UEFI option ROM Launch Storage OpROM Policy Select UEFI only to run those that support UEFI option ROM only Select Legacy only to run those that support legacy option ROM only Select Do not launch to not execute both legacy and UEFI option ROM Launch Video OpROM Policy ...

Page 64: ...ption the following message Discard changes and exit setup will pop out Select OK to exit the UEFI SETUP UTILITY without saving any changes Discard Changes When you select this option the following message Discard changes will pop out Select OK to discard all changes Load UEFI Defaults Load UEFI default values for all options The F9 key can be used for this operation Launch EFI Shell from filesyst...

Page 65: ...mation For technical questions please submit a support request form at https event asrock com tsd asp ASRock Incorporation 2F No 37 Sec 2 Jhongyang S Rd Beitou District Taipei City 112 Taiwan R O C ASRock EUROPE B V Bijsterhuizen 11 11 6546 AR Nijmegen The Netherlands Phone 31 24 345 44 33 Fax 31 24 345 44 38 ASRock America Inc 13848 Magnolia Ave Chino CA91710 U S A Phone 1 909 590 8308 Fax 1 909 ...

Page 66: ... Number Conforms to the following specifications FCCPart15 SubpartB Unintentional Radiators Supplementary Information This device complies with part 15 of the FCC Rules Operation is subject to the following two conditions 1 This device may not cause harmful interference and 2 this device must accept any interference received including interference thatmaycauseundesiredoperation Representative Pers...

Page 67: ...111 6546 AR Nijmegen The Netherlands Company Address Person responsible for making this declaration Name Surname A V P Position Title October 18 2017 Date P N 15G0620640M0AK V1 0 EMC Directive 2014 30 EU from April 20th 2016 EN 55022 2010 AC 2011 Class B EN 55024 2010 A1 2015 ڛ EN 55032 2012 AC 2013 Class B ڛ ڛ EN 61000 3 3 2013 ڛ EN 61000 3 2 2014 ڛ LVD Directive 2014 35 EU fromApril 20th 2016 EN...

Reviews: