10
11
CHAIR ASSEMBLY:
ATTACHING THE
CHAIR WINGS TO THE CHAIRBACK
1.
Slide the metal inserts on the chair’s
wings into the metal sleeves on the
side of the chair back
2.
Slide the wings down until
they are completely set on the
back’s metal sleeves
5. ASSEMBLY/DISASSEMBLY
CORD AND TRANSFORMER CONNECTIONS
Once the box has been removed from around the chair, you’ll notice the back is resting on top of
the seat. There are a couple of items to remove from the seat portion of the chair first.
Follow the steps below:
1. Remove the zip tie holding the plastic bag with the Power Transformer, hand control and its
cord on the left
2. Remove the hand control from the plastic bag and connect it to the female plug located in
the left side pocket on the outside of the chair’s arm
3. Connect the Power Transformer to the plug coming from the chair
4. Connect the Power Cord into the Power Transformer
5. Connect the Power Cord into an electrical outlet, near where the chair will be positioned
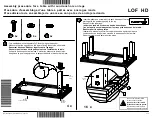
CHAIR ASSEMBLY:
ATTACHING THE CHAIR BACK TO THE CHAIR BASE
CAUTION
: PLEASE READ ALL INSTRUCTIONS CAREFULLY BEFORE STARTING ASSEMBLY
PROCESS. IT IS RECOMMENDED TO USE TWO PEOPLE WHEN ASSEMBLING AND REMOVING
THE INSIDE BACKS TO AND FROM THE BASE OF THE FURNITURE.
1. Slide inside back receivers onto the steel mechanism posts in the base of the chair
(Figure A)
2. Press both sides of the back firmly into place until the back automatically locks into place
3. To remove the back from the base, use a screwdriver pressing outward on the black tab in
the metal receivers on both sides of the chair back and lift the back from the base of the
chair
(Figure B)
4. Connect the Headrest and Lumbar cable plugs
(Figure C).
Headrest-only models feature one
less set of cables