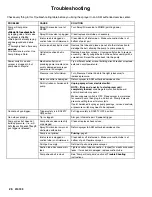
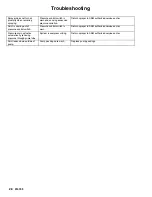
ASM 248772 A series Operating Instruction Download Page 27

27

310749

Troubleshooting

PROBLEM

CAUSE

SOLUTION

Pump cycles but paint only
dribbles or spurts when
trigger is pulled

Pressure is set too low.

Turn Pressure Control Knob to the right (clockwise) to
increase pressure.

trigger is pulled.

Tip is clogged.

Clear tip.  See your gun manual.

Spray tip is too large or worn.

Replace tip.

Pressure is set at maximum,
but cannot achieve a good
spra pattern

Extension cord is too long or
not a heavy enough gauge.

Replace extension cord.

g

spray pattern.

Tip is too large for sprayer.

Select a smaller tip.

Tip is worn beyond capability
of sprayer.

Replace tip.

Inlet screen is clogged.

Clean debris off inlet screen.

Pump valves are worn.

Check for worn pump valves as follows: Prime sprayer with
paint.  See 

Priming,

 page 9

.

 Trigger gun momentarily. When

trigger is released, pump should cycle momentarily and stop. If
pump continues to cycle, pump valves may be worn.  Replace
check valves.

When paint is sprayed, it runs
down the wall or sags

Coat is going on too thick.

Move gun faster.

down the wall or sags.

Choose tip with smaller hole size.

Choose tip with wider fan.

Make sure gun is far enough from surface.

When paint is sprayed, coat is
not covering

Coat is going on too thin.

Move gun slower.

not covering.

Choose tip with larger hole size.

Choose tip with narrower fan.

Make sure gun is close enough to surface.

Motor is hot and runs
intermittently

Vent holes in shroud are
plugged or sprayer is

Keep vent holes in shroud clear of obstructions and overspray,
and keep sprayer open to air

intermittently.

NOTE:

 This is a thermal

plugged, or sprayer is
covered.

and keep sprayer open to air.

NOTE:

 This is a thermal

overload condition. Motor will
automatically shut off due to
excessive heat.

Extension cord is too long or
not a heavy enough gauge.

Replace extension cord.

excessive heat.

See 

Startup Hazard After

Thermal Overload, 

page 2.

Damage can occur if cause is

Unregulated electrical
generator being used has
excessive voltage.

Use electrical generator with a proper voltage regulator.
Sprayer requires a 120V AC, 60 Hz, 1500-Watt generator.

Damage can occur if cause is
not corrected.

Sprayer was operated at high
pressure with small tip, which
caused frequent motor starts
and excessive heat build up.

Decrease pressure setting, or increase tip size.

Building circuit breaker opens
after sprayer operates for 5 to
10 minutes

Too many appliances are
plugged in on same circuit.

Free up circuit (unplug things), or use a less busy circuit.

10 minutes.

OR

Building circuit breaker opens
as soon as sprayer is plugged

Extension cord is damaged or
too long or not a heavy
enough gauge.

D

Plug in something that you know is working to test
extension cord.

D

Replace extension cord.

as soon as sprayer is plugged
into outlet, and sprayer is
turned on.

Sprayer power cord is
damaged.

Check for broken insulation or wires. Replace power cord if
damaged.

Fan pattern varies
dramatically while spraying or
sprayer does not turn on
promptly when resuming
spraying.

Pressure control switch is
worn and causing excessive
pressure variation.

Return sprayer to ASM authorized service center.

Spray comes out of gun in
two thick streams.

Reversible tip is in CLEAN
position.

Rotate arrow–shaped handle on tip so it points forward.

Summary of Contents for 248772 A series

Page 1: ...ctural paints and coatings Specifications page 2 ti3587B Important Safety Instructions Read all warnings and instructions in this manual Save these instructions Use water based or mineral spirit type material only Do not use materials having flash points lower than 70_ 21_ For information about your material request MSDS from distributor or retailer ...

Page 2: ...ayer at least 20 ft 6 m away from explosive vapors D Keep work area free of debris including solvent rags and gasoline D Do not plug or unplug power cords or turn lights on or off when flammable fumes are present D Ground equipment and conductive objects in work area Read Grounding instructions D If there is static sparking or you feel a shock stop operating immediately Do not use equip ment until...

Page 3: ...igued or under the influence of drugs or alcohol D Comply with all applicable safety regulations PRESSURIZED ALUMINUM PARTS HAZARD Do not use 1 1 1 trichloroethane methylene chloride other halogenated hydrocarbon solvents or fluids containing such solvents in this equipment Such use could result in a serious chemical reaction with the possibility of explosion which could cause death serious injury...

Page 4: ... sprayer performance Grounding and Electric Requirements D Ground sprayer gun through connection to a properly grounded fluid hose and pump D Ground fluid supply container Fol low local code D Ground solvent pails used when flush ing Follow local code Use only conduc tive metal pails placed on a grounded surface such as concrete Do not place the pail on a non conductive surface such as paper or ca...

Page 5: ...y when flushing or relieving pressure by holding metal part of spray gun firmly to side of a grounded metal pail then trigger gun Grounding and Electric Requirements Thermal Overload D Motor has a thermal overload switch to shut itself down if overheated ti5851a To reduce risk of injury from motor staring unexpectedly when it cools always turn power switch OFF if motor shuts down ...

Page 6: ...eave Spray Prime Drain valve in PRIME DRAIN position until you are ready to spray again D If you suspect the spray tip is clogged or that pressure has not been fully relieved after follow ing the above steps VERY SLOWLY loosen tip guard retaining nut or hose end coupling to relieve pressure gradually Then loosen com pletely Clear hose or tip obstruction Follow Pressure Relief Procedure when you st...

Page 7: ...7 310749 Gun Power Switch Pressure Control Knob Component Identification Suction Tube Inlet Screen Spray Prime Valve Prime drain position Paint position Prime Tube Fluid Outlet Fitting ...

Page 8: ... end of grounded fluid hose to Gun Use a wrench to tighten Setup 7 Connect other end of hose to sprayer fluid outlet fitting Use a wrench to tighten 8 Turn pressure control knob all the way left counterclockwise to minimum pressure ti3586a ti3586B ...

Page 9: ...Place prime tube in waste pail 4 If spraying oil based materials submerge suc tion tube in mineral spirits or compatible oil based cleaning solution If spraying water based materials submerge suction tube in water PRIME WASTE 5 Plug sprayer into grounded outlet 6 Point Gun into waste pail Mineral Spirits WATER OR WASTE prime tube suction tube ...

Page 10: ...urn power switch ON 8 Turn up pressure control knob until pump starts 30 to 60 seconds WASTE 9 Allow fluid to flow out of prime tube into waste pail for 30 to 60 seconds 10 Turn power switch OFF 11 Submerge suction tube in paint 12 Turn power switch ON PAINT ...

Page 11: ...ring pump in water inadequate flushing or ingested debris can cause either of the pump s two check valves to malfunction If the pump does not prime after 30 seconds try to jar the check balls loose by tapping the inlet valve with a small wrench as the sprayer is on and running HINT To determine if the inlet valve ball is sticking unscrew inlet valve from pump and check it If sprayer continues to c...

Page 12: ... tube larger NOTE To spray water based materials after spraying oil based materials follow the procedure outlined below using water instead of mineral spirits to flush system 3 Place prime tube in waste pail 4 Submerge suction tube in mineral spirits 5 Plug sprayer into grounded outlet 6 Point Gun into waste pail PRIME WASTE Mineral Spirits prime tube suction tube WASTE ...

Page 13: ...raying Water Based Materials 7 Turn power switch ON 8 Turn up pressure control knob until pump starts 9 Allow fluid to flow out of prime tube into waste pail for 30 to 60 seconds 10 Turn power switch OFF 11 Submerge suction tube in paint 30 to 60 seconds WASTE PAINT ...

Page 14: ...old gun trigger and turn Spray Prime valve to spray When paint comes out of gun release trigger NOTE The motor stopping indicates the pump and hose are primed with paint 14 Transfer prime tube to paint pail pull and hold trigger paint Release trigger SPRAY WASTE ti3586a ti3586a NOTE If pump does not prime after 30 seconds see Pump Check Valves page 7 prime tube suction tube ...

Page 15: ...ase parts in order shown 3 Screw tip and base assembly on gun and tighten nut by hand 9600B Tip must be pushed all the way into base Base Tip Retaining nut Point the arrow shaped handle on the Uni tip forward to SPRAY and backward to UNCLOG obstructions UNCLOG arrow points backward SPRAY arrow points forward SAFETY ON Put trigger safety lever in SAFETY ON position before you rotate arrow shaped ha...

Page 16: ... 254 mm 0 015 in 0 38 mm 69 515 10 to 12 in 254 to 305 mm 0 015 in 0 38 mm 69 417 8 to 10 in 203 to 254 mm 0 017 in 0 43 mm 69 517 10 to 12 in 254 to 305 mm 0 017 in 0 43 mm 69 519 10 to 12 in 254 to 305 mm 0 019 in 0 48 mm 69 619 12 to 14 in 305 to 356 mm 0 019 in 0 48 mm Example For an 8 to 10 in 203 to 254 mm fan width and a 0 013 in 0 33 mm hole size order Part No 69 413 Using the Right Tip fo...

Page 17: ...ontain information about the hole size and about the fan width on the surface when the gun is held 12 in 30 5 cm from the surface being sprayed First digit when doubled approximate fan width Last two digits tip hole size in thousands of an inch 413 tip has a 0 013 in hole size 413 tip has 8 to 10 in fan width ...

Page 18: ...p Wear good spray pattern pressure too low gaps at edges Getting Started with Basic Techniques D Hold gun 12 in 30 cm from surface and aim straight at surface Tilting gun to direct spray angle causes an un even finish 12 in 30 cm even finish thin uneven finish thick D Flex wrist to keep gun pointed straight Fanning gun to direct spray at angle causes uneven finish Triggering Gun D Pull trigger aft...

Page 19: ...cted in this section Pail Flushing For flushing after spraying non water solvent coat ings with compatible flushing fluid For water based coatings see Zip Flushing page 21 4 Remove suction tube from paint pail and allow it to drain into paint pail for a few minutes Then sub merge it in flushing fluid For flushing water based materials follow Zip Flush procedure page 16 5 Place prime tube in waste ...

Page 20: ... power switch ON and slowly align arrow on sprayer with bucket symbol on Pressure Control knob until pump starts Continue flushing until about 1 3 of flushing fluid is gone from flushing fluid pail 10 Turn power switch OFF 11 Turn Spray Prime valve to SPRAY WASTE 12 Trigger gun into paint pail 13 Turn power switch ON Continue to trigger gun and flush sprayer until all the flushing fluid is gone fr...

Page 21: ...sh attachment garden hose open closed Zip Flush close WASTE inlet screen Cleanup ZIP Flush Flushing After Spraying Water based Paint 4 Unscrew inlet screen from suction tube and place in waste pail Zip Flush garden hose Suction tube 5 Connect garden hose to suction tube with Zip Flush at tachment Leave prime tube in waste pail ...

Page 22: ... hose 7 Align arrow on sprayer with bucket symbol on Pressure Knob open 8 Turn power switch ON Cleanup ZIP Flush Flushing After Spraying Water based Paint 9 Remove tip and base assembly from gun and place in flushing pail Trigger gun 10 Turn Spray Prime Valve to SPRAY ...

Page 23: ...leanup ZIP Flush Flushing After Spraying Water based Paint 12 Turn Spray Prime Valve to PRIME 20 SEC WASTE 13 Let water flow through sprayer into waste pail for 20 seconds 14 Turn Power Switch OFF closed 15 Close Zip Flush attachment Turn off garden hose 16 Unscrew Zip Flush attachment from suction hose ...

Page 24: ...orage fluids ASM Pump Life Pump Shield Pump Defender 1 Place suction tube in storage fluid bottle and prime tube in waste pail 2 Turn Prime Spray valve to PRIME 3 Turn Pressure Control knob all the way left counterclockwise to minimum pressure Storage Filling the Sprayer with Storage Fluid WASTE prime tube suction tube 4 Turn power switch ON ...

Page 25: ...ol knob 6 When storage fluid comes out of prime tube in 5 10 seconds turn power switch OFF Storage Filling the Sprayer with Storage Fluid watch for storage fluid from prime tube in 5 to 10 seconds 7 Turn Spray Prime valve to SPRAY to keep storage fluid in sprayer during storage WASTE ...

Page 26: ...re is set at minimum Turn Pressure Control Knob to the right clockwise to increase pressure Motor or control is damaged Return sprayer to ASM authorized service center Paint is frozen or hardened in pump Unplug sprayer from electrical outlet NOTE If frozen do not try to start sprayer until completely thawed or damage to motor control board and or drivetrain may occur Make sure power switch is OFF ...

Page 27: ...r intermittently NOTE This is a thermal plugged or sprayer is covered and keep sprayer open to air NOTE This is a thermal overload condition Motor will automatically shut off due to excessive heat Extension cord is too long or not a heavy enough gauge Replace extension cord excessive heat See Startup Hazard After Thermal Overload page 2 Damage can occur if cause is Unregulated electrical generator...

Page 28: ...uthorized service center Paint is coming out of pressure control switch Pressure control switch is worn Return sprayer to ASM authorized service center Pressure drain actuates automatically relieving pressure through prime tube System is overpressurizing Return sprayer to ASM authorized service center Paint leaks down outside of pump Pump packings are worn Replace pump packings ...

Page 29: ...29 310749 Notes ...

Page 30: ... 1 42 248798 KIT cover housing includes 3 labels 2 dowel pins 2 bushings 1 Ref No Part No Description Qty 44 245149 KIT gear includes two gears and connecting rod 1 50 245078 KIT pump repair 1 51 245079 KIT control board 1 52 245080 KIT motor repair 1 53 245076 KIT outlet valve 1 54 245077 KIT inlet valve 1 55 116295 CLAMP spring 88 diameter 1 56 115478 SCREW machine pan head 2 57 196594 CORD powe...

Page 31: ...31 310749 ti2080a 42 53 31 64 13 12 13 3 2 6 63 23 52 5 51 63 7 57 41 60 9 54 55 61 62 1 Apply light coat of lithium based grease 30 32 38 4 1 56 8 70 58 50 1 44 ...

Page 32: ...unf Electric motor 3 8 hp 7 0 Amp open frame universal Sprayer weight only 15 lb 7 kg Dimensions Length 14 9 in 37 8 cm Width 15 0 in 38 1 cm Height 15 6 in 39 6 cm Wetted parts sprayer stainless steel brass ultra high molecular weight polyethylene UHMWPE leather carbide nylon aluminum PVC polypropylene fluroelastomer Inlet Screen on Suction Tube 35 mesh 450 microns Maximum material temperature 12...

Page 33: ...33 310749 Notes ...

Page 34: ...ES EXPRESS OR IMPLIED INCLUDING BUT NOT LIMITED TO WARRANTY OF MERCHANTABILITY OR WARRANTY OF FITNESS FOR A PARTICULAR PURPOSE ASM s sole obligation and buyer s sole remedy for any breach of warranty shall be as set forth above The buyer agrees that no other remedy including but not limited to incidental or consequential damages for lost profits lost sales injury to person or property or any other...

Reviews: