50
Preparation for Work - 3
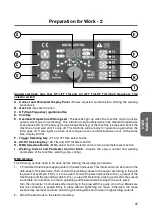
3- Connect the work clamp to a clean place on the work piece free of paint or rust with the jaws in
complete contact.
4- Insert the input cable to a suitable mains supply.
5- Perform the following checks before starting the welding procedure:
a- Make sure that the welding machine is grounded securely.
b- Make sure that all contact surfaces, especially the contact between the work clamp and work
piece are well secured.
c- Check that the welding cables are attached correctly.
d- The particles and sparks splashing around while welding may cause a fire. Therefore, make
sure that no flammable materials are present in the welding area.
6- Turn on the On/Off switch (7).
7- Press “
MMA selection switch
” to adjust MMA mode. In MMA mode, only welding current,
hotstart and arc force parameters can be adjusted. By pressing MMA selection switch you can
select between arc force, hotstart and welding current parameters. When the related parameter
led is lit, parameter can be set by adjusting “
Welding Current and Parameter Control Knob
.
8- Adjust the proper welding current to be found from the electrode data sheet according to the
electrode diameter, type and welding position with the “Welding Current Control Knob (I)”. In
general, the welding current should be between the values indicated below. However, adjusting
your settings according to the values setout in the catalog of the welding electrode manufacturer
recommendations would be more appropriate.
This welding machine is designed for 2.50 and 3.25 mm diameter welding electrodes with
rutile and basic coating used for light welding operations.
Current range for rutile and basic electrodes:
Ø 2.5 mm : 70 - 100 A Ø 3.2 mm : 100 - 140 A
9- Start welding observing the welding rules.
TIG (GTAW) Welding :
The following actions need to be done before starting the welding procedures:
1- The TIG welding is generally carried out using the DC (–) pole. Connect the torch cable to the
(–) output of the machine (3) and the grounding clamp to the (+) output (4). Turn the connecter
¼ turn clockwise after inserting in the plug with the guide pin on top. Attach the TIG torch gas
hose to the TIG torch gas hose socket (2). Make the connection between the gas cylinder
regulator and the gas hose connection socket (6). Connect the TIG torch trigger connector to
the TIG torch trigger plug (5) on the front panel of the machine.
2- Connect the work clamp to a clean place on the work piece free of paint or rust with the jaws
incomplete contact.
3- Insert the mains cable to a suitable outlet.
4- Perform the following checks before starting the welding procedure:
a- Make sure that the welding machine is grounded securely.
b- Make sure that all contact surfaces, especially the contact between the clamp at the end of
the chassis cable and the work piece, are well secured.
c- Check that the welding cables are attached correctly.
d- The particles and sparks splashing around while Welding may cause a fire. Therefore,
makesure that no flammable materials are present in the welding area.
5- Turn on the On/Off switch (7).
U
S
E
R
MAN
U
AL
Summary of Contents for Inverter 205-TIG AC/DC
Page 2: ......
Page 38: ...36 KULLANIM KILAVUZU ...


