Tighten the grinder.
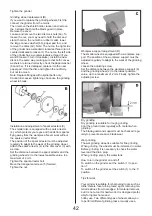
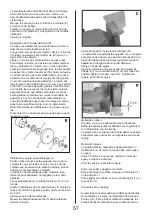
Grinding wheel replacement (B)
If you want to replace the grinding wheels, first dis
-
connect the grinder from the mains.
Then remove the shield holder, loosen and remove
the 3 screws that hold the blade guard in place.
Remove the cover.
Loosen and remove the two disc lock nuts (ba). To
loosen the nut, you may need to hold the disc and
slam it hard on the nut with a rubber mallet, lower
the large convex washer (bb), paper pad (bc), and
remove the discs (bd). Note: The nut on the right side
of the grinder has a standard clockwise thread (turn it
counterclockwise to loosen it). The nut on the left side
of the grinder has a counterclockwise thread (if you
want to loosen it, turn it clockwise). Install the new
discs in the same way, making sure that both convex
washers are turned correctly, check the paper washer
(bc and be). If it is damaged, replace it with a new
paper pad. Hold the disc and tighten the nut firmly,
but not too much.
Note: Replace flanges with original parts only.
Caution: Excessive tightening can cause the grinding
wheel to break.
Installation and adjustment of spark arresters (C)
The smaller disc is equipped with a spark arrestor
(4), which protects your eyes and hands from sparks
flying away from the workpiece. Never work without
the spark arrestor fitted.
The position of the spark arrestor must be adjusted
regularly to adapt to the wear of the grinding wheel.
Attach the spark arrestor (4) to the disc cover (3) with
a screw.
Set the distance between the spark arrestor and the
grinding wheel (2) to the lowest possible value, to a
maximum of 2 mm.
Tighten the spark arrestor bolt.
Move the transparent screen (5) forward.
Tighten the nut.
Workpiece support adjustment (D)
The smaller wheel is equipped with a workpiece sup
-
port. The position of the workpiece support must be
adjusted regularly to adapt to the wear of the grinding
wheel.
Loosen the adjusting screw.
Set the distance between the workpiece support (6)
and the grinding wheel (2) to the lowest possible
value, up to a maximum of 2 mm. Finally, tighten the
adjusting screw.
Dry grinding
Dry grinding is suitable for rough grinding.
Cool the ground tools regularly with coolant when
grinding.
The blade guard and support must be checked regu
-
larly to prevent excessive blade wear.
Wet grinding
The wet grinding wheel is suitable for fine grinding.
When grinding, the wheel must be immersed in water.
Before grinding, it is necessary to check the water
level and the drain plug.
When grinding, empty the water tank.
How to turn the grinder on and off
To switch on the grinder, set the switch (1) to posi
-
tion ’I’.
To switch off the grinder, set the switch (1) to the ’0’
position.
Tips for work
Your grinder is suitable for sharpening tools, such as
drills, chisels, face turning tools, eg for removing ma
-
terial residues from tool edges; for material removal,
but it is not a tool for hard work. It is designed prefer
-
ably for lighter home and
hobby use. Two different types of wheels allow you
to perform different grinding tasks. Usually use a
42

