4
Panel Controls
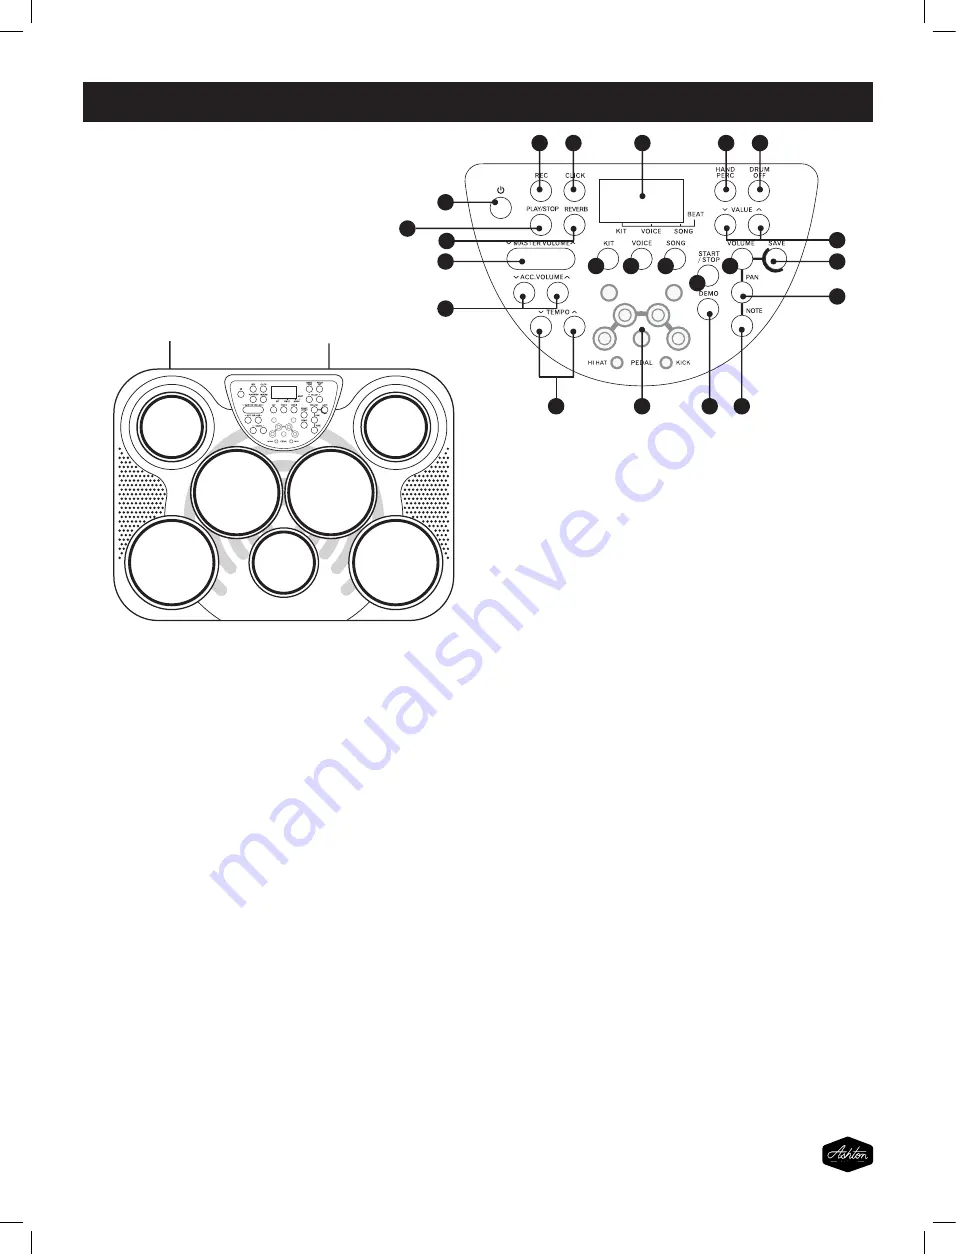
1.POWER BUTTON
This button set the power of module on or off.
2.TEMPO + &
-
These buttons are used to change current tempo.
3.MASTER &
-
These buttons can be used to change the master volumes.
4.ACC. &
-
These buttons can be used to change the accompaniment
volumes.
5.REC AND LED INDICATOR
This button can be used to start or stop recording.
6.CLICK AND LED INDICATOR
This button is used to turn on or off the metronome.
7.3-DIGIT LED
This LED is the main display device of DD315, which will
show the parameters of current menu.
8.HAND PERCUSSION AND LED INDICATOR
This button can be used to turn on the hand percussion
function.
9.DRUM OFF AND LED INDICATOR
This button is used to enable or disable drum off function.
10.KIT
This button is used to enter kit menu.
11.VOICE
This button is used to enter voice or volume menu.
12.SONG
This button is used to enter song menu.
13.START/STOP
This button can be used to start or stop song playing.
14.VOLUME
This button can be used to change the volume of pad.
15.
+ & -
VALUE
These buttons can be used to change values (kit number,
voice number, song number, etc.) when editing.
16.SAVE
This button is used to save current kit settings to a user kit.
17.PAN
This button can be used to change the pan of pad.
18.PLAY/STOP
This button can be used to start or stop recording replay.
Drum pad (x7)
Control panel
Top panel
2
1
3
16
17
5
6
7
8
9
10
11
12
13
14
18
19
20
21
22
4
15
5
TOP PANEL
Power Supply
The EDP450 will run on either batteries or power adaptor.
Follow the instructions below according to
source you intend to use.
1. POWER BUTTON
This button turns the EDP450 on or off.
2. TEMPO + & -
These buttons are used to change current tempo.
3. MASTER & -
These buttons can be used to change the master volumes.
4. ACC. & -
These buttons can be used to change the accompaniment
volumes.
5. REC AND LED INDICATOR
This button can be used to start or stop recording.
6. CLICK AND LED INDICATOR
This button is used to turn on or off the metronome.
7. 3-DIGIT LED
This LED is the main display device, which will
show the parameters of current menu.
8. HAND PERCUSSION AND LED INDICATOR
This button can be used to turn on the hand percussion
function.
9.DRUM OFF AND LED INDICATOR
This button is used to enable or disable drum off function.
10.KIT
This button is used to enter the kit menu.
11. VOICE
This button is used to enter the voice or volume menu.
12. SONG
This button is used to enter the song menu.
13. START/STOP
This button can be used to start or stop a song playing.
14. VOLUME
This button can be used to change the volume of pad.
15. VALUE + & -
These buttons can be used to change values (kit number,
voice number, song number, etc.) when editing.
16. SAVE
This button is used to save current kit settings to a user kit.
17. PAN
This button can be used to change the pan of pad.
18. PLAY/STOP
This button can be used to start or stop recording replay.
19. REVERB
This button is used to change the reverb level.
20. PAD INDICATORS
Displays the pad currently being played.
21. DEMO
This button can be used to start or stop demo song playing.
22. NOTE
This button can be used to change the MIDI note of pad.
5
PANEL CONTROLS
Summary of Contents for EDP450
Page 1: ...OPERATING MANUAL ...
Page 20: ...ashtonmusic com au ...


