Ashly digiMix24 Operating Manual Download Page 27

27

Operating Manual - digiMIX24 Digital Mixer

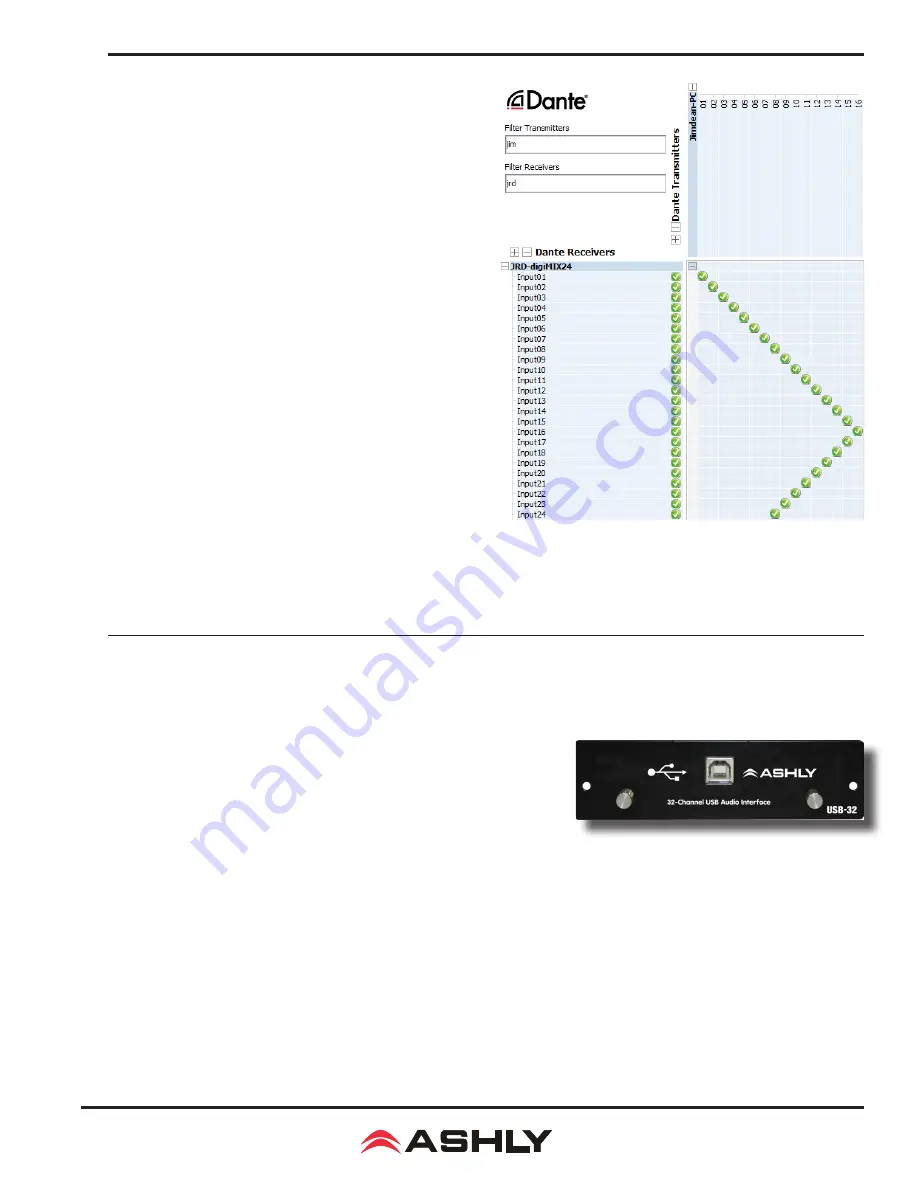
7.1a Dante Controller

:


The Dante-32 module allows the 

digiMIX24 to receive and transmit audio with other Dante devices. 

Configuration of Dante audio streams requires the use of Dante 

Controller. This free software from Audinate is available for both 

Windows® and Mac®. Dante Controller uses a simple matrix (see 

figure 7.1a) to connect Dante audio transmitters with receivers. 

The Dante-32 provides access for up to 24 digital audio input 

channels and 32 digital audio output channels on the digiMIX24. 

Any Dante transmitter channel can be assigned to one or more 

Dante-32 receiver channels, but each Dante receiver channel can 

have only one transmitter as its input source.

The  Dante-32  resolution  &  sampling  rate  is  24bit  /  48KHZ. 

Dante-32 modules are compatible with AES67.

Dante latency

 can be observed and configured for individual 

Dante devices within the Dante Controller Network Status tab. 

Total system latency adopts the slowest latency found among all 

devices linked in the transmitter/receiver stream. 

Note that when the Dante-3

2

 module is installed, it must always 

be the master clock.

7.1b  Dante  Virtual  Soundcard


(not  shown)

:

  The 

Dante Virtual Soundcard, purchased separately from Audinate, 

allows a Windows or Mac computer to act as a Dante audio 

source. Any sound the computer generates (background music, 

announcements, VoIP sessions, etc.) can be routed to a Dante receiver 

via the Dante controller. 

NOTE: The Dante Virtual Soundcard audio stream may not automatically start up after digiMIX24 is powered on. If this happens, 

cycle the mixer power again or restart the Dante audio stream.

 

8  DIGITAL AUDIO with USB-32 (optional)

Digital audio workstations (DAW) often use multitrack USB audio streams for I/O. The USB-32 module provides the digiMIX24 with 

up to 32 digital outputs and 24 inputs. See section 7 for details on how digital input and output channels are routed within the 

mixer, or refer to the block diagram in section 13.

The USB-32 resolution & sampling rate is 24bit / 48KHZ. 
Typical  applications  include  multitrack  recording  from  the  mixer  to  a  USB 

audio device, or playback of pre-recorded music from a USB audio device. One 

particularly useful application is to record a band live onto a multi-track DAW, then 

play it back through the mixer later for a "virtual" soundcheck before the musicians 

arrive. Visit the Ashly website knowledge base to review the Ashly application 

note digiMIX-AN-2 for virtual soundcheck details.

8.1 USB-32 Device Driver

 - Purchase the USB-32 audio interface module from an Ashly dealer and install in the digiMIX24


mixer as instructed in section 3.15. An ASIO device driver is required for Windows computers but is not required for Mac. 

The USB multi-channel ASIO Windows device driver can be downloaded from the Ashly website Software > digiMIX Downloads


section. Install the device driver on the PC 

before

 connecting it to the 

digiMIX24. The device driver will appear as an "ASIO" type 

device in the audio software's device list. 

► 

TIP

Detailed USB multichannel device driver installation and virtual soundcheck instructions are found in the Ashly application 

note <digiMIX AN-2>, available in the Ashly website's digiMIX page Knowledge Base.

8.2 DAW Hardware Configuration

 - 

The digiMIX24 cannot re-configure it's internal channel mapping. You must have a working 

knowledge of your specific DAW hardware and software for proper configuration of channel mapping, recording, and playback properties.


USB-32 Module

7.1a: Dante Controller

Summary of Contents for digiMix24

Page 1: ...585 872 0739 ashly com All Trademarks referred to herein are the property of their respective owners 2016 2018 Ashly Audio Inc All rights reserved worldwide Operating Manual 24 Channel Digital Mixer T...

Page 2: ...the point where they exit from the apparatus 12 Only use attachments accessories specified by the manufac turer 13 Use only with the cart stand tripod bracket or table specified by the manufacturer or...

Page 3: ...al to fully understand the features and capabilities of this product FCC Compliance This device complies with part 15 of the FCC Rules Operation is subject to the following two conditions 1 This devic...

Page 4: ...ader or mute groups Cross fade mode for panning between any two assigned channels Stereo link for inputs subgroups and aux outputs EZ Mode for secure simplified touchscreen or iPad control TRS inserts...

Page 5: ...hortcut to EZ Mode sec 6 4 Password Protection Access password and security settings by pressing the System button Passwords are always four character alpha numeric and case sensitive The password ent...

Page 6: ...an alternately indicate every channel s current fader position by pressing the Faders Meters button sec 2 23 2 3 Select Button Every input subgroup main output aux and effect FX has a dedicated select...

Page 7: ...st Parameter knob The second method is to press the Send button associated with each aux level control to quickly view and adjust all input chan nels sent to that aux mix Use the touchscreen to select...

Page 8: ...ect button is pressed sec 2 3 this control works together with the motorized fader and touchscreen 2 14 Ctrl Room Level Control This adjusts the level of the control room outputs Control room outputs...

Page 9: ...or show the current fader position of all channels 2 24 Pan Control The pan control is dedicated to fading the selected channel from left to right in the mix It is also used for Crossfade mode sec 6...

Page 10: ...nd PEQ GEQ settings Up to 48 different DSP channel presets can be saved 3 FX FX presets are used to save load up to 104 different user defined FX1 and FX2 effects 4 GEQ The 48 GEQ presets are only use...

Page 11: ...signed Assignment status can also be edited using the touchscreenAssign window sec 2 38 or the Main Sends button sec 2 45 2 34 Sub 1 4 Press the sub 1 4 buttons to assign the currently selected input...

Page 12: ...adjust filter level Up to 48 different GEQ presets can be saved to memory and loaded later for use with specific rooms or loudspeakers Press the EQ bypass button sec 2 25 or the touchscreen ON button...

Page 13: ...bus for DSP processing 3 3 Channel 17 18 19 20 Stereo Line Inputs These inputs function as two stereo line level inputs sec 2 7 or as four mono inputs There is no adjustable preamp on these inputs so...

Page 14: ...ith wifi for remote iPad control sec 9 or for using with digiMIX24 Preset Utility software sec 6 2 For firmware update Ashly recommends using the USB control jack not Ethernet 3 14 USB Control Jack Th...

Page 15: ...power amplifiers turned down at first 2 One input at a time set input trim controls so their loudest signal peaks are around 0dBu on the input meters sec 2 1 3 Assign all desired inputs to the main ou...

Page 16: ...compensating for room resonance It is well worth the time becoming proficient with parametric EQ filters as they offer the best solution to many EQ problems HPF LPF The hi pass and low pass filters a...

Page 17: ...to pass through unchanged Attack sets the amount of time from when the input signal reaches threshold to when the gate actually opens up Ame dium attack time helps the gating action sound more natura...

Page 18: ...using the pan control when either channel is selected Their signal is routed to the main stereo output 3 In the Long Faders mode example shown the selected channel in a linked channel pair is indicate...

Page 19: ...igned toAux1 and also to the main mix 1 The channel fader is now named Ch1 2 2 The Pan bars appear for both Ch1 2 initially panned full left and full right 3 The orange bar shows the currently selecte...

Page 20: ...sion Wet Dry Out Reverb Plate Simulate the transducer s sound like classic bright vocal plate Pre Delay Decay Room Size Brightness Diffusion Wet Dry Out Delay Echo of the input signal Time Decay Brigh...

Page 21: ...t Password To delete the password make sure the Delete Password box is active with the orange bar beneath it and press Enter The screen prompts for the current password to be entered into both text bo...

Page 22: ...d there will be a root folder called digiMIX24 Firmware Utility containing an executable file named digiMIX24 Firmware Utility exe plus a sub folder called Lib see figure 6 1a Click on the executable...

Page 23: ...ection can be used for preset backup restore Windows Download and install digiMIX24 Preset Utility file bundle from the Ashly website Software digiMIX downloads section Once installed there will be a...

Page 24: ...uts 1 8 and Stereo Main output level with on off switch for each fader To use EZ mixer 2 DCA groups must first be defined and named and Sub 1 4 outputs must be configured to function as Aux 5 8 sec 5...

Page 25: ...the System menu press the shortcut button for Automix Assign 2 Assign the desired input channels to the automixer Make sure the Automix Active button is pressed 3 Select one of the assigned main speec...

Page 26: ...be group selected pre post DSP from the mixer s System screen Whether pre or post DSP digital outputs from Mic channels 1 16 are always pre fader and pre mute Note the mixer will not allow digital in...

Page 27: ...USB 32 optional Digital audio workstations DAW often use multitrack USB audio streams for I O The USB 32 module provides the digiMIX24 with up to 32 digital outputs and 24 inputs See section 7 for det...

Page 28: ...eft side of this screen always controls the currently selected channel or channel pair if two channels are stereo linked 9 1e To access the Assign Channel PEQ Expander Gate or Compressor Limiter contr...

Page 29: ...properly defined Press FX1 or FX2 to define edit or load an effect Make sure the Wet Dry mix control is properly set 2 Inputs must have their signal sent to the FX1 or FX2 bus Select an input and use...

Page 30: ...Frequency response to main output 20Hz 20kHz 0 5dB Distortion THD N to main output 0 01 at 0dBu 20Hz 20kHz Gain 10dB Maximum input level 20dBu USB 2 Track I O USB type B connector 16 bit 48kHz sample...

Page 31: ...rter dynamic range 110dB unweighted Internal processor 32 bit floating point D A converter dynamic range 106dB unweighted ADC DAC bit depth and sampling rate 32 bit 48kHz Optional digital audio module...

Page 32: ...Operating Manual digiMIX24 Digital Mixer 32 12 DIMENSIONS...

Page 33: ...PFL alt AUX 5 8 AUX 1 4 OUTPUTS 3c 4d 2b 1a 5e AUX 1 4 BUS AUX 1 4 OUTPUT DSP MUTE DIGITAL OUTPUTS Aux 1 4 D A AUX1 4 SOLO PFL SOLO L R D A SOLO L R BUS FX1 FX2 OUTPUT DSP Stereo POST PRE ASSIGN MAIN...

Page 34: ...duct This warranty is void if the serial number is altered defaced or removed ASHLY AUDIO INC reserves the right to make changes in design or make additions to or improvements upon this product withou...

Page 35: ...35 Operating Manual digiMIX24 Digital Mixer This page intentionally left blank...

Page 36: ...one 585 872 0010 Fax 585 872 0739 Toll Free 800 828 6308 www ashly com DM24 R05 0418 2016 2018 Ashly Audio Inc All rights reserved worldwide Ashly Audio is a division of Jam Industries Ltd All feature...

Reviews: