Ashly digiMIX18 Operating Manual Download Page 28

Operating Manual - digiMIX18 Digital Mixer

28

 

9 iPAD REMOTE CONTROL

A free remote control iPad app called "Ashly digiMIX" is available from the 

iTunes App Store. This app is used for all Ashly digiMIX products. Most mixer 

touchscreen controls are duplicated on the app for wireless remote control of the 

mixer, including EZ-Mode. 

Note: The digiMIX18 does not provide its own 

Wi-Fi signal, so an existing network with Wi-Fi must be available for the 

iPad.


Only one iPad at a time can be used to control the mixer. 

9.1 iPad Setup steps

9.1a

 - 

Configure the iPad Wi-Fi to be on the same network subnet as the mixer


9.1b - 

Download, install and launch the Ashly digiMIX app with the mixer turned 

on and connected to the network. 

9.1c

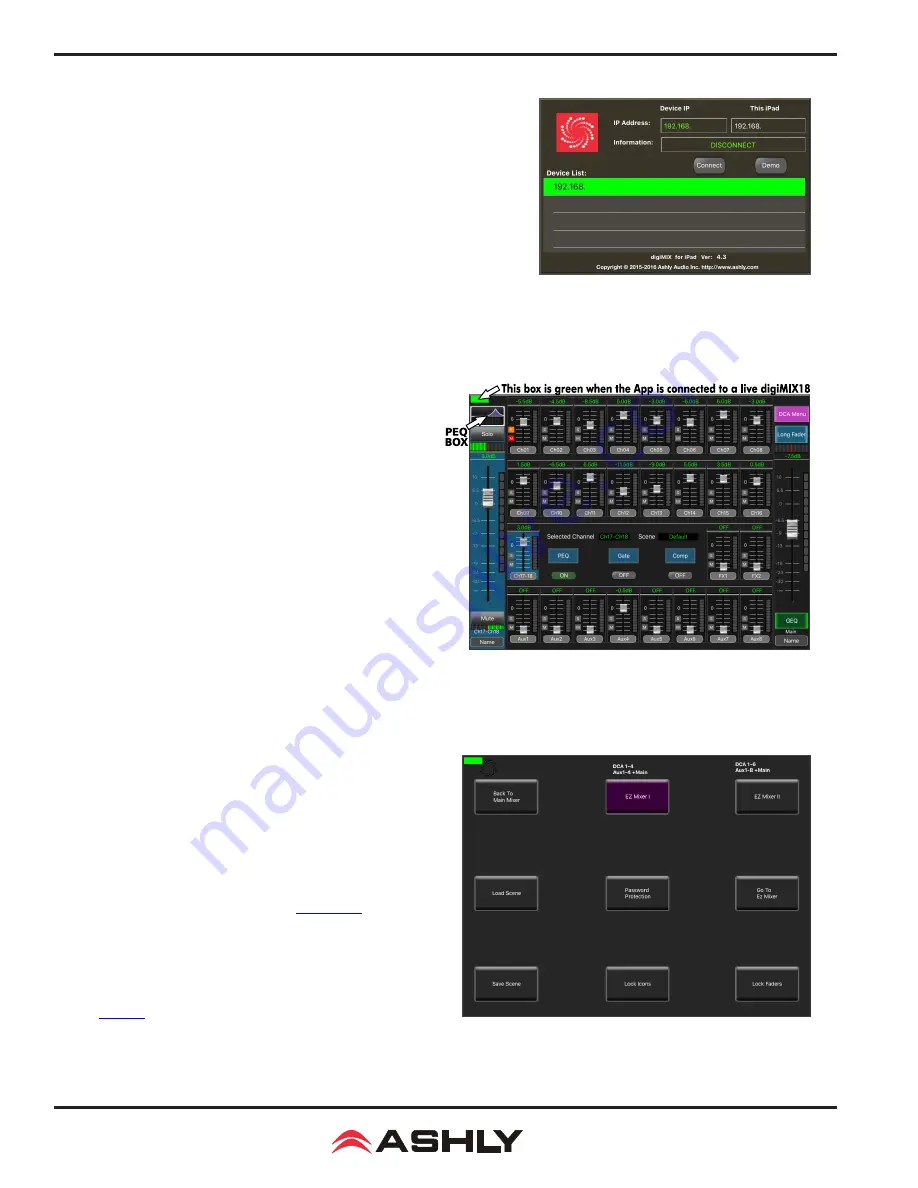
 - On startup, the digiMIX app displays a device list of available IP addresses 

for the mixer(s) on the network. Select an IP address and press <Connect>. 

9.1d

 - In the resulting mixer display, a green rectangle in the upper 

left corner indicates that the app is connected to a live mixer. It 

turns grey if the connection is lost. If it is grey, press it to return 

to the Device List used in step 9.1c. When connected, the iPad 

always displays the same screen as the mixer. Changes to either 

device will result in an identical change to the other device. The 

fader on the left side of this screen always controls the currently 

selected channel, or channel pair if two channels are stereo linked.

9.1e

 - To access the Assign, Channel, PEQ, Expander/Gate, or 

Compressor/Limiter control screens for the currently selected 

channel, press the "PEQ BOX" as shown in the upper left corner 

of the mixer screen in the illustration to the right. 

► 

TIP

: If two channels are stereo linked, tapping the fader on the 

left side of this screen alternately toggles between the two linked 

channels, offering the ability to select and pan either channel 

separately from within the Assign or Channel screens.

9.1f

 - To backup/restore presets, access EZ Mode, or use other 

system functions from the iPad app, tap the <System> button 

while in any of the control screens mentioned above in step 9.1e.

9.2 iPad EZ Mode

EZ Mode offers two configurations for basic remote control of the 

mixer's main L/R and aux1-8 outputs and DCA groups. 

EZ-Mode 

on the iPad allows the use of pictures as icons. 

Select an EZ-Mode 

fader, press and hold the icon box above the fader, then press the 

camera icon above the Select button. Select either the camera or  

Photo library option to load the picture, then press ok. To remove 

an icon or picture, repeat this process and select a blank icon. Other 

than this feature, the two EZ Mode mixers function the same on 

the iPad app as on the digiMIX18. See 

section 6.4

 for complete 

EZ Mode details. To use EZ Mode on the iPad, go to the system 

page as described above in step 9.1f and press the EZ Mode button.

9.3 iPad EZ-Mode Password Protection

EZ-Mode will always use the same four-character password as the 

mixer (

sec. 5.4

). 

The password must initially be entered on the 

mixer,

 then can be used on the iPad to lock EZ-Mode faders or 

fader icons. Passwords are case sensitive.

9.1c: digiMIX app IP address selection

9.1d & 9.1e: digiMIX app Mixer Mode Display

9.2: digiMIX app EZ-Mode

Summary of Contents for digiMIX18

Page 1: ...9103 Phone 585 872 0010 Toll Free 800 828 6308 Fax 585 872 0739 ashly com All Trademarks referred to herein are the property of their respective owners 2018 Ashly Audio Inc All rights reserved worldw...

Page 2: ...the point where they exit from the apparatus 12 Only use attachments accessories specified by the manufac turer 13 Use only with the cart stand tripod bracket or table specified by the manufacturer or...

Page 3: ...anual to fully understand the features and capabilities of this product FCC Compliance This device complies with part 15 of the FCC Rules Operation is subject to the following two conditions 1 This de...

Page 4: ...ts on channels 1 8 8 aux sends assignable pre post 6 DCA for fader or mute groups 2 stereo effects buses FX with fully editable reverbs delay with tap tempo tremolo flanger and chorus 7 inch color LCD...

Page 5: ...on technical user to operate the mixer with limited access to mixer functions sec 6 4 Password Protection Access password and security settings by pressing the System button Passwords are always four...

Page 6: ...23 2 3 Select Button Every input main L R output aux1 8 and FX1 2 have a dedicated select button All routing assignment DSP sends functions and motorized fader activity are applied only to the selecte...

Page 7: ...er 2 13 FX1 2 Select and Send Button This mixer has built in stereo effects including reverbs delay chorus flanger tremolo and several combinations Press the FX Editor button below the touchscreen to...

Page 8: ...p is not yet defined a touchscreen message prompts for a response before proceeding further 2 18 Motorized Fader This is the primary level control for all inputs main L R and aux1 8 outputs effects ma...

Page 9: ...29 Enter Tap Button This button has two functions The first is to offer a Yes response any time the touchscreen prompts for yes or no answer For example after pressing the flat button when the touchsc...

Page 10: ...meters will be copied 2 32 The Touchscreen Display Most mixer functions can be adjusted using either the touchscreen or the buttons knobs Some functions can only be adjusted using the touchscreen Leve...

Page 11: ...t channel DSP functions include stereo pan polarity invert channel delay up to 300ms stereo link expander gate PEQ and compressor limiter Main L R and aux1 8 outputs do not have expander gate function...

Page 12: ...iring of XLR and phone jacks The mic preamp circuit is overridden when the phone jack is inserted Avoid plugging or unplugging connectors when the volume is turned up as loud transient pops can result...

Page 13: ...to a network for remote iPad control sec 9 or for using the digiMIX18 Preset Utility software sec 6 2 Ashly recommends using the USB control jack for the firmware update software 3 12 USB Control Jac...

Page 14: ...amplifiers turned down at first 2 One input at a time set input trim controls so their loudest signal peaks are around 0dBu on the input meters sec 2 1 3 Assign all desired inputs to the main L R outp...

Page 15: ...best solution to many EQ problems HPF LPF The hi pass and low pass filters are cut only with adjustable frequency and slope There are 20 different filter types to choose from including Butterworth Bes...

Page 16: ...l above which the gate opens up and input signal is allowed to pass through unchanged Attack sets the amount of time from when the input signal reaches threshold to when the gate actually opens up Ame...

Page 17: ...aker protection or setting maximum SPL whereas the compressor is more natural sounding and typically used on microphone inputs 4 6 Input Channel Stereo Linking The following examples show how input ch...

Page 18: ...01 is sent to Aux1 2 and also assigned to main L R 1 In either of the Ch01Assign orAux1 2 Sends screens the pan control fades Ch01 between main L R when Ch01 is selected TIP If in the Sends Mixer scre...

Page 19: ...fusion Wet Dry Out Reverb Plate Simulate the transducer s sound like classic bright vocal plate Pre Delay Decay Room Size Brightness Diffusion Wet Dry Out Delay Echo of the input signal Time Decay Bri...

Page 20: ...eset Password To delete the password make sure the Delete Password box is active with the orange bar beneath it and press Enter The screen prompts for the current password to be entered into both text...

Page 21: ...tility containing an executable file named digiMIX 18 Firmware Utility exe plus two DLLfiles and a sub folder called Lib see figure 6 1a Click on the executable file to then run the utility MAC Downlo...

Page 22: ...a root folder called digiMIX 18 Preset Utility containing an executable file named digiMIX 18 Preset Utility exe plus two DLL files and a sub folder called Lib see file list example at right Click on...

Page 23: ...and aux1 8 outputs with on off switch and icon for each fader Before using EZ Mixer 2 DCA groups should be defined and named and aux1 8 outputs should also be named sec 2 34 EZ Mode Icon Menu see figu...

Page 24: ...f From the System menu press the shortcut button for Automix Assign 2 Assign the desired input channels to the automixer Make sure the Automix Active button is pressed 3 Select one of the assigned pri...

Page 25: ...selected as pre or post DSP using the touchscreen Whether pre or post DSP digital outputs from Mic channels 1 16 are always pre fader and pre mute Note the mixer will not allow digital in and out to b...

Page 26: ...USB 3018 Option Digital audio workstations DAW often use multitrack USB audio streams for I O The USB 3018 provides the digiMIX18 with 30 digital outputs and 18 inputs See section 7 for details on how...

Page 27: ...onnected before the side can be completely removed Step 3 Gently disconnect the wire assembly header that powers the illuminated Ashly logo Pull apart by holding the white plastic header rather than t...

Page 28: ...l screens for the currently selected channel press the PEQ BOX as shown in the upper left corner of the mixer screen in the illustration to the right TIP If two channels are stereo linked tapping the...

Page 29: ...DCA and that DCA turned down or muted 10 6 FX not working Three things are necessary for an FX to work properly 1 FX must be properly defined Press FX1 or FX2 to define edit or load an effect Make sur...

Page 30: ...B Maximum input level 20dBu Maximum Output levels 240 Ohm source impedance Main L R outputs Balanced XLR and TRS phone jack 20dBu Aux 1 8 outputs Pseudo Balanced TRS phone jack 20dBu Control room outp...

Page 31: ...it 48kHz DigiMIX18 digital in ch1 18 pre DSP On Off level control 10dB to 70dB off fixed channel mapping DigiMIX18 digital out ch1 16 selectable as group pre or post DSP On Off 10dB to 70dB level fixe...

Page 32: ...Operating Manual digiMIX18 Digital Mixer 32 12 DIMENSIONS...

Page 33: ...33 Operating Manual digiMIX18 Digital Mixer 13 BLOCK DIAGRAM...

Page 34: ...duct This warranty is void if the serial number is altered defaced or removed ASHLY AUDIO INC reserves the right to make changes in design or make additions to or improvements upon this product withou...

Page 35: ...35 Operating Manual digiMIX18 Digital Mixer This page intentionally left blank...

Page 36: ...SA Phone 585 872 0010 Fax 585 872 0739 Toll Free 800 828 6308 ashly com DM18 R01 0118 2018 Ashly Audio Inc All rights reserved worldwide Ashly Audio is a division of Jam Industries Ltd All features sp...

Reviews: