background image

Ascon Tecnologic - Y39 Line - Operating Instructions - Pag. 5

4.3 

Electrical Connections

Carry out the electrical wiring by connecting only one wire to 
each terminal, according to the following diagram, checking 
that the power supply is the same as that indicated ON the 
instrument and that the load current absorption is no higher 
than the maximum electricity current permitted.
As the instrument is built-in equipment with permanent con-
nection inside housing, it is not equipped with either switches 
or internal devices to protect against overload of current: the 
installation will include an overload protection and a two-
phase circuit-breaker, placed as near as possible to the in-
strument, and located in a position that can easily be reached 
by the user and 

marked as instrument disconnecting 

device

 which interrupts the power supply to the equipment.

It is also recommended that the supply of all the electrical 
circuits connected to the instrument must be properly pro-
tected, using devices (ex. fuses) proportionate to the circulat-
ing currents.
It is strongly recommended that cables with proper insula-
tion, according to the working voltages and temperatures are 
to be used.
Furthermore, the probe input cable must be kept separate 
from line voltage wiring.
When a probe shielded cable is used, the protection shield 
should be connected to ground at only one side.
Whether the instrument is a 12/24 V version (Power supply 
code F/G) it is recommended to use an external TCTR trans-
former, or with equivalent features (class II insulation) and to 
use only one transformer for each instrument because there 
is no insulation between supply and input.

We recommend that a check should be made that the 
parameters are those desired and that the application 
functions correctly 

before connecting the outputs


to the actuators so as to avoid malfunctioning that 
may cause irregularities in the plant that could cause 
damage to people, things or animals.

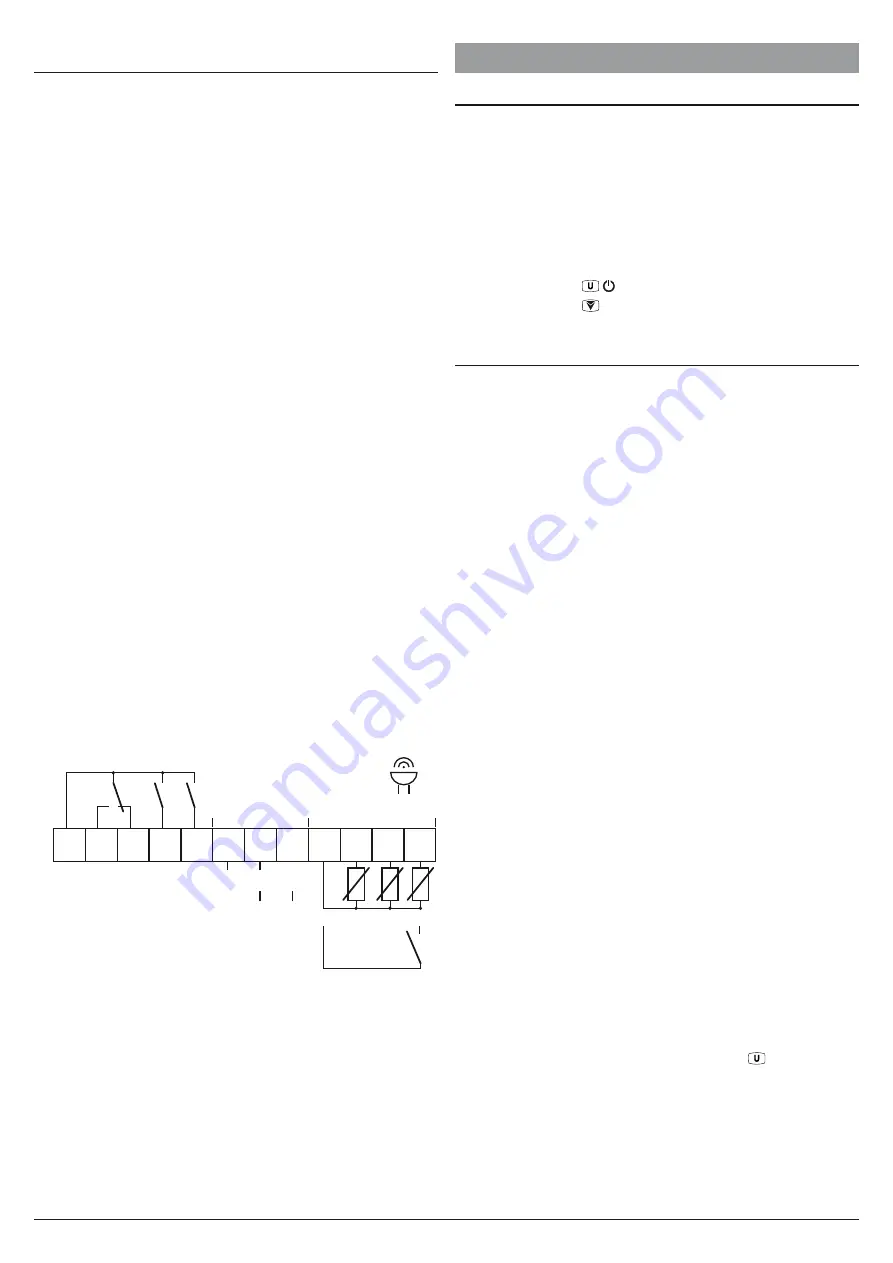
4.3.1  Electrical Wiring Diagram

1 2 3 4 5 6 7 8 9 101112

Internal

Buzzer

Pr1

Pr3

Pr2

Digital

Input

12... 24 VAC/VDC

100... 240 VAC

Power supply

Inputs

NO

NO

NC

NO

C

Out2

Out1 Out3

Out1:

 16A-AC1 (6A-AC3)/250V)

Out2:

  8A-AC1 (3A-AC3)/250V)

Out3:

  5A-AC1 (2A-AC3)/250V)

16A max. for relays common terminal (

C

)

(12A max. for those with removable terminal block).

5  FUNCTIONS

5.1 

ON/STAND-BY Function

Once powered the instrument can assume 2 different conditions:

ON:

  The controller uses the control functions.

STAND-BY: 

The controller uses no control function and the 

display is turned OFF except for the Stand-by LED.

The transition between Standby and ON status is equivalent 
to power ON the instrument providing the electrical power.
In case of power failure, the system always sets itself in the 
condition it was in before the black-out.
The ON/Stand-by function can be selected: 


Pressing the key  /  for at least 1 s if 

t.UF

 = 

4

;


Pressing the key  /

Aux

 for at least 1 s if 

t.Fb

 = 

4

;


Using the Digital Input if parameter 

i.Fi

 = 

10

.

5.2 

Measure and Display configuration

Through parameter 

i.SE

 it is possible to select the type of 

probes that that is to be used.  The probe type can be:  
thermistors PTC KTY81-121 (Pt) or NTC 103AT-2 (nt).
With parameter 

i.uP

 it is possible to select the tempera-

ture engineering unit and the desired measure resolution 
(C0 = °C/1°; C1=°C/0.1°; F0 = °F/1°; F1 = °F/0.1°).
The instrument allows the measure calibration, which can be 
used to re-calibrate the instrument according to application 
needs, through the parameters 

i.C1

 (for input 

Pr1

), 

i.C2

 (for 

input 

Pr2

) and 

i.C3

 (for input 

Pr3

).

The function carried out by 

Pr2

 and 

Pr3

 probes is defined by 

parameters 

i.P2

 and 

i.P3

.  These parameters can be config-

ured for the following functions:

EP


Evaporator probe: used to managing the defrost and 
the  evaporator fans (see relative functions);

Au


Auxiliary probe;

dG


Digital input (see Digital input functions);

If probe 

Pr2

 and/or 

Pr3

 is/are not used, set the relative pa-

rameters 

i.P2

 and/or 

i.P3

 = 

oF

.

It is not possible to program the two parameters for the same 
function, if so, priority goes to 

i.P2

.

Using 

i.Ft

parameter can be set a software filter for measur-

ing the input values in order to decrease the sensibility to 
rapid temperature changes (increasing the sampling time).
Through the 

idS

 parameter is possible to set the variable 

normally displayed:

P1


Probe Pr1 measurement;

P2


Probe Pr2 measurement;

P3


Probe Pr3 measurement;

SP


Active set point value;

oF


Numerical display switched OFF.

When one of the measures is displayed (

i.dS

 = 

P1

/

P2

/

P3

the 

i.CU

 parameter allows to set an offset that is to be ap-

plied only to the displayed variable (all controls will always 
made according to the correct temperature value, changed 
only by the calibration parameters 

i.C1

i.C2

i.C3

).

The normally displayed value is established by parameter 

i.dS

, but, repeatedly pressing and releasing   key, it is 

possible to display all the variables and also the 

Pr1

 high 

and low peak measurement values.  The display alternately 
shows the code that identifies the variable and its value.
The variables that can be displayed are:

Pr1

  Pr1 probe temperature;

Pr2

  Pr2 probe temperature (on/oF if set as Digital input);

Pr3

  Pr3 probe temperature (on/oF if set as Digital input);

Summary of Contents for Y39

Page 1: ...rature probes and a digital input alterna tive to a temperature input in addition can be equipped with an internal buzzer that is the sound system for alarms The 3 outputs can be can all be configured for controlling the compressor or the temperature control device the defrosting device the evaporation fan or alternatively any of the previ ous functions using an auxiliary device or an alarm The 3 ...

Page 2: ...atus ON ON OFF OFF or inhibited flashing 12 LED Stand By When the instrument is in Stand by mode is the only lit LED 2 PROGRAMMING 2 1 Fast Set Point Programming The normal mode to program the setpoint is done by mo mentarily pressing the key the display shows SP or SP2 alternated to the programmed value To change it press the key to increase the value or to decrease it These keys increase or decr...

Page 3: ...e protected parameters Previous Parameter Next Parameter SET PARAMETER Increase Value Decrease Value 35 0 25 5 NOT Protected PARAMETERS NORMAL MODE Hold for 2 s Hold for 5 s PARAMETERS PROGRAM MODE INS CORRECT PASSWORD Increase Value Decrease Value 0 R P PASSWORD REQUEST S LS a HA 2 5 Reset Parameters to Default Value The instrument allows the reset of the parameters to those values programmed in ...

Page 4: ...er must ensure that EMC rules are respected also after instrument installation if necessary using proper filters 4 INSTALLATION WARNINGS 4 1 Mechanical Mounting The instrument in case 78 x 35 mm is designed for flush in panel mounting Make a hole 71 x 29 mm and insert the instrument fixing it with the provided special brackets In order to obtain the declared front protection degree use the screw t...

Page 5: ...nction and the display is turned OFF except for the Stand by LED The transition between Standby and ON status is equivalent to power ON the instrument providing the electrical power In case of power failure the system always sets itself in the condition it was in before the black out The ON Stand by function can be selected Pressing the key for at least 1 s if t UF 4 Pressing the key Aux for at le...

Page 6: ...after the i ti time all the control outputs are disabled the alarm is activated and the instrument alternately shows ON the display the label AL and the variable set at para meter i dS 10 Instrument Switch ON OFF ON Stand by of instrument via NO contact closing the digital input and after the i ti time the instrument is switched ON while it is placed in Stand by when the digital input is open 11 A...

Page 7: ...OUT ot off off ON ON ON time Pr1 Temp Pr1 In the event of probe error it is possible to set the instrument so that the output continues working in cycles according to the times programmed with parameters r t1 activation time and r t2 deactivation time If a probe error occurs the instrument activates the output for the r t1 time then deactivates it for the r t2 time and so on whilst the error remai...

Page 8: ...nterval and automatic defrost start modes are set with parameter d dC rt At real time power ON intervals d di interval is count ed referring to the total time the instrument is switched ON Mode currently used in the refrigerators systems ct At time intervals of the compressor operation output ot switched ON Mode typically used in the posi tive temperature refrigerators systems with defrost by stop...

Page 9: ... A ends because the d tE temperature has been reached defrost B ends when d dE time has elapsed as temperature d tE has NOT been reached defrost C does not take place as the evaporator temperature is higher than d tS d tE d ts dF off off off off d di dSd ON ON ON time d di Defrost d de 1 Temp EP Example of electric defrost with evaporator temperature control The defrost ends when d dE time has ela...

Page 10: ...ion similar to AL but with inverse logic function output active in normal conditions disabled in alarm n Function is similar to An but with inverse logic function output active in normal conditions disabled in alarm The instrument is equipped with the alarm memory function which can be activated via the A tA parameter A tA values are oF The instrument disables the alarm signal when the alarm statu...

Page 11: ...t is possible to enable disable the auxiliary output if configured as o Fo 2 2 Pressing the key for at least 1 s it is possible to enable disable a continuous cycle 3 Pressing the key for at least 1 s it is possible to select one of the 2 stored Set Point in rotation Once the selection has been made the display shows flashing the active Set Point code for about 1 s SP SP2 4 Pressing the key for at...

Page 12: ...upplied by the instrument Supply TLCNV Cable 7 8 9 6 5 4 ON TX RX TTL TLCNV B GND A RS 485 3 2 1 For additional info please consult the TLCNV instruction manual 7 PROGRAMMABLE PARAMETERS TABLE Here below is a description of all the parameters available on the instrument Some of them may not be present because depend on the model type of instrument S Set Point parameters Parameter Description Range...

Page 13: ...essor output conditioning Et Electrical heating with evaporator temperature control EL 24 d di Defrosting interval oF 0 01 9 59 h min 99 5 h min x 10 6 00 25 d Sd 1st defrost delay at power oF Defrost at power on 0 01 9 59 h min 99 5 h min x 10 6 00 26 d dE Length max of defrost cycle oF 0 01 9 59 min s 99 5 min s x 10 20 0 27 d tE Defrost stop temperature 99 9 999 C F 8 0 28 d tS Defrost enable t...

Page 14: ... and continuous cycle and unlock display delay after defrost oF 0 01 9 59 h min 99 5 h min x 10 1 00 52 A oA Alarm delay with door open oF 0 01 9 59 min s 99 5 min s x 10 3 00 o Outputs and buzzer configuration parameters Parameter Description Range Default 53 o o1 OUT1 function oF No function ot Temp Control compressor dF Defrosting Fn Fan Au Auxiliary At Silenceable alarm AL Not silenceable Alar...

Page 15: ...be shipped to Ascon Tecnologic with a detailed description of the faults found without any fees or charge for Ascon Tecnologic except in the event of alterna tive agreements 10 TECHNICAL DATA 10 1 Electrical Data Power supply 12 VAC DC 12 24 VAC DC 100 240 VAC 10 AC Frequency 50 60 Hz Power consumption 4 VA approx Input s 3 inputs for temperature probes PTC KTY 81 121 990W 25 C or NTC 103AT 2 10kW...

Page 16: ...e 2006 95 CE EN 60730 1 EN 60730 2 9 Regulation 37 2005 CE EN13485 air S A 2 50 C 90 C with probe NTC 103AT11 11 HOW TO ORDER MODEL Y39 Instrument with mechanical keyboard Y39S Instrument with Sensitive Touch keyboard a POWER SUPPLY H 100 240 VAC G 12 24 VAC VDC F 12 VAC VDC b OUT1 OUTPUT R Out1 Relay SPST NO 16A for resistive loads d OUT3 OUTPUT R Out3 Relay SPST NO 5A for resistive loads Not pre...

Reviews: