background image

7

Safety instructions

PLUGS

– Do not dismantle any part of the unit power connector
–  Disconnect the power plug from the AC outlet when the unit is not going to 

be used for an indefinite period of time

POWER AND EXTENSIONS CORDS

–  Use the appropriate power cord with the correct plug type
–  Do not overload wall outlets or power cords
–  Make sure the total ampere passed through a extension cord does not  

exceed the maximum allowed by the cable used

–  Do not place anything on the power cord 
–  Do not locate this product where a person may walk or trip over the cord

Wiring connected to hazardous voltage requires installation by  qualified 
personnel or the use of ready-made flexible cables.

For your security, your equipment must be connected to an electrical 
outlet with grounding connection protection.

The operating electrical outlet must be in an easily accessed place.

ENVIRONMENT

– Install the equipment on an elevated, flat surface
– Install the equipment in a ventilated area
– Avoid exposing the equipment to:


Rain or water 


Excessive heat, cold or humidity 


Areas exposed to direct sunlight 


Dirty areas 


Equipment generating strong magnetic fields

– Avoid placing open containers of liquid, near the equipment
– Keep a minimum distance of 30mm in order to have good ventilation
–  Never place any sources of flames, such as lighted candles, etc. above the device
–  If you are using the device in extreme weather conditions and/or tropical 

climates, the equipment should be installed in a room which ensures a 
reasonable level of temperature and humidity

Summary of Contents for AHDSSA

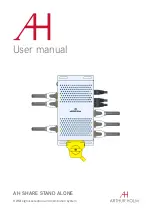
Page 1: ...User manual AH SHARE STAND ALONE HDMI signal selection and distribution system ...

Page 2: ......

Page 3: ...ntents EC REGULATIONS SECURITY 6 SAFETY INSTRUCTIONS 7 APPLICATIONS 8 FEATURES 8 BOX CONTENTS 8 INPUT CONNECTORS 9 AH SHARE 11 AHnet RS422 13 AHnet WEB API COMMANDS 15 NETWORK CONFIGURATION 17 PRODUCT WARRANTY 19 ...

Page 4: ......

Page 5: ...or an easy installation and maximum reliability Please read this installation and operating instructions carefully and keep them in a safe place for future reference We remain at your entire disposal if you have any suggestions that would help us improve our products Henrik Holm General Manager ...

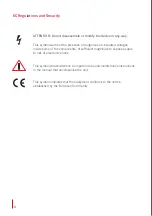
Page 6: ...s un insulated voltages inside some of the components of sufficient magnitude to expose people to risk of electronic shock This symbol draws attention to important use and maintenance instructions in the manual that accompanies the unit This symbol indicates that the equipment conforms to the norms established by the European Community ...

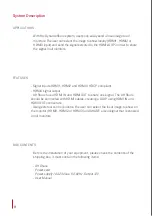
Page 7: ...e flexible cables For your security your equipment must be connected to an electrical outlet with grounding connection protection The operating electrical outlet must be in an easily accessed place ENVIRONMENT Install the equipment on an elevated flat surface Install the equipment in a ventilated area Avoid exposing the equipment to Rain or water Excessive heat cold or humidity Areas exposed to di...

Page 8: ...nal output AH Share has a HDMI IN and HDMI OUT to share one signal The AH Share should be connected with HDMI cables creating a LOOP using HDMI IN and HDMI OUT connectors Using external control buttons the user can select the local image to show on the monitor HDMI1 HDMI2 or HDMI3 and SHARE a local signal that is showed on all monitors BOX CONTENTS Before the installation of your equipment please ...

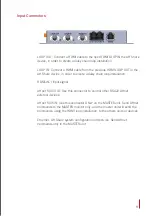
Page 9: ...eate a daisy chain loop installation HDMI IN 1 input signal AHnet RJ45 OUT Use this connector to control other RS422 AHnet external devices AHnet RJ45 IN Use this connector ONLY on the MASTER unit Send AHnet commands to the MASTER monitor only and the master unit will send the commands using the HDMI loop installation to the others units or devices Ethernet AH Share system configuration and servic...

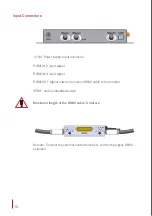
Page 10: ... HDMI IN 2 input signal HDMI IN 3 input signal HDMI OUT Signal output Connect a HDMI cable to the monitor SPDIF Audio embedded output Maximum length of the HDMI cable 5 meters Remote Connect the external control buttons to control the signal HDMI selection ...

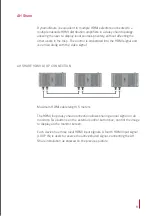
Page 11: ...signal and is carried along with the video signal AH SHARE HDMI LOOP CONNECTION Maximum HDMI cable length 5 meters The HDMI loop daisy chain connection allows sharing a local signal on all monitors Two buttons on the external control button box control the image to display on the monitor screen Each device has three local HDMI input signals A fourth HDMI input signal LOOP IN is used to receive the...

Page 12: ...n LED light is on In private mode the monitor displays always the local signal source selected although a monitor activates the share option VIEW push button Press this button to select the local HDMI 1 HDMI 2 HDMI 3 or loop shared input source Four LED lights indicate the HDMI local signal displayed on the monitor LED1 HDMI1 input signal selected LED2 HDMI2 input signal selected LED3 HDMI3 input ...

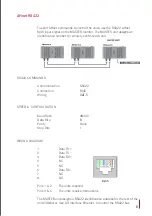
Page 13: ...DS Communication RS422 Connection RJ45 Wiring CAT 5 SPEED CONFIGURATION Baud Rate 38400 Data Bits 8 Parity None Stop Bits 1 WIRING DIAGRAM 1 Data TX 2 Data TX 3 Data RX 4 NC 5 NC 6 Data RX 7 NC 8 NC Pins 1 2 The units respond Pins 3 6 The units receive instructions The MASTER unit assigns a RS422 identification address for the rest of the units IDshare Use AH Interface Ethernet to control the RS42...

Page 14: ... RESPONSE FA XX 05 00 00 VIEW LOOP IN FB XX 05 00 00 FA XX 05 01 00 VIEW HDMI1 FB XX 05 01 00 FA XX 05 02 00 VIEW HDMI2 FB XX 05 02 00 FA XX 05 03 00 VIEW HDMI3 FB XX 05 03 00 FA XX 05 0B 00 SHARE HDMI1 FB XX 05 0B 00 FA XX 05 0C 00 SHARE HDMI2 FB XX 05 0C 00 FA XX 05 0D 00 SHARE HDMI3 FB XX 05 0D 00 XX Device identification Example Instruction Share local signal HDMI2 on device 2 FA 02 05 0C 00 ...

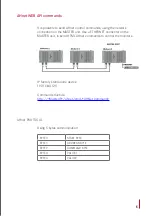
Page 15: ...e a ETHERNET connector on the MASTER unit to send HTML AHnet commands to control the monitors IP factory stand alone device 192 168 0 125 Command structure http MasterIP ahnet cmd AHNet command AHnet PROTOCOL Using 5 bytes communication BYTE 0 START BYTE BYTE 1 ADDRESS BYTE BYTE 2 COMMAND BYTE BYTE 3 VALUE 1 BYTE 4 VALUE2 ...

Page 16: ...5 01 00 VIEW HDMI1 FB XX 05 01 00 FA XX 05 02 00 VIEW HDMI2 FB XX 05 02 00 FA XX 05 03 00 VIEW HDMI3 FB XX 05 03 00 FA XX 05 0B 00 SHARE HDMI1 FB XX 05 0B 00 FA XX 05 0C 00 SHARE HDMI2 FB XX 05 0C 00 FA XX 05 0D 00 SHARE HDMI3 FB XX 05 0D 00 Example Instruction Share signal HDMI1 on device 1 http 192 168 0 125 ahnet cmd FA 01 05 0B 00 ...

Page 17: ...nge the IP address by using the configuration web page 1 Connect the unit to your network ETHERNET connector 2 Type the IP address device on a web browser 3 Choose Network Setting to configure the network Click on Save Settings when you finish the network settings configuration ...

Page 18: ...elp to save valuable resources and prevent any potential negative effects on human health and the environment which could otherwise arise from inappropriate waste handling Please contact your local authority for further details of your nearest designated collection point Penalties may be applicable for incorrect disposal of this waste in accordance with national legislation For business users in t...

Page 19: ...ons S L Albiral Display Solutions S L will not be responsible for the damages caused by transportation if the customer does not inform in writing when receiving the goods II After 180 days of the purchase date both freight and insurance costs will be paid by the customer D Albiral Display Solutions S L will not be responsible for the damages caused by transportation when this one is paid by the cu...

Page 20: ...9367 A1 MU 17301 ES00 MU 17322 ES00 MU 17376 ES00 MU 17403 ES00 This manual can be modified without previous notice ENG November 2016 Fàtima 25 Sant Hipòlit de Voltregà 08512 Barcelona Spain tel 34 93 850 23 76 23 83 fax 34 93 850 25 50 23 72 web www arthurholm com e mail marketing arthurholm com ...

Reviews: