background image

16

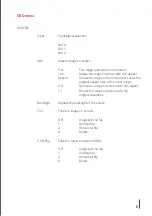
OSD menu

SETUP

Language


OSD language selection

PC Control


Adjusts the image on screen. Only on ARGB (analogue)    


input


H-Pos 


Adjust the image on screen horizontally


V-Pos


Adjust the image on screen vertically


Phase


Adjust the phase


Clock


Adjust the clock


Auto Adjust


Auto adjust the image on screen


Reset


PC image control reset

1050


 Selection of the exact input resolution. Only for ARGB 
(analogue) input


1400 x 1050


1680 x 1050

WXGA


 Selection of the exact input resolution. Only for ARGB 
(analogue) input


1024 x 768


1280 x 768


1360 x 768

BG Colour


 Background colour of the screen when there is no input 
signal. The monitor only goes to stand by mode when black 
colour is selected


BLACK


RED


GREEN


BLUE

Summary of Contents for AH 18D3 RHDGA RV

Page 1: ...User manual AH18D3 RHDGA RV Electrically motorised monitor for furniture integration Vertical and horizontal working positions ...

Page 2: ......

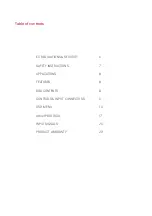
Page 3: ...Table of contents EC REGULATIONS SECURITY 6 SAFETY INSTRUCTIONS 7 APPLICATIONS 8 FEATURES 8 BOX CONTENTS 8 CONTROLS INPUT CONNECTORS 9 OSD MENU 14 AHnet PROTOCOL 17 INPUT SIGNALS 20 PRODUCT WARRANTY 23 ...

Page 4: ......

Page 5: ...the screens are a part of the interior design as well as essential communication tools Please read this installation and operating instructions carefully and keep them in a safe place for future reference We remain at your entire disposal if you have any suggestions that would help us improve our products Henrik Holm General Manager ...

Page 6: ... components of sufficient magnitude to expose people to risk of electronic shock This symbol draws attention to important use and maintenance instructions in the manual that accompanies the unit This symbol indicates that the equipment conforms to the norms established by the European Community This symbol indicates that the equipment has some potential entrapment hazard parts ...

Page 7: ...utlet with grounding connection protection The operating electrical outlet must be in an easily accessed place ENVIRONMENT Install the equipment on an elevated flat surface Install the equipment in a ventilated area Avoid exposing the equipment to Rain or water Excessive heat cold or humidity Areas exposed to direct sunlight Dirty areas Equipment generating strong magnetic fields Avoid placing ope...

Page 8: ...trical engine for furniture integration Vertical and horizontal working positions Up Down function operated by buttons on the cover plate Monitor close button memorise screen position button and input select button Low power consumption Low radiation Quick response time Data inputs DVI I DVI D HDCP compliant Addressable RS422 monitor control by AHnet protocol RJ45 connector CAT5 BOX CONTENTS Befor...

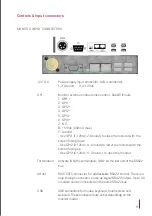
Page 9: ... screen facing down Use GPI2 3 12Vdc 4 Ground to lower the monitor with the screen facing up Use GPI3 6 12Vdc 5 Ground to open the monitor Termination Activate ON the termination ONLY on the last unit of the RS422 bus AHnet RJ45 CAT5 connector for addressable RS422 control There is a loop through connector to use as signal RS422 output Up to 30 monitors can be connected on the same RS422 bus USB U...

Page 10: ...put signal and select DVI 1 on the OSD monitor menu Use a DVI to VGA adapter to connect an ARGB analogue input signal and select DVI A on the OSD monitor menu DVI 2 DVI D input signal Connect a DVI digital input signal and select DVI 2 on the OSD monitor menu Use high quality DVI cables with 2m maximum length ...

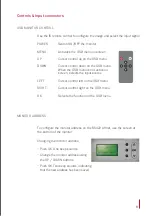
Page 11: ...en the OSD menu is not active on screen selects the input source LEFT Cursor control left on the OSD menu RIGHT Cursor control right on the OSD menu OK Selects the function on the OSD menu MONITOR ADDRESS To configure the monitor address on the RS422 AHnet use the screen at the bottom of the monitor Changing the monitor address Push OK One beep sounds Change the monitor address using the UP DOWN b...

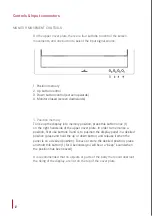
Page 12: ... press this button once 1 on the right hand side of the upper cover plate In order to memorise a position first use buttons 3 and 4 to position the display panel in a desired position press and hold the up or down button and release it when the panel is on a desired position To save or store the desired position press and hold this button 1 for 3 seconds you will hear a beep sound when the positio...

Page 13: ...th the screen facing up press this button 3 on the right hand side of the upper cover plate Pressing this button will also turn on or off the monitor when the monitor is on horizontal position Permanent press this button 3 to retract the monitor and release it to stop the movement at the desired display panel position It is recommended that no objects or parts of the body that could obstruct the f...

Page 14: ...plete list of all the functions available for the monitor Press the SEL button to enable the item When a function is selected press the LEFT and RIGHT buttons in order to change the parameter of the function Press the Menu button to access to the main menu PICTURE CSM Configuration of the image colour Cool Normal Warm User manually adjustment of red green and blue colours PSM Configuration of the ...

Page 15: ...screen but keeps the original aspect ratio of the input image 4 3 Shows the image on screen with 4 3 aspect 1 1 Shows the image on screen with the original resolution Backlight Adjusts the backlight of the screen Flip Flips the image on screen Off Image with no flip 1 Vertical flip 2 Horizontal flip 3 Rotate OSD Flip Flips the menu on screen OSD Off Image with no flip 1 Vertical flip 2 Horizontal ...

Page 16: ...e clock Auto Adjust Auto adjust the image on screen Reset PC image control reset 1050 Selection of the exact input resolution Only for ARGB analogue input 1400 x 1050 1680 x 1050 WXGA Selection of the exact input resolution Only for ARGB analogue input 1024 x 768 1280 x 768 1360 x 768 BG Colour Background colour of the screen when there is no input signal The monitor only goes to stand by mode whe...

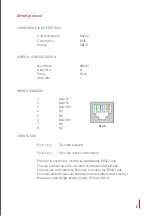
Page 17: ... RX 4 NC 5 NC 6 Data RX 7 NC 8 NC CONNECTION Pins 1 2 The units respond Pins 3 6 The units receive instructions Protocol to control the monitor by addressable RS422 bus You can connect up to 30 monitors on the same RS422 bus You can use a AH Interface Ethernet to control the RS422 bus The units should have a set address and the address must start by 1 Maximum cable length between ends 500m 1640 ft...

Page 18: ... MEMORY POSITION FB XX 01 03 00 FA XX 02 01 00 SCREEN ON FB XX 02 01 00 FA XX 02 00 00 SCREEN OFF FB XX 02 00 00 FA XX 03 01 00 DVI A SELECTION FB XX 03 01 00 FA XX 03 00 00 DVI 1 SELECTION FB XX 03 00 00 FA XX 03 03 00 DVI 2 SELECTION FB XX 03 03 00 FA XX 04 01 00 BUTTON LOCK FB XX 04 01 00 FA XX 04 00 00 BUTTON UNLOCK FB XX 04 00 00 FA XX 14 00 00 INQUIRY CONTROL BYTE FB XX 14 CB1 CB2 XX Number ...

Page 19: ...OSITION 1 1 1 0 MONITOR IN VERTICAL POSITION 0 1 0 1 MONITOR IN MEMORISED VERTICAL POSITION 1 0 0 1 MONITOR CLOSED 1 1 0 1 SCREEN ON 1 SCREEN OFF 0 DVI A 0 0 DVI 1 D 0 1 DVI 2 D 1 1 PROTECTION STOP 1 MONITOR OK 0 CB2 BITE 7 6 5 4 3 2 1 0 BUTTON LOCK 1 BUTTON UNLOCK 0 ...

Page 20: ...75 000 Progressive 1024x768 60Hz 48 363 60 005 Progressive 1024x768 70Hz 56 476 70 070 Progressive 1024x768 75Hz 60 023 75 030 Progressive 1280x720 60Hz 44 772 59 855 Progressive 1360x768 60Hz 47 72 59 799 Progressive 1280x1024 60Hz 63 981 60 020 Progressive 1600x1200 60Hz 75 000 60 00 Progressive 1680x1050 60Hz 64 742 59 946 Progressive 1920x1080 60Hz 66 647 59 98 Progressive ...

Page 21: ......

Page 22: ...elp to save valuable resources and prevent any potential negative effects on human health and the environment which could otherwise arise from inappropriate waste handling Please contact your local authority for further details of your nearest designated collection point Penalties may be applicable for incorrect disposal of this waste in accordance with national legislation For business users in t...

Page 23: ...ons S L Albiral Display Solutions S L will not be responsible for the damages caused by transportation if the customer does not inform in writing when receiving the goods II After 180 days of the purchase date both freight and insurance costs will be paid by the customer D Albiral Display Solutions S L will not be responsible for the damages caused by transportation when this one is paid by the cu...

Page 24: ...89367 A1 MU 17301 ES00 MU 17322 ES00 MU 17376 ES00 MU 17403 ES00 This manual can be modified without previous notice ENG March 2017 Fàtima 25 Sant Hipòlit de Voltregà 08512 Barcelona Spain tel 34 93 850 23 76 23 83 fax 34 93 850 25 50 23 72 web www arthurholm com e mail marketing arthurholm com ...

Reviews: