background image

30

ARMASIGHT by FLIR

PROMETHEUS C       

U S E R   M A N U A L

SEQ 

NO.

LOCATION OF 

ITEM TO CHECK/ 

SERVICE

PROCEDURE

NOT FULLY MISSION  

CAPABLE IF...

14 Video Cable

Connect an external monitor to the 

Prometheus C. Point the equipment on 

an object. Turn the equipment on. Look 

for an image on the monitor. Turn off the 

Prometheus C. Disconnect the monitor.

No image.

POST-CHECK PROCEDURES

Turn off the equipment.
Replace the objective lens cap.
Remove the batteries.
Return the equipment and all accessories to 

the carrying case.

4.2   OPERATOR TROUBLESHOOTING

The purpose of troubleshooting is to identify the most frequent equipment malfunctions, probable causes, 

and corrective actions required.
Table 4-2 lists the common malfunctions that may be found during the operation or maintenance of the 

Prometheus C. Perform the tests/inspections and corrective actions in the order listed.

This table does not list all of the malfunctions that may occur with your device, or all of the 

tests and corrective actions that may be necessary. 

If you experience an equipment malfunction 

that is not listed, or is not fixed by the corrective actions listed in the table, please contact Customer 

Service center.

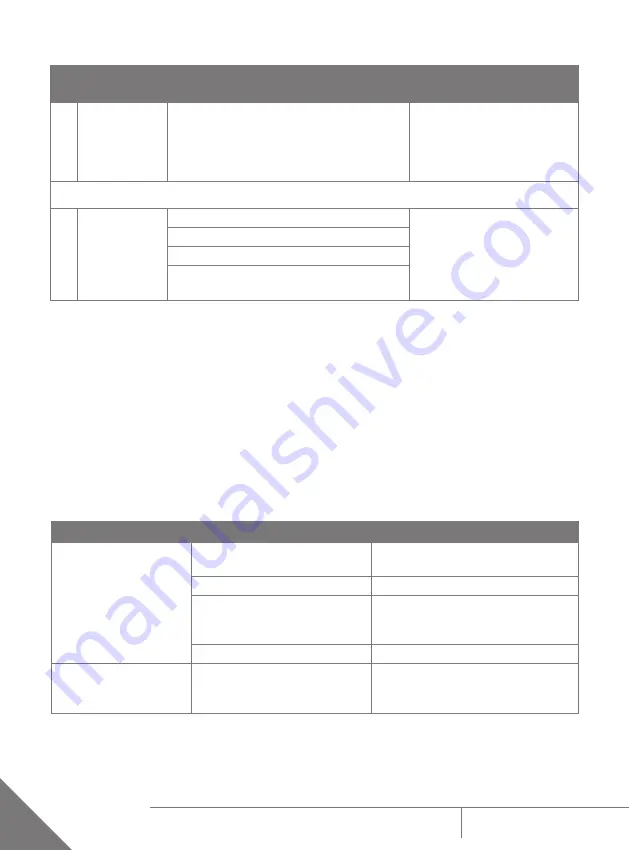
TABLE 4-2.   OPERATOR TROUBLESHOOTING

MALFUNCTION

PROBABLE CAUSE/ TEST/INSPECTION

CORRECTIVE ACTION

The Prometheus C fails 

to activate.

Batteries are missing or 

improperly installed.

Insert batteries or install correctly.

Batteries are dead.

Replace the batteries.

Batteries, surfaces, or contacts 

are dirty or corroded.

Clean the contact surfaces with a 

pencil eraser and/or alcohol and 

cotton swabs.

The equipment is damaged.

Please contact Customer Support.

The Prometheus C is not 

responsive to control 

buttons.

The equipment is damaged.

Please contact Customer Support.

TABLE 4-1. CONTINUED

Summary of Contents for ANAMTM0003

Page 1: ...U S E R M A N U A L ARMASIGHT by FLIR PROMETHEUS C Thermal Imaging Monocular 99 Washington Street Melrose MA 02176 Phone 781 665 1400 Toll Free 1 800 517 8431 Visit us at www TestEquipmentDepot com...

Page 2: ...ther registered trademarks or trademarks of FLIR Outdoor Tactical Systems and or its subsidiaries All other trademarks trade names or company names referenced herein are used for identification only a...

Page 3: ...E USER Modification of this device without the express authorization of FLIR Commercial Systems Inc may void the user s authority under FCC rules to operate this device Note 1 This equipment has been...

Page 4: ...stem Description 8 2 2 Specifications 11 2 3 Standard Components 13 2 4 Optional Equipment 14 2 5 Key Features 15 SECTION 3 OPERATING INSTRUCTIONS 16 3 1 Installation and Connecting 16 3 2 Controls an...

Page 5: ...es other than those specified herein may result in hazardous radiation exposure CAUTION Do not point the camera at high intensity radiation sources such as the sun lasers or arc welders Do not leave f...

Page 6: ...nt the Prometheus C thermal imager is extremely difficult to detect with other devices as it emits no visible light or RF energy The Prometheus C is available in different versions with 1x or 2x optic...

Page 7: ...alidate the warranty on your product FLIR Outdoor Tactical Systems must receive a completed Product Warranty Registration Card for each unit or the Customer can complete the warranty registration form...

Page 8: ...ng on the user s selected image palette FIGURE 2 1 PROMETHEUS C THERMAL IMAGING MONOCULAR NOTE It is important that the Prometheus C sensor receive sufficient thermal contrast between the target and b...

Page 9: ...rection that used to automatically adjust the gain to an appropriate range the weaker the image signal the stronger the gain User Controlled Manual Non Uniformity Correction Flat Field Correction UCMN...

Page 10: ...d by two CR123A 2 3V batteries Figure 2 2 shows the Prometheus C The ITEM NO column of Table 2 1 indicates the number used to identify items in Figure 2 2 1 2 3 5 4 6 7 8 9 11 10 12 FIGURE 2 2 PROMETH...

Page 11: ...o 8 Levels Turn on Time max 3 sec Digital Zoom 2 4 2 4 8 Temperature Imaging Modes Image Palettes White Hot Black Hot Fusion Rainbow Globow Ironbow1 Ironbow2 Sepia Color1 Color2 Ice Fire Rain and OEM...

Page 12: ...rom 3 0V to 3 7V 2 Current Consumption maximum 320 mA Battery Life at 20 C 68 F Up to 4 hrs up to 12 hrs with optional extended battery pack Extended Battery Pack optional Two 18650 rechargeable batte...

Page 13: ...2 7 The ITEM NO column indicates the number used to identify items in Figure 2 3 FIGURE 2 3 STANDARD COMPONENTS 1 2 3 4 6 5 7 TABLE 2 7 STANDARD COMPONENTS ITEM NO DESCRIPTION QUANTITY 1 Prometheus C...

Page 14: ...er used to identify items in Figure 2 4 The PART NO column indicates the primary number used by the manufacturer to identify an item TABLE 2 8 OPTIONAL EQUIPMENT ITEM NO DESCRIPTION PART NO 1 HD DVR D...

Page 15: ...lens Real time display Digitally controlled features Current operational state information display battery status active profile palette setting Wireless remote control Analog video input and output...

Page 16: ...batteries refer to Figure 3 1 1 Unscrew the battery cap A 2 Insert the batteries B into the battery compartment Align the polarity symbols on the batteries with the polarity symbols on the unit body...

Page 17: ...e 6VDC 600mA to the Prometheus C Connect plug C of the video cable to the Prometheus Connector FIGURE 3 2 VIDEO CABLE INSTALLATION A B C NOTE The external power supply must have a standard OD double p...

Page 18: ...ily or can be set to appear only when a certain function is activated FIGURE 3 3 CONTROLS 1 2 3 4 TABLE 3 1 CONTROLS AND INDICATORS ITEM NO CONTROL INDICATOR FUNCTION 1 Objective Focus Ring Focuses th...

Page 19: ...on control panel is shown in Figure 3 4 Table 3 2 contains the button functions and their brief descriptions The ITEM NO column of the table indicates the number used to identify buttons in Figure 3 4...

Page 20: ...ction UCMNUC FFC 3 MENU Holding down button 3 will bring up the Main Menu The menu includes the following functions Palette Enhancement and Settings SELECTION Push the SELECTION button 3 to view the s...

Page 21: ...EXIT and push button 3 to return to the MAIN MENU PALETTE MENU The PALETTE menu Figure 3 6 and Figure 3 7 allows you to select from a range of temperature imaging modes White Hot Black Hot Fusion Rain...

Page 22: ...d on dynamic adjustments where a variety of contrast levels occur depending on relative scene temperatures The adjustment range is from 8 to 8 with a default value of 4 Lower values will cause hotter...

Page 23: ...ith similar but not identical temperatures can be differentiated with greater accuracy The adjustment range is from 0 to 100 with a default value of 15 GAIN Automatic Gain Control AGC a correction tha...

Page 24: ...settings The Firmware FW revision number is listed at the bottom of the menu display STANDARD Changes the video output standard between NTSC and PAL FACTORY RESET Resets the camera to factory defaults...

Page 25: ...ng case 2 Remove the objective lens cap 3 Point the equipment at an object 4 Activate the Prometheus C by pressing POWER button After approximately 3 sec video of the thermal scene should appear 5 Adj...

Page 26: ...ring the 5 second countdown which will appear at the bottom of the display C Use the digital zoom to magnify the central area of the image Hold down button 1 to gradually zoom in on the image The 2x 4...

Page 27: ...ometheus C as follows 1 Be sure to save your settings and data 2 Turn off the Prometheus C 3 Place the protective cap on the objective lens 4 Disconnect the cable if applicable 5 Place the protective...

Page 28: ...dicates the location and the item to be checked or serviced PROCEDURE column Details the check service procedure NOT FULLY MISSION CAPABLE IF column Indicates what faults will prevent your equipment f...

Page 29: ...r adversely affects the user s ability to properly focus the objective lens 9 Eyepiece Focus Ring Rotate eyepiece focus ring to ensure the ring is not too tight or too loose Range is approximately 2 t...

Page 30: ...ometheus C Perform the tests inspections and corrective actions in the order listed This table does not list all of the malfunctions that may occur with your device or all of the tests and corrective...

Page 31: ...Light is visible around eyecup Check eyecup resilience If the eyecup is defective please contact Customer Support 4 3MAINTENANCE 4 3 1 GENERAL The Prometheus C operator maintenance consists of operati...

Page 32: ...Clean the optical surface using circular movements starting from the center and moving out towards the edge not touching the lens holder and changing the cotton swab after each circular stroke Repeat...

Page 33: ...s the design and characteristics of the item in terms of its engineering drawings specifications standards and inspection requirement to identify an item 5 4 6 9 1 2 3 8 7 FIGURE A 1 PROMETHEUS C SPAR...

Page 34: ...34 ARMASIGHT by FLIR PROMETHEUS C U S E R M A N U A L NOTES...

Page 35: ...35 ARMASIGHT by FLIR PROMETHEUS C U S E R M A N U A L...

Page 36: ...port Diversion contrary to US law is prohibited Imagery for illustration purposes only Specifications are subject to change without notice 2018 FLIR Systems Inc All rights reserved 05 07 2018 18 0611...

Reviews: