Ariston OK 997E LDP X AUS S Operating Instructions Manual Download Page 4

4

AUS

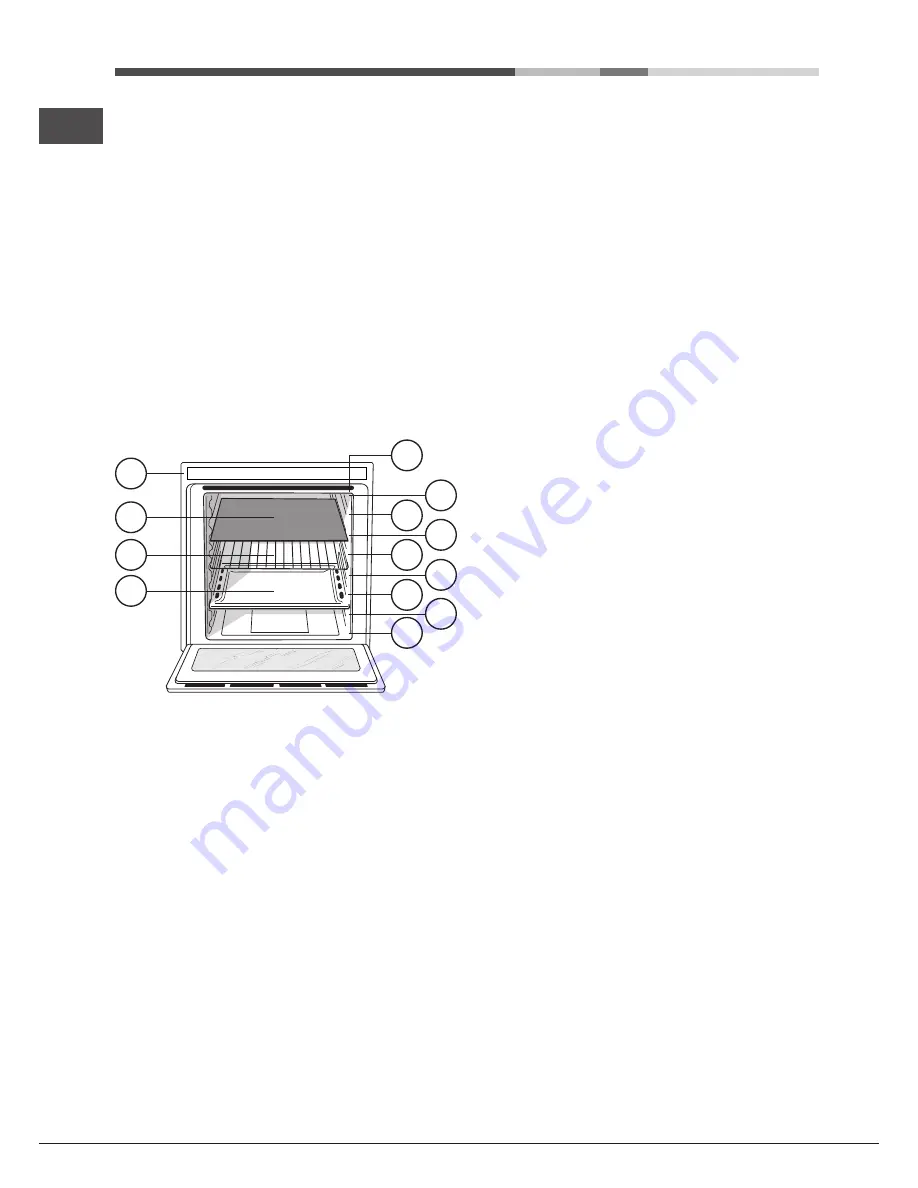
Description of the appliance

Overall view

1. POSITION 1
2. POSITION 2
3. POSITION 3
4. POSITION 4
5. POSITION 5
6. DIVIDER “D” POSITION
7. POSITION 6
8. POSITION 7
9. GUIDES
 for the sliding racks
10.  DRIPPING PAN
11.  RACK
 shelf
12.  DIVIDER shelf
13.  Control panel

13

12

11

10

1

2

3

5

7

4

6

8

9

Summary of Contents for OK 997E LDP X AUS S

Page 1: ...ption of the appliance 4 Installation 6 Electrical Connection 7 Oven structure 8 Start up and use 9 Cooking modes 10 Precautions and tips 17 Maintenance and care 17 Troubleshooting 20 OK 997E LDP X AU...

Page 2: ...thout supervision Do not use harsh abrasive cleaners or sharpmetalscraperstocleantheovendoor glass since they can scratch the surface which may result in shattering of the glass Before initiating the...

Page 3: ...ation to hand The type of problem encountered The appliance model Mod The serial number S N The latter two pieces of information can be found on the data plate located on the appliance ARISTON PRIORIT...

Page 4: ...view 1 POSITION 1 2 POSITION 2 3 POSITION 3 4 POSITION 4 5 POSITION 5 6 DIVIDER D POSITION 7 POSITION 6 8 POSITION 7 9 GUIDES for the sliding racks 10 DRIPPING PAN 11 RACK shelf 12 DIVIDER shelf 13 C...

Page 5: ...con 32 MINUTE MINDER icon 33 DOOR LOCK indicator 34 CAVITY PREHEATING RESIDUAL HEAT indicator 35 MAIN CAVITY icon 36 MODE icons 25 26 27 28 29 30 31 32 33 34 35 36 Control panel 14 SELECTOR knob 15 CO...

Page 6: ...h a veneer exterior must be assembled with glues which can withstand temperatures of up to 100 C To install the oven under the counter see diagram or in a kitchen unit the cabinet must have the follow...

Page 7: ...at it is fully compliant with safety regulations Before connecting the appliance to the power supply make sure that The appliance is earthed and the plug is compliant with the law The socket can withs...

Page 8: ...elf levels RACK or DRIPPING PAN DRIPPING PAN cooking on 3 shelves Divider D fixed position RACK cooking on 3 shelves RACK cooking on 3 shelves SMALL SPACE MAIN SPACE DRIPPING PAN cooking on 3 shelves...

Page 9: ...ls press and hold the icon for at least 2 seconds A buzzer will sound and the display shows the key symbol n O The and icons when lit indicate lock function activation To deactivate the lock press and...

Page 10: ...pliance buzzer sounds three times ascending and all buttons light up in sequence 2 Select the desired cooking mode by turning the SELECTOR knob The TEMPERATURE display shows the temperature associated...

Page 11: ...ts are achieved using one cooking rack only PIZZA mode The top and circular heating elements switch on and the fan begins to operate This combination heats the oven rapidly If you use more than one ra...

Page 12: ...led completely THE DIVIDER Fit the DIVIDER to the DIVIDER shelf D using the pin with the arrows turned towards the rear part of the oven A buzzer will sound to confirm that the DIVIDER has been fitted...

Page 13: ...cooking duration can be customised according to personal tastes modifying it before the start time by 5 20 minutes depending on the selected programme Once cooking has begun it is still possible to mo...

Page 14: ...the top When cooking pizzas or focaccia breads use a lightweight aluminium tray with a maximum diameter of 30 cm placing it on top of the rack supplied If the pizza has a lot of toppings we recommend...

Page 15: ...20 30 10 20 15 25 3 6 Low temperature Proving Defrosting White meringues Meat Fish 1 4 3 2 1 1 3 3 5 5 6 No No No 40 65 90 8 12 hours 90 180 Pizza Pizza Focaccia Creation Success Multilevel Tarts 1 2...

Page 16: ...45 Cake 1 2 D Yes 160 60 75 100 Cooking advice table for the Main Space feature Function Food Weight Kg Cook on shelf no Shelf position Preheating Recommended temperature C Cooking duration minutes Dr...

Page 17: ...e product These individuals should at the very least be supervised by someone who assumes responsibility for their safety or receive preliminary instructions relating to the operation of the appliance...

Page 18: ...ted on the two hinges see diagram F 3 Grip the door on the two outer sides and close it approximately half way Pull the door towards you lifting it out of its slot see diagram To replace the door reve...

Page 19: ...irm 5 Press the icon to begin the cleaning cycle An end time for the FAST CLEAN cycle as for a normal cooking cycle may be programmed see Programming the automatic cleaning end time Safety devices the...

Page 20: ...d value for the selected mode Wait for the oven to cool down Fan assisted cooking has been selected and the food looks burnt Positions 1 and 5 the direct heat could cause temperature sensitive foods t...

Reviews: