background image


Appendix 

Adding Alternate IP Address 


Windows Vista/Windows 7  


1.


Click 

Start

 and select 

Control Panel

.  

2.


Make sure you are in Classic View by clicking 

Classic View


on the left of the Control Panel.  

3.


Open 

Network and Sharing Center

.  

4.


Click 

Manage Network Connections

 on the left side of 

Network and Sharing Center.  

5.


Right click on the network connection you want to add an 
IP address for (to which the camera has been connected) 
and select 

Properties

.  

6.


Select 

Obtain an IP address automatically 

and click on 

the 

Alternate Configuration

 tab. 

7.


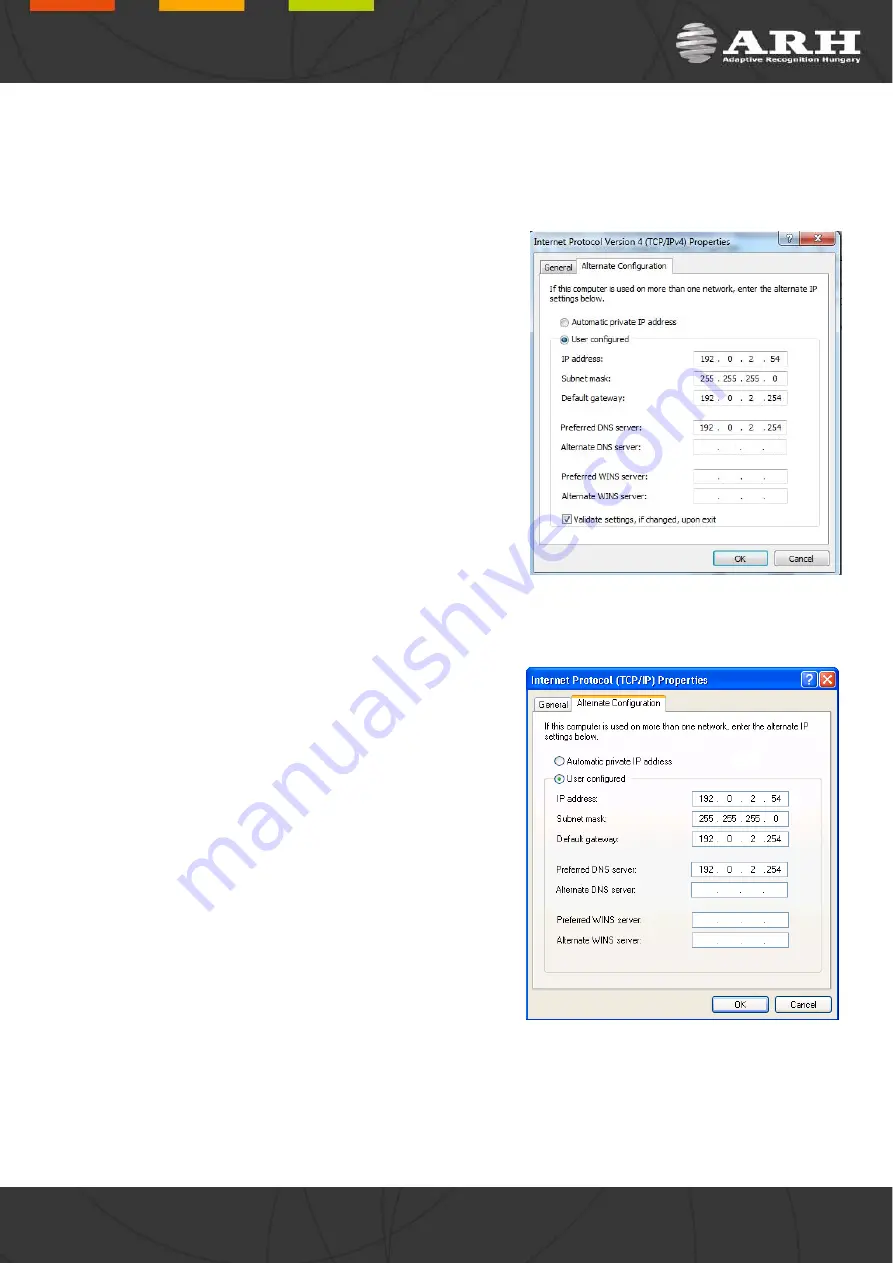
Select 

User configured

 and enter e.g. the 192.0.2.54 

IP 

address

 and 255.255.255.0 as 

Subnet mask 

as shown on 

Figure 1.


8.


Click 

OK

 in the opened windows. 


Figure 1. 


Windows XP 


1.


Click

 Start 

and select

 Settings / Control Panel

2.


Make sure you are in Classic View by clicking 

Classic View


on the left of the Control Panel.  

3.


Click 

Network Connections

4.


Right click on the network connection you want to change 
the IP address of (to which the camera has been 
connected) and select 

Properties

5.


On the 

General 

tab click once the 

Internet Protocol 

(TCP/IP) 

item, and click 

Properties

6.


Select 

Obtain an IP address automatically 

and click on 

the 

Alternate Configuration

 tab. 

7.


Select 

User configured

 and enter e.g. the 192.0.2.88 

IP 

address

 and 255.255.255.0 as 

Subnet mask 

as shown on 

Figure 2

.  

8.


Click 

OK

 in the opened windows. 


Linux 

Figure 2. 


1.


Open a terminal. 

2.


Enter the 

ifconfig

 command to see the reserved Ethernets (e.g. 

eth0

). 

3.


Enter the following command: 

ifconfig eth

Y

 192.0.2.25  

where 

Y

 is a free eth (e.g

.


eth1

and


192.0.2.25 

is a sample IP address. 

Page 13/15 

Page 13/15 

ParkIT Install Guide 

Summary of Contents for PARKIT

Page 1: ......

Page 2: ...Power Trigger Serial Connection 7 3 2 Ethernet Connection 8 4 Software Requirements 8 5 Accessing the Camera 9 6 Recommended Camera Position 10 7 Maintenance Storage 12 Appendix 13 Contact Information...

Page 3: ...eception which can be determined by turning the equipment off and on you are encouraged to try to correct the interference by one or more of the following measures Reorient or relocate the antenna of...

Page 4: ...rview Sunshield Wall bracket Infrared LEDs Green status LED Infrared LEDs Light sensor Red status LED Camera optics Camera with bracket Head Foot Cover Camera front Bracket Page 4 15 Page 4 15 ParkIT...

Page 5: ...Bracket Details and Sizes Page 5 15 Page 5 15 ParkIT Install Guide...

Page 6: ...f the bracket can be rotated by 180 extending the 35 degree spatial angle with additional 20 according to the figure B A Bracket foot rotated by 180 enables additional 20 to rotate the camera by Steps...

Page 7: ...oor certified cables Improper cabling causes warranty to void Water may enter into the camera inside through loose cable ends Use smooth circular cables only 6 8mm diameter 3 1 Power Trigger Serial Co...

Page 8: ...th to PC and network switch directly NOTE The RJ45 plug is not weatherproof 4 Software Requirements The ParkIT camera is developed to operate without any kind of special software Software requirements...

Page 9: ...se the ping command to test the communication with the camera 4 Reply from 192 0 2 3 ddress of the PC can be pinged n on and enter the previous ping Start a browser then enter the default IP address o...

Page 10: ...happen that a part of the plate is over the camera s field of view when the vehicle is near to the side of the lane or the plate is not at the middle of the vehicle Generally sharp and characters easi...

Page 11: ...A properly set camera should provide a similar image A proper sample image Proper character sizes in pixels on the sample image Page 11 15 Page 11 15 ParkIT Install Guide...

Page 12: ...rocess avoid scratching the front cover Never use the camera without its sunshield as it was specially designed to protect the device against environmental effects such as heat moisture or contaminati...

Page 13: ...1 Click Start and select Settings Control Panel 2 Make sure you are in Classic View by clicking Classic View on the left of the Control Panel 3 Click Network Connections 4 Right click on the network...

Page 14: ...Position of the sticker The sticker indicating the Name IP address MAC address and the Serial Number of the camera can be found on the bottom of the device Page 14 15 Page 14 15 ParkIT Install Guide...

Page 15: ...ample application please let us know the name of the application you tested If you have some problem while developing your own application please specify the followings o your programming language o y...

Reviews: