background image


3. Connect the Cables 

NOTE

: Technical specifications are subject to change without prior notice. 


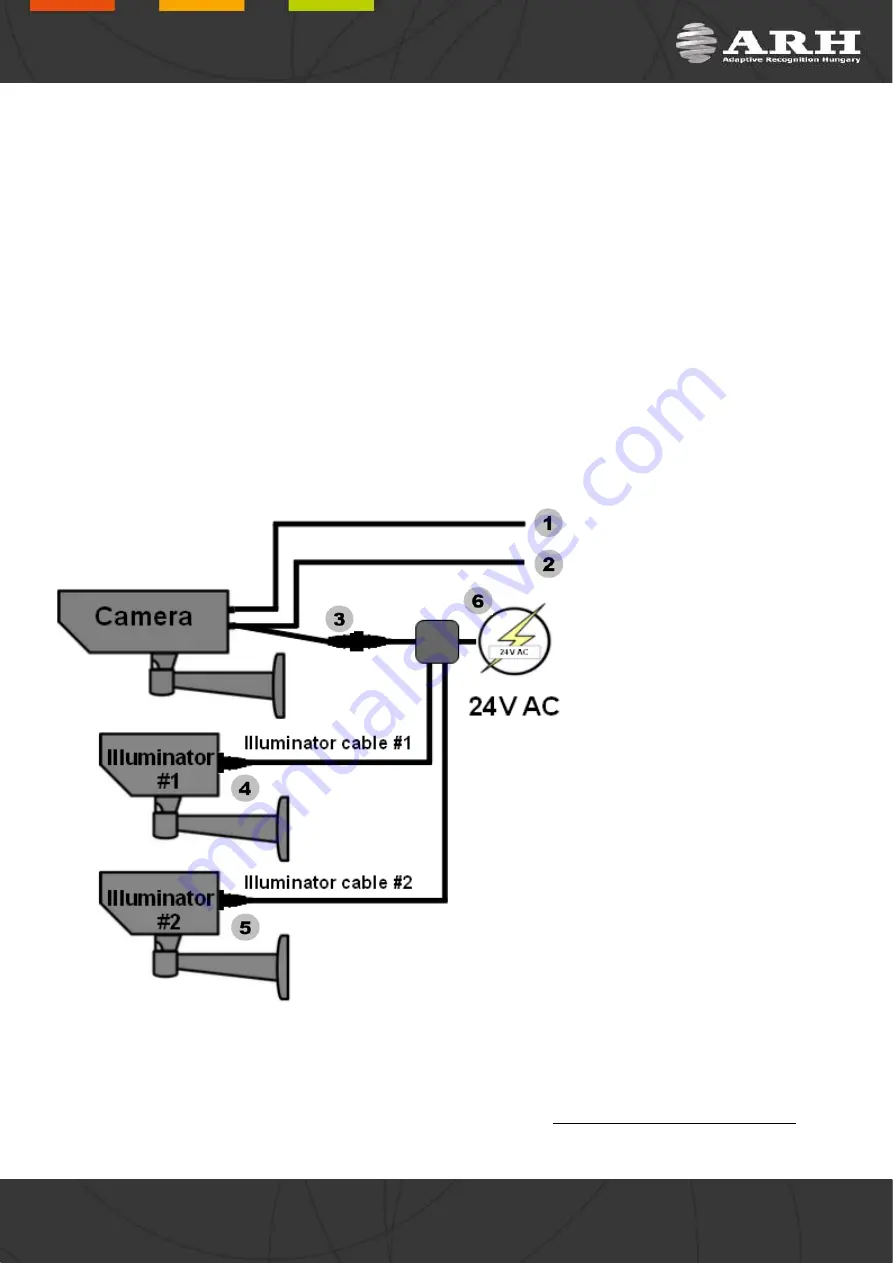
The camera is pre-assembled with three cables. The first cable (

1

) is responsible for communication via TCP/IP, the 

second (

2

) one is for user trigger and serial connections and the third cable (

3

) is for power supply (

6

) and 

illuminator communication (

4

 and 

5

).  


RJ45: with e.g. inline coupler 


User I/O and Power&Illuminator: with e.g. junction box 


IMPORTANT NOTICE! For cabling use quality, outdoor-certified cables! 

Improper cabling causes warranty to void! Water may enter into the camera inside through loose cable 

ends. Use smooth circular cables only (6-8mm diameter). 


NOTE

: Junction box is included in the package only if the camera has been purchased with illuminators. 

 
The camera is pre-assembled with cables according to the followings: 
 

1. Ethernet 


2. User I/O 


1. Opto Out G (–) 
2. Serial RX 
3. Serial TX 
4. Opto In S (+) 
5. Opto In G (–) 
6. Opto Out S (+) 
7. (Green/Yellow) Serial GND 

 
3. Power&Illuminator 


1. AC 
2. Illuminator Control 1 
3. Illuminator Control 2 
4. Illuminator Control Out + 
5. Illuminator Control 3 
6. AC 
7. (Green/Yellow)  Illuminator 

Control Out - 


4. Illuminator connector 
 
5. Illuminator connector 
 
6. Power 


AC 


AC 


IMPORTANT

: SEAL THE UNUSED CABLE ENDINGS (END SLEEVES) BEFORE CONNECTING TO POWER IN 

ORDER TO AVOID DAMAGES DUE TO SHORT CIRCUIT! 


Page 7/17  

Page 7/17  

Page 7/17  

Page 7/17

FreewayCAM Install Guide 

Summary of Contents for FREEWAYCAM

Page 1: ......

Page 2: ...6 Table of Contents Compliances 3 1 Hardware Overview 4 1 1 Bracket Details and Sizes 5 2 Install the Hardware 6 2 1 Mounting 6 3 Connect the Cables 7 3 1 Cable Layouts 9 4 Software Requirements 11 5...

Page 3: ...e EU RoHS Directive Compliance with RoHS means that where the product falls under the scope of the EU RoHS Directive the product does not contain the following substances Mercury Hg 0 1 Lead Pb 0 1 Ca...

Page 4: ...unshield Wall bracket Green status LED Infrared LEDs behind the protecting plate Light sensor Red status LED Camera optics Camera with bracket Camera front Page 4 17 Page 4 17 Page 4 17 Page 4 17 Free...

Page 5: ...1 1 Bracket Details and Sizes Page 5 17 Page 5 17 Page 5 17 Page 5 17 FreewayCAM Install Guide...

Page 6: ...m of the bracket Use size 5 Allen key 2 Adjust the bracket into the desired position 3 Tighten the screw back NOTE Do not overtighten the screws 2 1 Mounting The bracket can be mounted into different...

Page 7: ...gh loose cable ends Use smooth circular cables only 6 8mm diameter NOTE Junction box is included in the package only if the camera has been purchased with illuminators The camera is pre assembled with...

Page 8: ...minators IMPORTANT NOTICE For cabling use quality outdoor certified cables Improper cabling cause warranty to void Always use sealing caps if the connector is not used to keep the illuminators waterpr...

Page 9: ...serial port POWER SPECIFICATIONS The required input voltage is model dependent please use the proper input according to your model Please consider voltage drop if you use cables FreewayCAM WideVGA Fre...

Page 10: ...of the polarity SCHEMATIC FOR TRIGGERING EXTERNAL WIRING SCHEMATIC SERIAL CONNECTION SPECIFICATION The serial port of the camera complies with the RS 232 standard Route the cable according to the ima...

Page 11: ...e IP address or set your computer s IP in the 192 0 2 x subnet where x is an integer number between 1 and 254 except 3 with the subnet mask of 255 255 255 0 For more information see Appendix 3 Use the...

Page 12: ...nce is too short it may happen that a part of the plate is over the camera s field of view when the vehicle is near to the side of the lane or the plate is not at the middle of the vehicle From the po...

Page 13: ...A properly set camera should provide a similar image A proper sample image Proper character sizes in pixels on the sample image Page 13 17 Page 13 17 Page 13 17 Page 13 17 FreewayCAM Install Guide...

Page 14: ...over Do not use the camera without its sun shield in hot environment because it was specially designed to provide proper air cooling The cameras should be stored in low humidity environment in tempera...

Page 15: ...t and select Settings Control Panel 2 Make sure you are in Classic View by clicking Classic View on the left of the Control Panel 3 Click Network Connections 4 Right click on the network connection yo...

Page 16: ...er The sticker indicating the Name IP address MAC address and the Serial Number of the camera can be found on the back of the device under the sunshield Page 16 17 Page 16 17 Page 16 17 Page 16 17 Fre...

Page 17: ...g a Demo or a sample application please let us know the name of the application you tested If you have some problem while developing your own application please specify the followings o your programmi...

Reviews: