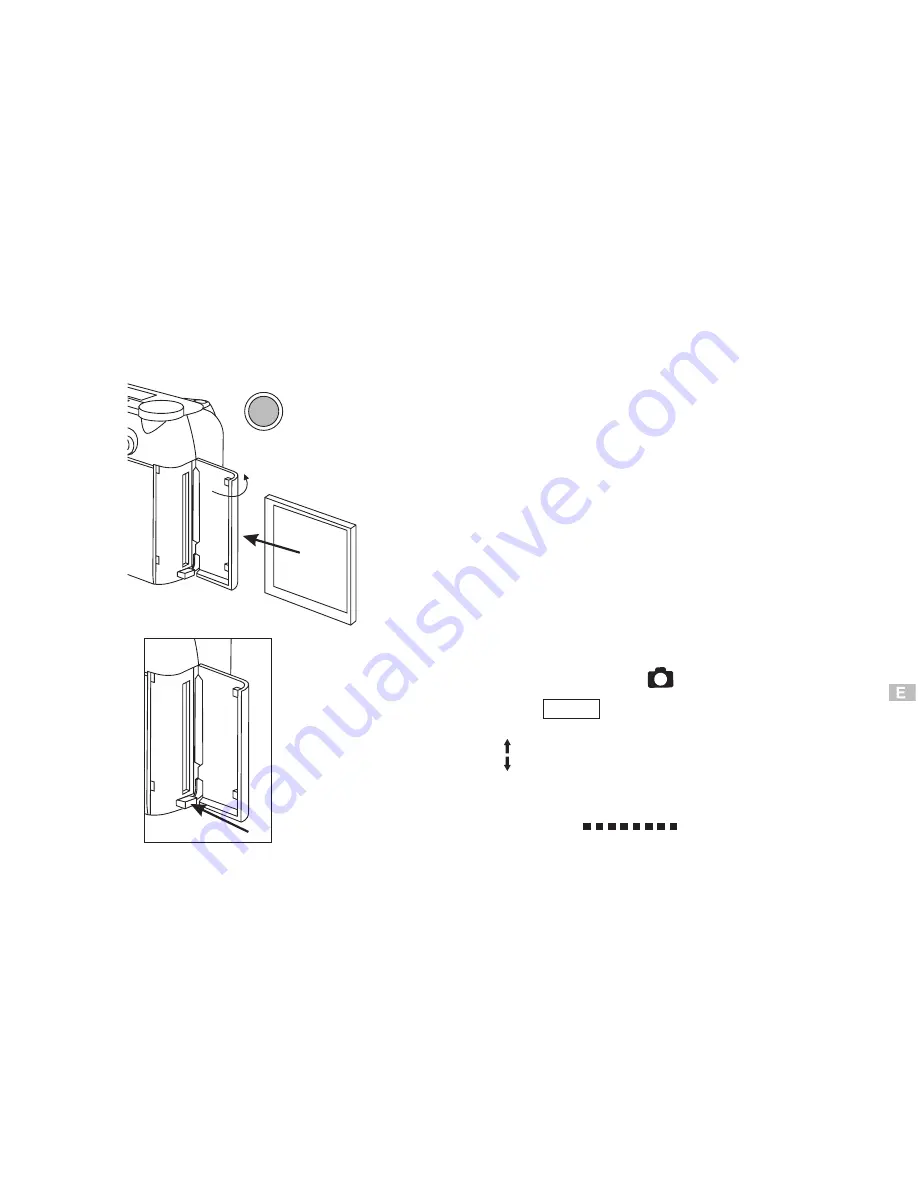
Ejecting the Compact Flash Card:
power(off)
Compact Flash Card Installation
3.Insert the CF card into the slot. Be sure
that the CF card is in the upright position and
the back of the card faces the back of the camera.
2.Open Card compartment cover.
4.Close the CF card slot.
1.Be sure that the camera is OFF.
1.Turn OFF camera power.
2.Open the Card compartment cover.
3.Push the eject lever to eject the card.
See Figure 2
Figure 1
Figure 2
Formatting the CF Card
2.Press the Menu button to display
the Menu.
1.Set the Mode dial to
.
3.Move arrows on the navigation to
"
"
and press
.
FORMAT
4.Confirm
with
then auto run
"FORMAT/SURE?
9
Open the CF card
compartment cover
eject lever
COMPLETE
"ok"
"ok"
the bac
k of the
card
faces
the back
of the
camera.
the back
of the
card
faces
the back
of the
camera.
Summary of Contents for DC3550
Page 1: ...Digital Camera DC3550 User s Manual 9 9 9 9 6 8 8 5 5 ...
Page 2: ......
Page 4: ......
Page 10: ...Accessory Set up CARD CARD Figure 1 Figure 2 Figure 3 Figure 4 6 ...
Page 33: ...29 Note Screen display the driver file name automatically Then click Next ...
Page 34: ...30 Note Select the driver Then click Next Search ...
Page 35: ...31 Note Select locations of data source Then click Next ...
Page 36: ...Digital Camera Zoom 32 Note Screen display to confirm the driver location Then click Next F ...
Page 38: ...34 Note Screen display a removable Disk appear Then click it ...
Page 39: ...35 Note A new file appear ...
Page 40: ...36 Note Click the file ...
Page 41: ...37 Note Click the file to playback picture ...
Page 43: ...39 ...
Page 44: ...40 Note The set up process automatically please wait ...
Page 45: ...41 Note The software recommended that you exit all Windows programs If you ready click Next ...
Page 46: ...42 Note Display the LICENSE AND WARRANTY information If you agree click Yes ...
Page 47: ...43 Note Please select the image file type s that you wish associate then click Next ...
Page 48: ...44 Note Choose the file destination location Browse the destination folder then click Next ...
Page 49: ...45 Note select folder name Accessories or new then click Next ...
Page 50: ...46 8 21 8 21 Note display Current setting automatically then click Next ...
Page 51: ...47 Note display Online Registration automatically then click Continue ...
Page 52: ...48 ...
Page 55: ...51 ...
Page 56: ...52 ...
Page 57: ...53 ...
Page 58: ...54 ...
Page 59: ...55 21SE ...
Page 61: ...57 ...
Page 62: ...58 ...
Page 63: ...59 Note The instruction of Location Installation Update then click Next ...
Page 64: ...60 Note The software recommended that exit all Windows programs If ready click Next ...
Page 65: ...61 Note Display the LICENSE AND WARRANTY information If you agree click Agree ...
Page 66: ...62 Note Choose the file destination location Browse the folder then click Next ...
Page 67: ...63 Note Please select the image file type s that you wish associate then click Next ...
Page 68: ...64 Note Select folder name Accessories or new then click Next ...
Page 69: ...65 Note Selection of Plugin then click Next ...
Page 70: ...66 Note The set up process automatically please wait ...
Page 71: ...67 Note The instruction of Setup Assistant then click Next ...
Page 72: ...68 Note The MIME Setting then click Next ...
Page 73: ...69 Note Select the file type assocition then click Next ...
Page 75: ...71 ...
Page 76: ...72 ...
Page 77: ...73 ...
Page 78: ...74 ...
Page 79: ...75 ...
Page 89: ......


