


5
6
(3) After recharging
Remove the mouse from the charging cables.
Make sure whether the communication between the mouse and the receiver is still available or
not. If not, please refer to the ID setting instruction in the manual to re-set the communcation.
a.
b.
B. Software Installation
The CD included in the package contains gaming software. (The Tilt Wheel function will be activated
only after the gaming software is installed.)
Driver Installation
The mouse features plug & play. It is not necessary to install the driver to operate the mouse. You
may require the mouse driver to make the tilt scrolling function effective. Please kindly install gaming
software to complete tilt wheel driver installation.
A. Un-install or removing the current mouse driver
Before installing the driver of the mouse, we suggest that you check if any other mouse driver has
been installed in your system. If yes, please uninstall or remove the existing mouse driver or software
before installing this gaming software to avoid conflict.
B. Install the mouse driver
Select setup.exe to install the driver from the CD.
C. Operation: 4-Way Scrolling
1. Vertical Scrolling
Roll wheel up to scroll up; roll wheel down to scroll down.
2. Horizontal Scrolling
Hold the wheel to left to scroll left; hold the wheel to right to scroll
right. Release wheel to stop scrolling function.
The 4-Way scrolling function is effective only after successful installation of the original mouse driver.
To function the 4-way scrolling in some applications in Windows VISTA such as Word, Excel,
Powerpoint and etc., the driver should be installed.
Note
Gaming Software Tool
Installation
To use the powerful gaming function, users need to install and execute the gaming software tool.
Just insert the CD, then run the GM.exe
While executing the gaming software, please close the related
Language Input Method
.
Not to cause conflict, we suggest you had better uninstall other mouse drivers before installing the gaming software.
The gaming software will auto-detect if the gaming mouse is plugged into the PC. After connecting to the PC, the
mouse photo will display on the upper right corner of the software.
After successful installation, there is a gaming mouse software icon will appear on the lower right corner of the windows
screen.
Note
Dpi light indicator
*
400 dpi
: One Blue LED “On”
*
800 dpi
: Two Blue LED “On”
*
1600 dpi
: Three Blue LED “On”
*
3200 dpi
: Four Blue LED “On”
Tips
for In-play Sensitivity Switching
1. Try the default settings in practice games first before changing these settings.
2. Practice using the In-game dpi Increase/Decrease buttons on the mouse before engaging in serious combat.
3. In first-person shooter games, programming the mouse to use only two tracking sensitivities may work better than using three or
more. Use a smaller dpi tracking sensitivity (e.g., 100 dpi) for sniping and shooting, and a higher setting (e.g., 5600 dpi) for quicker
movements.
4. Customize each game according to your specific sensitivity switching needs.
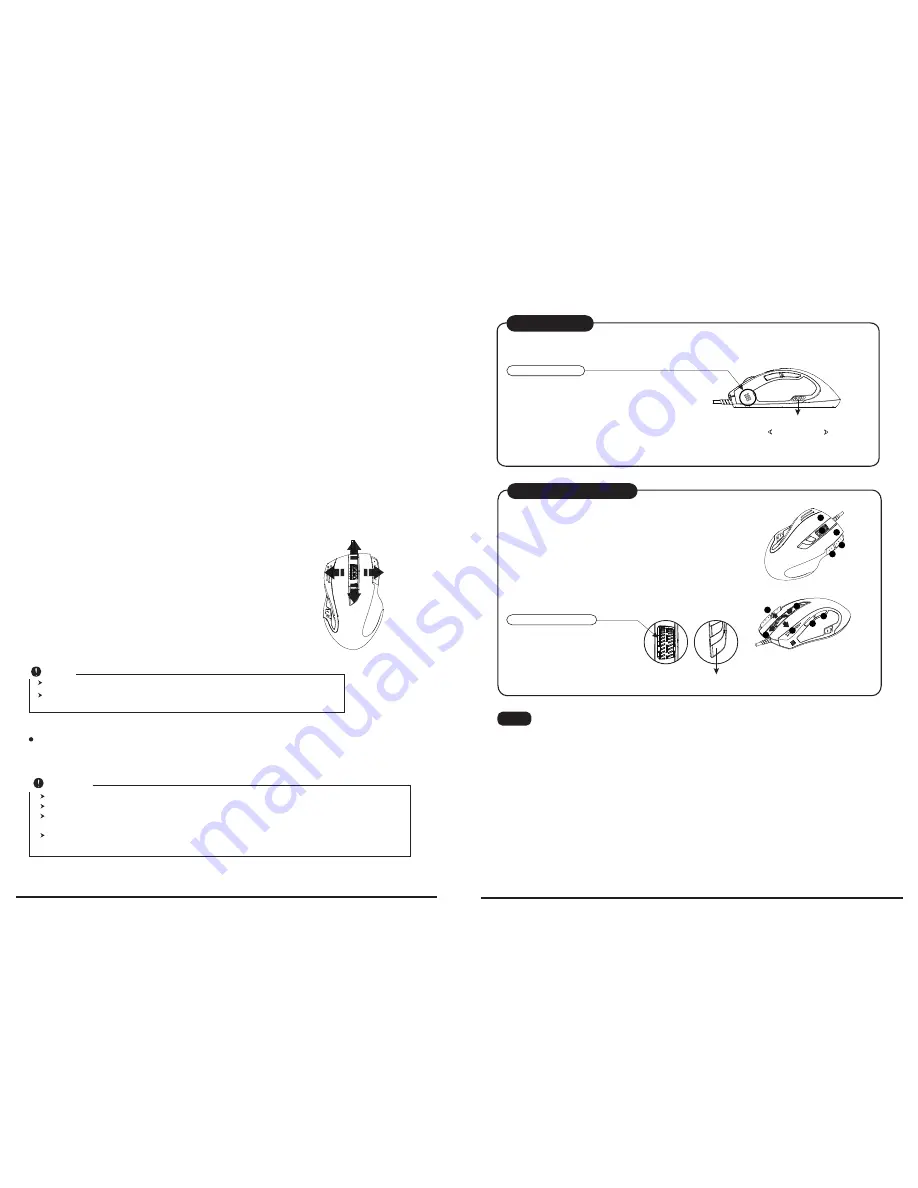
Dpi switch button
Dpi Settings
1. Press the dpi switch button to change the different resolution.
2. The default dpi setting:
3.User can change default dpi settings to the
range of 100~5600 dpi with the gaming
software tool included.
Mode light indicator
* Red light on - Mode 1
* Green light on - Mode 2
* Blue light on - Mode 3
* Pink light on – Mode 4
* Cyan light on – Mode 5
Mode switch button
* Users can record a macro or get a built-in function from script library,
and then save and assign a macro or a function to one of available
modes for each gaming button.
* The 4th/5th buttons default is Internet Forward & Backward.
1. There are 11 programming gaming buttons for users
to assign a macro function.
2. There are 5 modes switchable.
3. The mode switch button is on the top of the mouse.
Gaming Modes Setting
Gaming button
Dpi “+”
Dpi “-”
1
2
3
6
4
5
8
9
11
10
Gaming button
7
Summary of Contents for L901LR
Page 1: ...2 4G WIRELESS WIRED L901LR...


