background image

5

ERT7 and ERT8 Ebbert Rivet Tools (HK1061

)


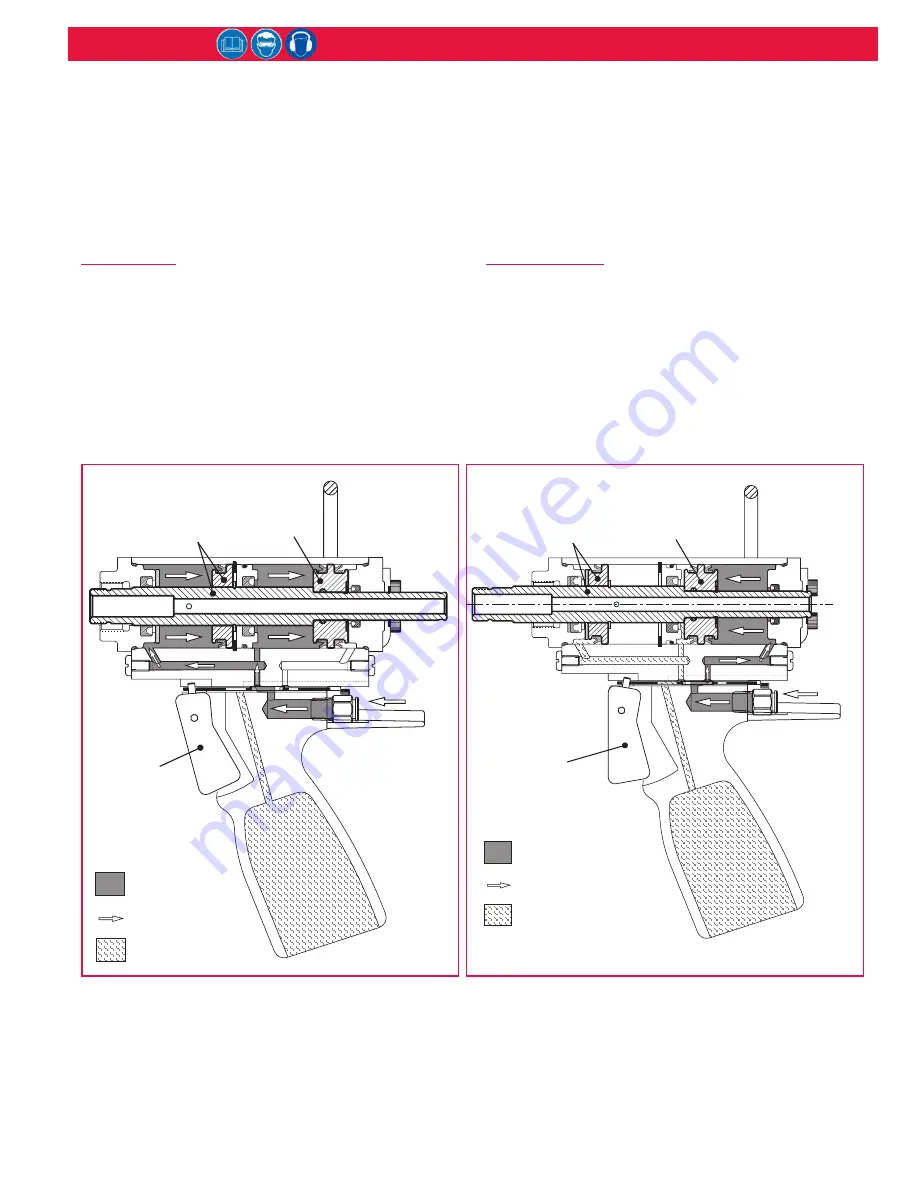
PULL CYCLE

When the trigger is pressed, the incoming non-oiled 

plant air, regulated at 90 psi forces the Piston Assembly 

and Double Piston to the rear of the tool, and air is 

exhausted out the bottom of the tool. The fastener is 

installed, and the fastener pintail breaks off.

NOTE

The ERT8 exhaust air exits through small holes 

in the bottom of the Valve Body. (See Item 16 of ERT8 

Assembly Drawing in this manual.)

RETURN CYCLE

When the trigger is released, the pressurized air is 

directed to the rear of the pistons, causing them to move 

forward. The fastener pintail is vacuumed out the rear 

of the tool and into the Power Unit Pintail Collection bin, 

and the tool is ready for the next fastener installation.

This manual contains operating and service procedures 

for the Ebbert Rivet Tool models ERT7 and ERT8. Pay 

close attention to the recommended service procedures 

in this manual.

Specific instructions for each tool are given under that 

tool model number heading. While the tools appear 

similar, each tool contains parts not used on other 

models, and removal and replacement methods may 

vary.

General Information

Principle of Operation

Summary of Contents for ERT7

Page 1: ...T8 Ebbert Rivet Tools Safety Instructions 3 4 General Information 5 Principle of Operation 5 Specifications 6 Preparation for Use 7 Maintenance 7 8 Disassembly Instructions 9 Assembly Instructions 10 Kits and Accessories 10 Troubleshooting 10 Assembly Drawing Parts List ERT7 11 Assembly Drawing Parts List ERT8 12 ...

Page 2: ...2 ERT7 and ERT8 Ebbert Rivet Tools HK1061 ...

Page 3: ...d preventing an accident which may cause severe personal injury 17 Never place hands between nose assembly and work piece Keep hands clear from front of tool 18 Tools with ejector rods should never be cycled without nose assembly installed 19 When two piece lock bolts are being used always make sure the collar orientation is correct See fastener data sheet for correct positioning II PROJECTILE HAZ...

Page 4: ...e controls to reduce the risk may include actions such as damping materials to prevent workpiece from ringing 3 Use hearing protection in accordance with employer s instructions and as required by occupational health and safety regulations 4 Operate and maintain tool as recommended in the instruction handbook to prevent an unnecessary increase in the noise level 5 Select maintain and replace the c...

Page 5: ...released the pressurized air is directed to the rear of the pistons causing them to move forward The fastener pintail is vacuumed out the rear of the tool and into the Power Unit Pintail Collection bin and the tool is ready for the next fastener installation This manual contains operating and service procedures for the Ebbert Rivet Tool models ERT7 and ERT8 Pay close attention to the recommended s...

Page 6: ...6 ERT7 and ERT8 Ebbert Rivet Tools HK1061 Specifications Inches mm ERT7 Inches mm ERT8 WEIGHT 3 25 lbs 1 47 kg RIVET SIZES 1 8 5mm 6mm WEIGHT 3 0 lbs 1 36 kg RIVET SIZES 1 8 5mm 6mm ...

Page 7: ...s in a vise and when parts require force use suitable soft materials to cushion impact For example use a half inch brass drift wood block and vise with soft jaws to reduce the possibility of damaging the tool Remove components in a straight line without bending cocking or applying undue force Reassemble tool with the same care Consult Troubleshooting section of this manual if a malfunction occurs ...

Page 8: ...rvice Kits hoses and extra parts should be kept in stock Inspect cylinder bore pistons and piston rods for scored surfaces and excessive wear or damage Replace as necessary Pulling Head Maintenance Clean the pulling head assembly often Dip it in mineral spirits Figure 1 or similar solvent to clean jaws and wash away metal chips and debris At regular intervals as experience shows disassemble the pu...

Page 9: ...avy plastic sleeve off the air line connector Press the red collet on the air line connector and pull the air line out of the connector Figures 2 3 Rivet Tool Disassembly Figures 2 3 1 Remove the Pulling Head Assembly from the tool remove all nicks and burrs from front of Piston Rod Assembly 2 Model ERT7 Remove the four screws and the piston rod guide from the front of the tool Figure 2 Model ERT8...

Page 10: ...stall the handle and two bearing plates and secure with four screws Torque the screws to 60 80 inch pounds Figure 3 9 Install the end cap and support loop assembly on the rear of tool and secure with the four screws Torque the screws to 60 80 inch pounds NOTE When the tool is used without the support loop assembly two additional screw bearing plates are required between the end cap and the screws ...

Page 11: ...3 9 300066 Seal 2 10 500780 O ring 1 11 300063 Double Piston 1 12 500995 Retaining Ring 2 13 300071 Seal 1 14 300029 End Cap 1 15 506268 Male Connector 1 16 300107 Guard 1 17 300156 Valve Back up Ring 1 18 500779 O ring 1 19 300042 Handle 1 20 300251 Trigger 1 21 500623 Pin 1 22 507660 Bleed Screw 2 23 300064 Screw Bearing Plate 2 24 500064 Socket Head Screw 8 25 300114 Support Loop Assembly 1 26 ...

Page 12: ...14 300029 End Cap 1 15 506268 Male Connector 1 16 300037 Valve Body 1 17 300156 Valve Back up Ring 1 18 500779 O ring 1 19 300105 Handle 1 20 300252 Trigger 1 21 500623 Pin 1 22 507660 Bleed Screw 2 23 300064 Screw Bearing Plate 2 24 500064 Socket Head Screw 8 25 300126 Support Loop Assembly 1 26 500061 Socket Head Screw 4 27 508010 Piston Rod Wiper 1 28 501344 Dowel 1 29 300158 Valve 1 30 300124 ...

Page 13: ... of a complete overhaul Determination is made on a case by case basis upon return of parts to Huck International Inc for evaluation Tooling Part s and Other Items not manufactured by Huck HUCK makes no warranty with respect to the tooling part s or other items manufactured by third parties HUCK expressly disclaims any warranty expressed or implied as to the condition design operation merchantabili...

Page 14: ...rations Unit C Stafford Park 7 Telford Shropshire England TF3 3BQ 01952 290011 FAX 0952 290459 Us Operations BP4 Clos D Asseville 95450 Us par Vigny France 33 1 30 27 9500 FAX 33 1 34 66 0600 FAR EAST Melbourne Operations 11508 Centre Road Clayton Victoria Australia 3168 03 764 5500 Toll Free 008 335 030 FAX 03 764 5510 Huck is Forever For the Long Haul The Future of Fastening Technology The Futur...

Reviews: