background image

MS250

32

If you do wish to ‘share’ the internet connection on your PC with the MS250, you can do this as follows:

1.   Using an Ethernet 

crossover 

cable (not a straight-through cable), connect the MS250 to the 

computer’s ethernet port

2.  Enable Internet Connection Sharing on your computer
3.  Switch on the MS250.

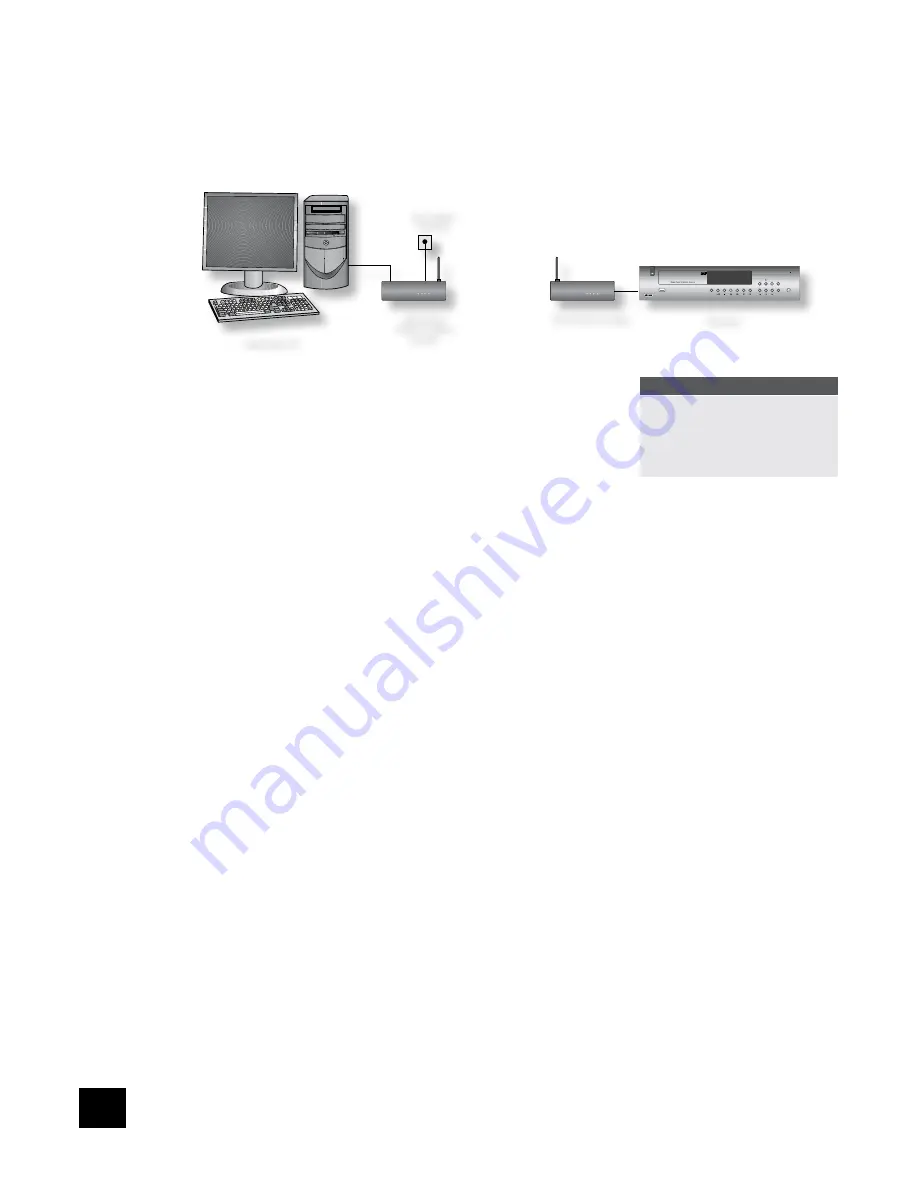
You can also use a wireless connection between the MS250 and your computer. To do this, you will need 
two wireless Ethernet Bridges. These will need to be configued using your PC, then connect one to your 
computer, and one to the MS250. 

If you don’t have an Ethernet network or an ADSL or cable modem

The easiest way to establish an Ethernet network with Internet connection for your MS250 is to use an 
ADSL or Cable Router connected to your PC. To simplify the wiring, you may prefer to 
use a wireless ADSL or Cable Router and a wireless Ethernet Bridge connected to the 
MS250. Proceed as follows:

1.  Subscribe to a broadband service and specify that you would like to use a 

wireless ADSL or cable Router. Many ISPs can provide a suitable router when 
you sign up; if not, you will need to purchase one of these from a computer 
store.

2.  Connect your computer to the router.
3.  Configure the router according to the instructions provided with it and the 

configuration information provided by your ISP.

4.  If you are using a wired Ethernet configuration, connect the MS250 to a spare LAN port 

on the Ethernet Router using a straight-through Ethernet cable. Refer to the diagram under 
‘Connecting the MS250 to an existing Ethernet network with Internet access’.


or


If you are using a wireless Ethernet configuration, use your PC to configure the Wireless 
Ethernet bridge according to the instructions provided with it and then connect the Wireless 
Ethernet bridge to the MS250. Refer to the diagram above.

5.  Switch on the MS250.

Connecting the MS250 to the Internet without a computer.

Although it is usually necessary to use a computer to configure the modem in the setup described above, 
once the configuration has been completed you no longer need the computer to access Internet radio 
stations or retrieve track names for CDs. The computer can therefore be disconnected, leaving only a 
single connection between the ADSL/cable router and the MS250.

Testing your Internet connection

To check that the MS250 is able to use your broadband Internet connection:

1.  Insert an audio CD into the MS250’s CD drive.
2.  Check that the MS250 retrieves track names from the Internet.

It may take a few moments to recover the track names from the Internet database. Also, although track 
names for most CDs are available, there are a few exceptions. Try another CD before concluding that the 
Internet connection is at fault.

Advanced network configuration information

By default, the MS250 is configuret to use DHCP, which means that it will pick up its network settings 
automatically from a suitable device (normally the router) on your LAN. However, if your network does 
not use or support DHCP, you will need to configure the MS250 with a static IP address. To do this, you’ll 
need to know the following settings (either obtain them from your ISP, or configure them to fit in with 
existing network setup):

1.  From the Home page, select 

Settings


)


Network


)


Ethernet

2.  From the 

NETWORK-ETHERNET

 menu screen, enter the following information:


IP Address – this must be a unique address on your LAN (e.g. if your router has the IP address 
192.168.1.1, you might set the MS250’s IP address to be 192.168.1.101)


Subnet mask – this must match the subnet mask of other devices on your LAN (and is usually 
255.255.255.0)


Name server – this is the IP address of the device that converts domain names into appropriate 
IP addresses and vice versa (normally the address of your router)


Gateway – the IP address of the device on your LAN that acts as a gateway to the Internet and 
other networks (this is normally your router)

3.  Make sure that 

Settings


)


Network


)


Options 

shows that DHCP is disabled.

4.  Select ‘Apply’ to enact the new network settings (this will take a few moments).

MS250

POWER

LOAD

OK

HOME

ZONE

DISPLAY

�����

����������

��������

����������

������

���������

������

���������������

NOTE

Although the MS250 has a total of 
three USB ports, you cannot connect 
a USB modem to the unit directly. 
The USB ports are for use with 
an external archive disk and/or a 
keyboard.

Summary of Contents for FMJ MS250

Page 1: ...MS250...

Page 2: ...ot defeated 10 Power cord protection Power supply cords should be routed so that they are protected against being walked on or pinched particularly at plugs and the point where they exit from the unit...

Page 3: ...0 Connecting to a network and the Internet 31 Local Area network configurations 31 Testing your Internet connection 32 Advanced network configuration information 32 Remote control codes 33 Technical s...

Page 4: ...ARE those warranties do not originate from and are not binding on SOFTWARE SUPPLIERS NO LIABILITY FOR CERTAIN DAMAGES Except as prohibited by law SOFTWARE SUPPLIERS shall have no liability for any ind...

Page 5: ...dealer immediately Inserting the batteries into the remote control The remote control requires 2 AAA batteries to operate To insert the batteries into the remote control please follow these instructio...

Page 6: ...ne level inputs are provided on the rear panel to allow routing and recording of analogue sources such as a DAB tuner The audio signal from theses inputs can be routed to any of the Zones If you wish...

Page 7: ...ideo The S Video output also known as S VHS or Y C is commonly supported by display devices worldwide Connect the S VIDEO output of the MS250 to the S Video input of the display device using an S Vide...

Page 8: ...dealer for further information if you think you may need this facility IR output bm RC5 code output is available to control equipment in Zones 1 and 2 if line of sight infrared cannot be used The 3 5...

Page 9: ...rmal playback speed and play the CD or stored music press 4 Skip track To start a CD with a track other than the first press or 0 to locate the desired track To select another track at any time during...

Page 10: ...lay fast 7 8 and Skip tracks 0 in both directions Source selection Press these buttons to select the internal CD player Internet radio or the devices connected to the AUX 1 or AUX 2 inputs Standby Pre...

Page 11: ...a window on the menu system showing a necessarily restricted view of the whole Use the up down left and right keys to navigate to each corner of the menu displayed The picture below shows an example...

Page 12: ...starts again from the first selected track The default setting is Repeat off You can also instruct the MS250 to play tracks in a random order from the CD by changing the Shuffle menu item to Shuffle...

Page 13: ...d right To enter uppercase letters press the key on the remote once The word Capitals appears in brackets on the menu page Press again to enter digits Press once more to revert to entering lower case...

Page 14: ...ode a simple Ooo animation on the front panel display shows that compression is in progress Storing the CD Choose Store from the left hand window of the menu page The following screen is displayed Sel...

Page 15: ...album you d like to listen to from the list that appears Press 4 to start playing the album from track 1 Alternatively press OK and select the tracks you d like to listen to from the list of tracks th...

Page 16: ...lass or Glass in the title the search function is not case sensitive 1 Select Search from the left hand window of the MUSIC GENRES page 2 Press OK to select the search text box and enter the track art...

Page 17: ...you switch on the MS250 it automatically downloads the latest list of available stations from the Arcam website given that the unit is connected to the Internet Playing an Internet radio station To p...

Page 18: ...ng a CD Creating a playlist To create a playlist 1 Choose the first selection of tracks you d like to include in your playlist so that they are listed on the MUSIC TRACKS menu page Any selected tracks...

Page 19: ...order Navigate to the desired playlist and press 4 Adding tracks to a playlist To add tracks to a playlist you first need to choose the tracks you d like to add so they are displayed on the MUSIC TRA...

Page 20: ...track up or down the playlist highlight the track as above and choose Move up or Move down from the left hand window of the menu page Continue to click OK until the track has moved to the desired loc...

Page 21: ...sage is briefly displayed if you try to enter a name that is too long To remove tracks from the album first select the tracks you d like to remove on the MUSIC TRACKS menu page All selected tracks are...

Page 22: ...to record onto the CD and press OK to display the list of tracks on the MUSIC TRACKS menu page Now choose Create CD from the left hand window of the MUSIC TRACKS menu page to display the following men...

Page 23: ...hen choose Create CD from the left hand window of the menu page The following menu screen appears Indicator bars show the progress of CD creation for each track and for the complete CD Once the CD has...

Page 24: ...ons This option allows you to select or deselect Background compression which ensures that disc compression is only carried out when the MS250 is in standby mode You can set the standby time manually...

Page 25: ...option to prevent the MS250 accessing a device that had previously been connected If you remove a non networked device such as an MP3 player you can reinstate it by disconnecting and reconnecting it t...

Page 26: ...um or Bright The Brightness can be adjusted subsequently from the front panel Display button or the remote s DISP button The Network menu Choose this option to change various network settings The opti...

Page 27: ...System Operating System and software version installed the Hard disk size and usage and other details This information may be useful to note if you are reporting a service issue to Arcam technical pe...

Page 28: ...ult is 5 minutes Standby time This sets the standby time in minutes the default is 60 minutes The Archive music menu This option allows you to move music files between the MS250 and an external USB di...

Page 29: ...lling you the name of the track to which the audio has been saved you might want to make a note of this so it s easy to find later Recordings are stored under the genre Recordings Working with recorde...

Page 30: ...it This could take a few minutes If you want to transfer the files to a disk over the network make sure the storage device has been added to the list of available locations using the Add location opti...

Page 31: ...from a spare LAN port on the Ethernet Router or attached Ethernet Switch to the Ethernet port on the rear panel of the MS250 2 Switch on the MS250 In most cases no further adjustments to the MS250 or...

Page 32: ...leted you no longer need the computer to access Internet radio stations or retrieve track names for CDs The computer can therefore be disconnected leaving only a single connection between the ADSL cab...

Page 33: ...40 Open 21 45 Pause 21 48 Play 21 53 Stop 21 54 Record 21 42 Zone 21 55 Delete character 21 112 Caps 21 113 Home 21 114 Display control commands Command Decimal Code Display 21 71 Advanced control com...

Page 34: ...ed 20Hz 20kHz unweighted Digital audio output IEC958 PCM on gold plated phono coax and TOSLINK optical sockets Video outputs Composite video 1 x gold plated phono 1V pk pk in 75 S Video 1 x 4 pin mini...

Page 35: ...r s responsibility to maintain the original media and or appropriate backup copies within the specific rights of the media s copyright holder The MS250 can backup music data to an external hard drive...

Page 36: ...A R Cambridge Ltd Pembroke Avenue Waterbeach CAMBRIDGE CB25 9QR England SH149 Issue 2...

Reviews: