background image

The AQ-DVD-3 & AQ-DVD-3B Media Center is designed for the harsh conditions of the marine 
environment. For easy system set-up, mount the Media Center so the front panel controls will 
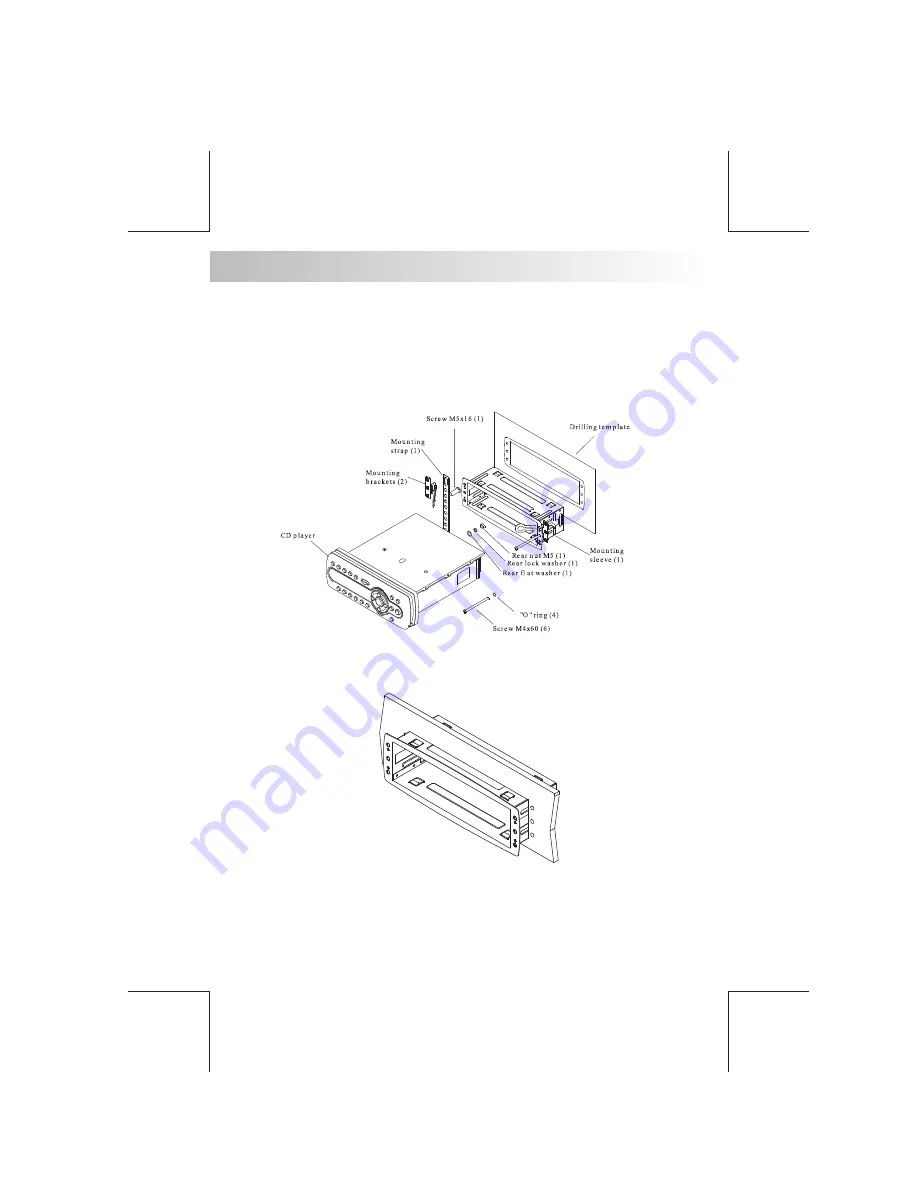
be easily accessible from the driver’s seat. In addition, observe the following precautions: 1. 
Check clearances on both sides of a planned installation before drilling any holes or installing 
any screws. 2. When routing RCA cables, keep them away from power cables and output 
speaker wires. 3. Due to the harsh conditions of the marine environment, Always support the 
back of the unit with the supplied back strap.

2. MOUNTING PRECAUTIONS

E - 3

1. Slide mounting can into DIN opening

Summary of Contents for AQ-DVD-3

Page 1: ...CD MP3 WMA DVD AM FM XM Radio SD Card iPod Wired Remote Ready INSTRUCTION MANUAL MULTI ENVIRONMENT PLAYER READY TOP SAT INFO READY AQ DVD 3B AQ DVD 3 ...

Page 2: ... numbers This unit can play the disc of all region code numbers ALL A DISCS CAN PLAY WITH THIS UNIT C DISCS WHICH CAN NOT BE PLAYED D NOTE ON REGION CODE E DISC MAINTENANCE E 2 B FORMAT CAN PLAY WITH THIS UNIT Digital Versatile Discs DVDs Video CDs VCDs HDCD Digital Versatile Discs Recordable DVD R Digital Versatile Discs Rewritable DVD RW Compact Discs CDs CD Recordable CD R CD Rewritable CD RW A...

Page 3: ...n addition observe the following precautions 1 Check clearances on both sides of a planned installation before drilling any holes or installing any screws 2 When routing RCA cables keep them away from power cables and output speaker wires 3 Due to the harsh conditions of the marine environment Always support the back of the unit with the supplied back strap 2 MOUNTING PRECAUTIONS E 3 1 Slide mount...

Page 4: ...s into position and tighten center bolts Remove backing brackets handles by bending backing bracket handles until they break off 3 Slide Media Center into mounting can Secure Media Center using supplied SS hardware and back strap ...

Page 5: ... 11 10 RIGHT FRONT SPEAKER 1 RED 7 8 4 5 6 3 2 BLUE GREEN BLACK GREEN YELLOW GRAY BLACK WHITE BLACK WHITE PIN NO WIRE COLOR LEFT REAR SPEAKER RIGHT REAR SPEAKER RIGHT REAR SPEAKER POWER ANTENNA RIGHT FRONT SPEAKER LEFT REAR SPEAKER LEFT FRONT SPEAKER LEFT FRONT SPEAKER ACCESSORY 12V 12 11 10 9 BLACK GROUND VIOLET BLACK VIOLET GRAY DESCRIPTION BATTERY 12V ANTENNA JACK LEFT LINE OUT LINE OUT RIGHT 5...

Page 6: ...Memor y 5 Memor y 6 Fast Forward Fast Backward Fast Backward Short Press Long Press Short Press Long Press Short Press Long Press Mute 2 Zon e Sub W Band Parking Random Folder 22 Short Press Long Press iPod infor mation Repeat Album Repeat Shuffle Album Shuffle Fast Forward Fast Backward File Up File Down iPod Video Pause Play DVD Menu Open Open Open 2 3 Top Audio Menu Enter 6 22 8 7 21 20 19 18 1...

Page 7: ...Press Long Press Short Press Long Press Torch Band Menu Top Short Press Long Press Short Press Long Press SAT iPod Enter Enter Enter Enter SAT Band SAT Search iPod Search 12V_1 12V_2 Pause Play Seek Up Seek Down File Track Up File Track Down Fast Forward Fast Backward Back File Track Up File Track Down Next Fast CH Up Fast CH Down CH Down CH Up Short Press Long Press Top control Top Note Top contr...

Page 8: ... Audio Operation of iX Bass for details operation of iX Bass control The IX Bass Boost Level control will only appear in the Audio Menu only if the iX Bass function is currently activated On 9 MODE BUTTON MODE Short Press the MODE button to select a different mode of operation as indicated on the display panel Available modes include Tuner DVD AV IN 1 E 8 7 8 VOLUME UP DOWN BUTTON Press the volume...

Page 9: ...ust from Off to On The low battery detection will monitor the voltage on the ACC line The threshold voltage shall be 10 5 0 3 VDC A true low voltage state shall be determined by the sampling of the ACC line over time where it is reading consistently at the 10 5 0 3 VDC If selected LOW BATT On The alarm shall be a beep tone heard over the speaker outputs at a burst of 8 seconds every 30 seconds The...

Page 10: ...ear Speakers sounds output through rear speakers Select ON to reactivate the rear speakers sound output Interamp On off On will be displayed by default The user has 5 seconds to press the VOLUME from On to Off Programmable Turn on Volume VOL PGM 12 is the default setting User now has 5 seconds use the VOLUME to program the turn on volume Beep Tone ON is the default setting User now has 5 seconds t...

Page 11: ...the FRONT source s function operation When DUAL ZONE is turned ON the Mode button is used to change between the Front Source Rear Source Press mode button repeatedly to change between Front and Rear mode The LCD will display the Rear Source mode for 10 seconds User has 10 seconds to make the operation on the Rear Source s function on Front Panel or Remote The LCD display will automatically switch ...

Page 12: ...ctivated ON by pressing the Sub w button on control panel SUB W LPF Sub woofer Low Pass Filter User has 5 seconds to use the Volume Up or Down button to select the 4 different Low Pass filter Flat 80Hz 120Hz or 160Hz The Sub woofer LPF control is only applicable if the unit is equipped with the optional sub woofer line out and only if the unit is connected to an optional sub woofer speaker The Sub...

Page 13: ...Volume Up or Down button to adjust the desired Treble level range from 6 to 6 TRE CFQ Treble Center Frequency User has 5 seconds to use the Volume Up or Down button to adjust the desired Treble center frequency to 10KHz 12 5KHz 15KHz or 17 5KHz BALANCE User has 5 seconds to use the Volume Up or Down button to adjust the Balance between the right and left speakers from R12 full right to L12 full le...

Page 14: ...he display Recall Station 1 Select a band if needed 2 Press a preset button to select the corresponding stored station XM Display Information Pressing the AS PS button will change the XM information display in the below order Channel Name Genre News Sports Hits Kids etc Artist name Song Name If the selected channel name artist or title exceeds eleven characters the display information will scroll ...

Page 15: ...ss AS PS button to quick return back to the category which is under those channels Tips The first channel name under the chosen category will be displayed on the LCD User can either press Vol Up Down or Track Up Down button to navigate thru the channels under the chosen category Once found the desired channel display on the LCD Short press AUDIO to confirm play the selected channel Diagnostic Mode...

Page 16: ...PS Automatically select 6 strong stations and store them in the current band Select a band if needed Press AS PS button for more than three seconds The new stations replace stations already stored in that band Preset Scan Scan stations stored in the current band Select a band if needed Press AS PS button for less than 3 seconds The unit will pause for ten seconds at each preset station Press AS PS...

Page 17: ...s AS PS button for more than 3 seconds to de activates the front panel control iPod feature After the LCD display iPod Video the iPod now is controllable and user can select the desire playback video file on iPod itself Once selected a video it will automatically display on the unit thru the video output Turning iPod Power On and Off The iPod power turns on automatically as soon as it is connected...

Page 18: ...during iPod playback mode for REPEAT ALL All songs of the current album will be kept on repeat playing until the Repeat All function is disabled To disable current Album REPEAT ALL function long press M3 button more than 3 seconds Press the M3 button for less than 3 seconds to REPEAT PLAY the current song And keep on repeat playing the current song until the REPEAT PLAY function is disabled To dis...

Page 19: ...he beginning of the previous chapter 21 BACK 1 Press FAST FORWARD to fast forward through the disc Each time the button is pressed a new speed 2X 4X 8X or 20X is selected 2 Press PLAY to resume normal playback 3 Press FAST BACKWARD to fast reverse through the disc Each time the button is pressed a new speed 2X 4X 8X or 20X is selected 4 Press PLAY to resume normal playback 8 9 FAST FORWARD FAST BA...

Page 20: ...top playback and show the logo screen The player memorizes the location where playback is stopped 2 Press PLAY to resume playback from the location where playback is stopped DVD VCD 1 1 VCD 2 0 and audio CD 3 Pressing STOP twice is resume playback from the beginning of the disc E 20 When the last track playback completed the unit will automatically enter into STOP mode User can press play button t...

Page 21: ...to fast reverse through the disc Each time the button is pressed a new speed 2X 4X 8X or 20X is selected 4 Press PLAY to resume normal playback 22 21 FAST FORWARD FAST BACKWARD or 15 20 NUMERIC BUTTONS 1 When playback CD MP3 WMA use for track number or File number direct access and use when function need numeric Selection or Input like in the Goto function etc 2 Use when playback DVD which need nu...

Page 22: ...l the repeat play is disabled To disable current file repeat play press REPEAT button less than 3 seconds 16 ENTER BUTTON Use this button to confirm the selection E 22 7 RANDOM BUTTON Press RANDOM button less than 3 seconds is random play all files on the disc To disable all file random play press RANDOM button less than 3 seconds ...

Page 23: ... button for less than one second to advance to the next FILE on the disc The selected file number will appear on the display Press and Hold TRACK UP 22 or TRACK DOWN 21 button for more than one second to fast forward or fast reverse through the disc File play starts when the button is released 1 Press PAUSE to pause playback still mode The sound from the disc is muted during still mode 2 Press PLA...

Page 24: ... pictures is five seconds PAUSE NEXT BACK and NUMERIC selection and navigation keys work the same as in other operations E 24 1 Press the TITLE key to get a thumbnail view Nine pictures 3x3 will be displayed on the screen beginning with the last viewed picture on the upper left part of the screen The first thumbnail image will be highlighted with a blue border 2 Use the direction keys LEFT RIGHT U...

Page 25: ...inning of the next chapter Press BACK to skip backward to the beginning of the previous chapter 1 Long press FAST FORWARD to fast forward through the disc Each time the button is pressed a new speed 2X 4X 8X or 20X is selected 2 Press PLAY to resume normal playback 3 Long press FAST BACKWARD to fast reverse through the disc Each time the button is pressed a new speed 2X 4X 8X or 20X is selected 4 ...

Page 26: ...tton the LCD will display Set Up and keep on blinking User can use the following buttons to adjust the Set Up items shown on the TFT monitor as follow Encoder Volume Knob as Cursor to navigate thru the Set Up Items shown on the TFT Monitor Track Up Down 22 21 buttons as Cursor Left Right to navigate thru the Set Up items shown on the TFT Monitor AUDIO button as ENTER to confirm the selected item s...

Page 27: ...r MMC card was inserted into the main unit card slot Press Mode button to select card model The unit will starts the files contained on the Memory Card Once the unit read the Memory Card successfully the first file on the Memory Card will automatically start playback Press Mode button repeatedly is allowing changing to other modes or switch back to card mode If no any Memory Card is inserted into ...

Page 28: ...Gaelic German Icelandic Irish Italian Norwegian Portuguese Spanish and Swedish Turkish Albanian Danish Dutch English Finnish French Gaelic German Italian Kurdish Latin Norwegian Portuguese Spanish Swedish and Turkish Slavoic Cyrillic Include Bulgarian Belorussian English Macedonian Moldavian Russian Serbian and Ukrainian The MPEG4 Subtiltle selection is appear in the SET UP menu language MPEG4 sub...

Page 29: ...utton and pressing OK can change settings in a different category 1 Use the UP DOWN direction buttons to select the setting to be changed 2 Press OK to cycle through each possible option or display a list of the options When a list of options appears press the UP DOWN direction buttons to move among the displayed options 3 Press OK again to choose the option and change the setting 4 Press OK after...

Page 30: ...le the display of OSD status messages during operation of the player The following options are available On Enable display of OSD status messages Off Disable display of OSD status messages External Subtitle setting is used for choosing the language domain only for MPEG4 After select one language domain alphabet when playback a MPEG4 with MPEG4 subtitle the subtitle display will use this language a...

Page 31: ...Aspect setting allows the user to select the aspect ratio of the TV DVD and VCD only The following options are available 4 3 Aspect ratio of TV is 4 3 16 9 Aspect ratio of TV is 16 9 Both wide screen and 4 3 contents will fill the entire screen Selecting the Video setting allows the user to select the TV output DVD and VCD only The following options are available NTSC TV is NTSC PAL content is pla...

Page 32: ...define if the priority is to play the Audio content or the Video The following options are available Picture CD View There are two options are available in Picture CD View Original Used to switch the picture size to the current display resolution Directly Fit to screen Like letter box Take the minimum value of horizontally fit scale ratio and vertically fit scale ratio Audio Settings 1 Using the L...

Page 33: ...Rating settings Password Selection to Lock and Unlock the Parental Control Rating Selecting the Password Setting Allows the user to enter a password to lock and unlock the parental control rating setting into the player The following options are available Unlocked The parental control is unlocked and may be changed in the Rating selection factory default Locked The parental control is locked so no...

Page 34: ...h a parental control setting of 2 or less are allowed to play PG Only titles with a parental control setting of 3 or less are allowed to play PG 13 Only titles with a parental control setting of 4 or less are allowed to Play PG R Only titles with a parental control setting of 5 or less are allowed to play R Only titles with a parental control setting of 6 or less are allowed to play NC 17 Only tit...

Page 35: ...18 OPTIONAL ACCESSORIES E 35 Wired Remote AQ RF 3 Wireless Remote Control Wireless Remote AQ IRR IR Remote Control iPod cables AQ WR 3 Silver AQ WR 3B Black AQ RF3F Silver AQ RF3FB Black AQ EXT IP 3 ...

Page 36: ...e Input Maximum Voltage Input Impedance 20Hz to 20KHz 3dB 1200 mV 4 7k ohm Radio Section FM Frequency Range Usable Sensitivity Stereo Separation S N Ratio AM or MW Frequency Range Usable Sensitivity S N Ratio 530 1710 10 KHz Space 522 1620KHz 40dB at S N 20dB 40 dB XM RADIO Support XM Mini Tuner General Operating Voltage Grounding System Fuse Operating Temperature Unit Mounting Angle DC 11 14 4V N...

Page 37: ...bient temperature returns to normal Condensation Leave the player to off for an hour or so then try again Volume is in minimum Adjust volume to a desired level Wiring is not properly connected Check wiring connection The operation keys do not work No sound The built in microcomputer is not operating properly due to noise Press the RESET button Front panel is not properly fixed into its place Sound...

Reviews: