background image

e

valuation

/ c

ontrols

/ i

nstallation

BEFORE TESTING FAN MAKE SURE ALL OBJECTS ARE OUT OF THE 

ROTATION PATH OF THE FAN BLADES.HIGH-SPEED WARNING. 

KEEP HANDS 

CLEAR!

 MAKE SURE GUARDS ARE INSTALLED OR UNIT IS OUT OF REACH.

DANGER

► 

For first-time evaluation, fill tank (with water only) about quarter full.

► 

Connect to power supply.

► 

BUMP START ORSM and check for proper fan blade rotation (clockwise if looking at front of unit). If incorrect,  


find rotation connection changes on the motor's electrical schematic.

► 

Turn on the unit and listen for any possible abnormalities, such as the blades rubbing against the  


venturi or any objects. Make re-adjustments if necessary.

► 

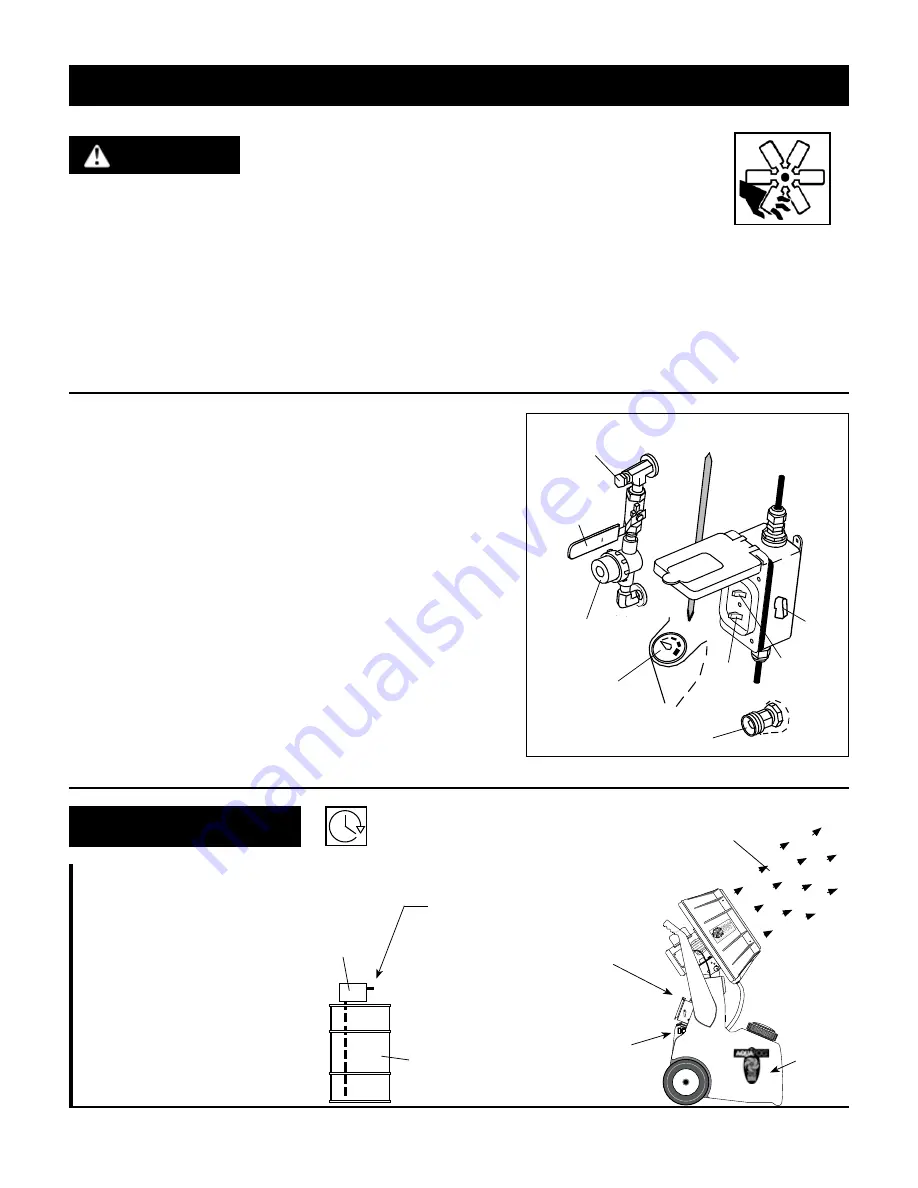
Evaluate fog quality adjusting the output by using the flow control valve. (See 

Fig. 2

).


After starting, it generally takes several seconds for the liquid to reach the atomizing fan. 

The volume of fog can be regulated by adjusting the Flow Control 

Valve. (See 

Fig. 2

)

Particle size is smaller/drier at lower outputs, so it is wise to 

operate the unit at a lower output for longer periods of time rather 

than high outputs for short periods of time.

At the base of the plumbing is an in-line strainer with a removable 

cap. Occasionally check inside and flush any sediment from the 

screen.
The Hose Connection is used to supply fresh water to the unit and is 

controlled by an internal float valve assembly.

Rain-tight Double-throw On - Off switch box.


Upper Switch - Fan Motor


Lower Switch - Feed Pump

A Fluid Level Gauge to aid in monitoring the tank's 18 gallon capacity.

Back Controls

Fig. 2

*

Connection for metering pump (3/8" fitting provided).

OFF

ON

Fluid Level Gauge

On/Off

Fan Motor

Key

Hose Connector

On/Off

Pump

Inline 

Strainer

Flow Control 

Valve

*Metering

Pump Inlet

5

A) Mobile Treatments

For short-term use, simply fill 

the tank with diluted chemical 

product and operate manually.

B) Stationary Treatments

For long-term operation, 

connect to a metering pump, 

with chemical concentrate 

and water hose. Calibrate 

water flow-rate to match the 

chemical's dilution ratio.

s

etup

A timer can be set-up to control power 

to the Metering Pump and ORSM 

simultaneously.

Water Connection

Metering

Pump

Chemical

Concentrate

The metering pump connects 

directly to the ORSM, dosing 

concentrate into the water flow 

traveling to the fogging head.

18 Gal.

Tank

Atomized 

Chemical Mixture

Summary of Contents for XE ORSM

Page 1: ...derstand Retain for Future Reference XE MOBILE ATOMIZER USER S MANUAL AND OPERATING INSTRUCTIONS OPERATOR S MANUAL NOTICE Rear Feed UL and CSA Electrical Components XE ORSM MODEL 115V 60Hz 1Ph 240V 50...

Page 2: ...afety guidelines DANGER DANGER INDICATES AN IMMINENTLY HAZARDOUS SITUATION WHICH IF NOT AVOIDED WILL RESULT IN DEATH OR SERIOUS INJURY WARNING INDICATES A POTENTIALLY HAZARDOUS SITUATION WHICH IF NOT...

Page 3: ...h use inspect blade assembly andelectricalcomponentsforsignsofdamage deterioration weakness or leakage Repair or replace defective items before using 10 Check all fasteners at frequent intervals for p...

Page 4: ...0 ft 115 230 16 AWG 14 AWG Fig 12 Electrical GROUND FAULT RECEPTACLES ARE RECOMMENDED AND MAY BE REQUIRED BY LOCAL AND OR NATIONAL CODE WARNING USE OF AN EXTENSION CORD IS NOT RECOMMENDED IF NECESSARY...

Page 5: ...puts for short periods of time At the base of the plumbing is an in line strainer with a removable cap Occasionally check inside and flush any sediment from the screen The Hose Connection is used to s...

Page 6: ...he internal valve to make adjustments and repeat process as needed see below Math example 1 minute captures 4 2 ozs x 60 128 2 GPH The valve KEY is needed to make changes You will need the KEY located...

Page 7: ...d poor inconsistent fogging output D Consistency of fogging output greatly depends on the consistency of the cleaning procedures See Page 10 Check strainer plumbing and inside of tank for dried sedime...

Page 8: ...betweenthemotorshaftandthestainlesssteelfaceplate Centeredintheslotareaand aimed slightly downward free from any rotational contact B Liquid not traveling through the fan blades This can be diagnosed...

Page 9: ...ST 8 58 5 16 flat washer SST 12 114 Drain fitting nut 1 115 Drain gasket 1 116 5 16 18 finish nut SST 4 117 1 4 20 x 5 8 HH bolt SST 4 308 XE blade tip setscrew SST 3 349 5 16 brass rod 1 391 Top pivo...

Page 10: ...Side of top pivot plate Rear of Housing To feed pump 14 16 52 600 L 117 54 20 49 58 56 32 58 57 56 57 116 349 403 391 392 56 394 395 32 479 20 600 R Motor s Junction Box 576 7 523 522 35 From Switch B...

Page 11: ...61 84 45 71 72 65 65 295 295 W 14 65 65 84 45 198 67 65 Tank s Wall Inside Tank ORSM Tank Exploded View 232 207 86 423 423 75 171 173 143 3 8 tube fitting provided for optional connection to metering...

Page 12: ...2 86 6 32 x 1 2 oval slotted screw 6 93 Hose connector gasket 1 94 Hose connector 1 96 Gasket 2 97 Float valve 1 98 Stem 1 99 Float 1 111 Axle SST 1 126 1 4 lockwasher SST 2 143 1 4 NPT M X 3 8 tube...

Page 13: ...t once a year or whenever a film of calcium or mineral deposits is visible While cleaning inspect for irregularities or hairline cracks and replace as necessary 5 Storage Protect your mobile Aquafog f...

Page 14: ...ck of maintenance or unauthorized repairs or alterations which affect the machine s performance or reliability LIMITATIONS OF LIABILITY TO THE EXTENT ALLOWABLE UNDER APPLICABLE LAW JAYBIRD MANUFACTURI...

Reviews: