background image

-16-

* Only FAT16 and FAT32 storage formats can be used for firmware updates. Incompatible formats 

    will result in the screen displaying a format error and will return to the main menu. 

** DO NOT unplug the light or the USB flash drive during the update process. In the case of an 

      unexpected power failure, DO NOT remove the USB flash drive. When the power is restored, the 

       fixture will automatically resume the update process. After successfully updating the firmware, 

        the fixture will automatically restart. 

* The factory default language is English.

11) Language

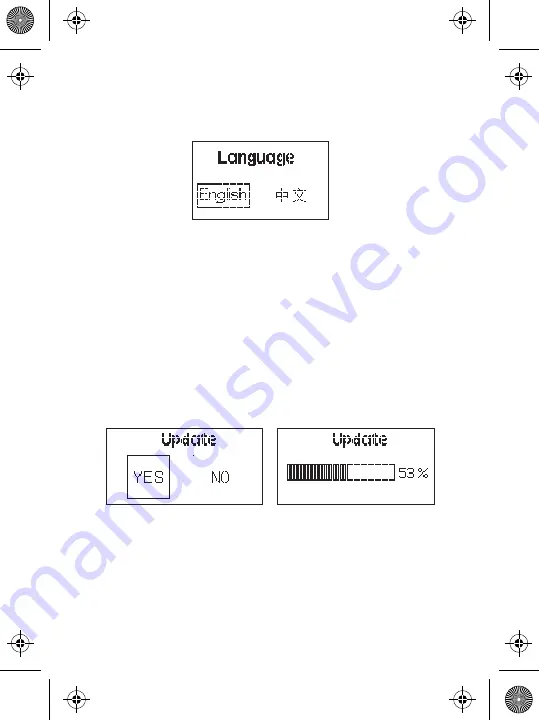
Press the MENU button to enter the system menu, rotate the dimming wheel to select 

Language, and press the MENU button again to enter the Language menu*. Use the 

wheel to select from the available languages. Initial languages include "English" and 

"Chinese". 

12) USB Mode

(1) The control box has a built-in USB port for firmware updates (for both the control 
box and lamp head). Insert a compatible USB* flash drive into the USB port.
(2) To update the light's firmware, press the MENU button to enter the system menu, 
rotate the dimming wheel to select USB Mode, and press the MENU button again to 
enter the Update menu. Use the wheel to select "YES" or "NO". If a USB flash drive 
containing a firmware update is mounted in the USB port, the screen will display an 
update progress bar**. If you choose “NO”, press MENU button then it will return the 
menu interface.
(3)  If a USB flash drive is not inserted into the USB port of the flash drive does not 
contain a firmware upgrade file, entering the Update menu and choosing "YES" will 
return you to the system menu interface. 

13) OTA Mode

You can also do an OTA wireless firmware update using the Sidus Link mobile app.

ai15858101745_LS_300x Product_Manual_EN.pdf   17   2020/4/2   下午2:49

Summary of Contents for Light Storm LS 300x

Page 1: ...Product Manual English LS 300x ai15858101745_LS_300x Product_Manual_EN pdf 1 2020 4 2 2 49...

Page 2: ...d by qualified service personnel 5 Position any power cables such that they will not be tripped over pulled or put into contact with hot surfaces 6 If an extension cord is necessary a cord with an amp...

Page 3: ...13 Please remove the protective cover before powering on the light 14 Please remove the protection cover before using the reflector 15 Please do not block the ventilation and do not look at the light...

Page 4: ...n Warning Changes or modifications not expressly approved by the party responsible for compliance could void the user s authority to operate the equipment NOTE This equipment has been tested and found...

Page 5: ...dealer or an experienced radio TV technician for help This device has been evaluated to meet general RF exposure requirements RF Warning Statement 300x Lamp Head 1 pc Control Box 1 pc Quick Release Li...

Page 6: ...ion Wireless Control Selection FX Trigger Antenna Box Battery Plate Anton Bauer or V mount USB Port Floor Stand Floor Stand Quick Release Plate Baby Pin Receiver Mounting Column 5 8in 16mm Yoke 5 Pin...

Page 7: ...Controls Group B Dimming Controls Group C Dimming Controls Group D Dimming Controls FX Button Group C Frequency CCT Controls Group D Frequency CCT Controls Installations 1 Installing the cable relief...

Page 8: ...nstall the reflector pull back the retaining pin insert the reflector into the Bowens mount and rotate it counterclockwise as shown in the following pictures To remove the reflector pull back the reta...

Page 9: ...e or round pipe with a diameter between 2 5cm or 0 79 1 97in 670g 1 48lbs 10 35x8 74x12 5cm 4 07x3 44x4 92in Specifications 1 2 1 2 PUSH 1 Clamp the Lightning Clamp onto a light stand 2 To attach the...

Page 10: ...voltage batteries will damage the power supply and the lighting xture Only use batteries that support the necessary continuous current discharge speci cations mentioned above If non compatible batter...

Page 11: ...ity of the light from 0 100 2 Manual Control 8 Insert the button battery to power VA Remote RC1 Remove battery compartment Install button battery and insert it into the VA Remote RC1 Brightness CCT Di...

Page 12: ...tton to single trigger the lighting effect long press the Trigger button to enter the Lightning Cycle Mode 3 Lighting FX Mode a Paparazzi Effect b Fireworks Effect c Faulty Bulb Effect d Lightning Eff...

Page 13: ...he TV effect worked in CCT range presets and you cannot set a fixed base CCT When controlling the explosion effect short press the Trigger button to single trigger the lighting effect As of writing th...

Page 14: ...as displayed on the screen 4 Wireless Connectivity Modes When setting up the device with the Bluetooth mobile application the corresponding name of the fixture is LS 300x six digits letters represent...

Page 15: ...otate the dimming wheel to select DMX mode and press the MENU button again to enter DMX mode 7 Dimming curve mode Press the MENU button to enter the system menu rotate the dimming wheel to select Dimm...

Page 16: ...the MENU button to enter the system menu rotate the dimming wheel to select Studio Mode and press the MENU button again to enter the Studio Mode menu Once in the menu use the wheel to choose between...

Page 17: ...include English and Chinese 12 USB Mode 1 The control box has a built in USB port for firmware updates for both the control box and lamp head Insert a compatible USB flash drive into the USB port 2 T...

Page 18: ...to toggle between channels 1 2 3 Press the GROUP button to toggle between groups A B C D Light Storm lights have three channels 1 2 3 and four groups A B C D Only groups C or D can be used to control...

Page 19: ...e control will only control the operation of the light when the fixture is in 2 4Ghz Wireless Control Mode The remote control can only be used to adjust CCT if the lights are in groups C or D 4 CCT Co...

Page 20: ...X Control Press the button to enter or exit lighting effect mode Press the to toggle between different effects Press the buttons to adjust the output of the light Press the buttons to toggle the effec...

Page 21: ...ry Data Link Data 2 Optional Secondary Data Link Data 1 Primary Data Link Data 1 Primary Data Link PUSH 1 2 3 4 5 Data 2 Optional Secondary Data Link Data 2 Optional Secondary Data Link Signal Common...

Page 22: ...66 70 4000K 71 75 4100K 76 80 4200K 81 85 4300K 86 90 4400K 91 95 4500K 96 100 4600K 101 105 4700K 106 110 4800K 111 115 4900K 116 120 5000K 121 126 5100K 126 130 5200K 131 135 5300K 136 140 5400K 141...

Page 23: ...art Point Single Trigger Undefined 6 5 22 In DMX mode intensity CCT FX frequency and lighting effects can only be controlled by a DMX controller When controlling multiple 300x lights independently i e...

Page 24: ...3 5A A B C D 29 84 21 56 34 45cm 11 75 8 49 13 56in 27 86 12 67 8 73cm 10 97 4 99 3 44in 27 86 12 67 9 67cm 10 97 4 99 3 81in 2 4GHz Cooling Mode CRI Remote Ability Active Cooling 350W maximum 96 1 2...

Page 25: ...by Neutrik in the US and other countries 585 fc 65 fc 23 fc 6300 lux 700 lux 250 lux 1904 fc 158 fc 51 fc 20500 lux 1700 lux 550 lux 5500K Bare Bulb Hyper Reflector 1m 474 fc 3m 5m 54 fc 20 fc 5100 lu...

Page 26: ...purchaser from defects in material and workmanship for a period of one 1 year after the date of purchase For more details of warranty visit www aputure com Serial No Item Name Purchase Date Buyer Nam...

Reviews: