APC-3X15B User Manual
11
1.4 Installation of PCI Addon
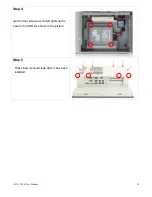
Step 4
To finish the job, just fasten the 5 screws as shown in
the picture.
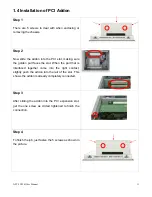
Step 1
There are 5 screws to deal with when enclosing or
removing the chassis.
Step 2
Now slide the addon into the PCI slot, making sure
the golden part faces the slot. When the part that is
interfaced together come into the right contact,
slightly push the addon into the rail of the slot. This
shows the addon is already completely connected.
Step 3
After sliding the addon into the PCI expansion slot,
get the one screw as circled tightened to finish the
connection.
Summary of Contents for APC-3215B
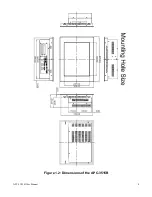
Page 7: ...APC 3X15B User Manual 7 1 2 Dimensions Figure 1 1 Dimensions of the APC 3215B ...
Page 8: ...APC 3X15B User Manual 8 Figure 1 2 Dimensions of the APC 3515B ...
Page 14: ...APC 3X15B User Manual 14 Chapter 2 Hardware 2 1 Mainboard Figure 2 1 Mainboard Dimensions ...
Page 61: ...APC 3X15B User Manual 61 ...
Page 64: ...APC 3X15B User Manual 64 ...
Page 65: ...APC 3X15B User Manual 65 ...
Page 66: ...APC 3X15B User Manual 66 Click FINISH A Driver Installation Complete ...
Page 68: ...APC 3X15B User Manual 68 ...
Page 69: ...APC 3X15B User Manual 69 Click FINISH A Driver Installation Complete ...
Page 71: ...APC 3X15B User Manual 71 Click FINISH A Driver Installation Complete ...
Page 73: ...APC 3X15B User Manual 73 ...
Page 74: ...APC 3X15B User Manual 74 ...
Page 77: ...APC 3X15B User Manual 77 3 A License Agreement appears Click I accept and Next ...
Page 78: ...APC 3X15B User Manual 78 4 Ready to Install the Program Click Install 5 Installing ...
Page 79: ...APC 3X15B User Manual 79 6 The Install Shield Wizard Completed appears Click Finish ...


