background image


- 10 - 

6.2.3. Rinse off the pH electrode in pure water and remove excess water, then insert it into the pH4.00 

buffer solution, make a quick stir and then hold it still. When the reading is stabilized and         stays on 

screen, short press          again to finish the 2

nd

 point calibration. “

4.00 pH

” will start flickering and a 

flickering 

c3


will show up, indicating the 2

nd

 point calibration has been finished and the meter is entering 

the 3

rd

 point calibration. 


6.2.4. Rinse off the pH electrode in pure water and remove excess water, 

then insert it into the pH10.01 buffer solution, make a quick stir and then 

hold it still. When the reading is stabilized and         stays on screen, short 

press           again to finish the 3

rd

 point calibration. “

10.01 pH

” will start 

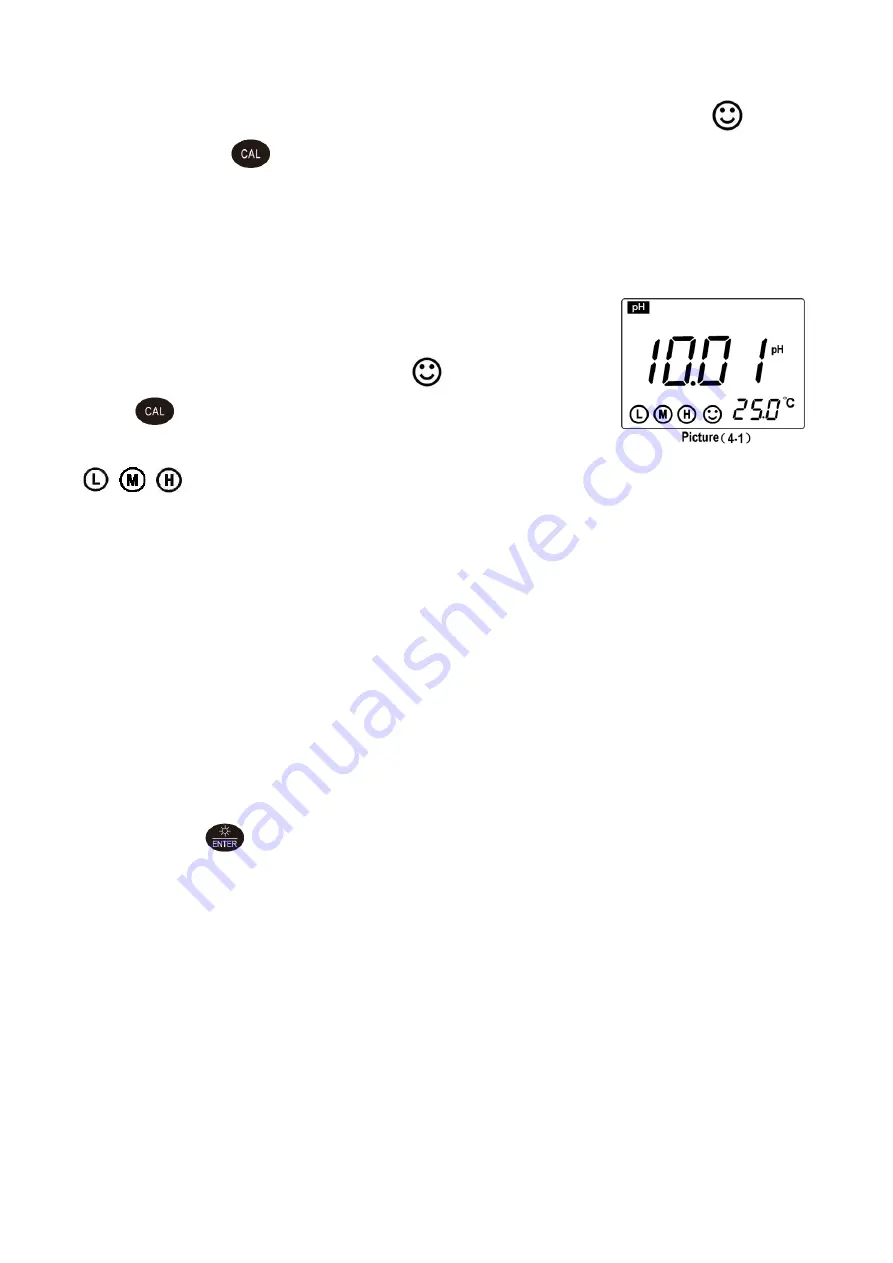
flickering and then the meter will return to measurement mode.  

                        will show up at the bottom left (see picture 4-1), indicating all three points of calibration 

are finished. 


6.3 

Notes about pH Calibration 

1) 

Keeping  the  freshness  and  cleanliness  of  calibration  buffers  is  essential  for  accurate  pH 

measurement. The  small  bottles  of  pH  buffers  come  with  the  meter  should  be  replaced  within  3 

months  after  opening.  The  new  buffer  solutions  should  be  made  by  a  legitimate  lab  supply 

manufacturer. Avoid sunlight and air contact when the buffers are not being used, and store at room 

temperature. 

2) 

This meter can adopt random  1-point, 2-point or 3-point automatic calibration. During calibration, 

short press             to return to measurement mode. When the measurement accuracy is ≤±0.1pH, 

choose a buffer that’s close to the estimated measurement range and perform 1-point calibration 

would be good. Choose pH4.00 and pH7.00 to calibrate if the measurement range is within the acidity 

range (<pH 7) and choose pH7.00 and pH10.01 to calibrate if just within the alkalinity range (>pH 7). 

3) 

Choose 3-point calibration to achieve a more accurate measurement if the measurement range is 

wide, or if the electrode has not been used for long. When connecting a new pH electrode, it must 

be calibrated at 3 points. 

4) 

The frequency that you need to calibrate your meter depends on the tested samples, condition of 

electrodes, and the requirement of the accuracy. For High-Accuracy measurements (≤ ±0.02pH), the 

meter should be calibrated before test every time; For ordinary-accuracy measurements (≥±0.1pH), 

once calibrated, the meter can be used for about a week or longer. In the following cases, the meter 

Summary of Contents for SX751

Page 1: ... 1 SX751 Portable pH Conductivity DO ORP Meter User Manual APERA INSTRUMENTS LLC aperainst com ...

Page 2: ...e ORP electrode 17 7 4 ORP Parameter Setting 17 8 Conductivity Measurement 17 8 1 Preparation 17 8 2 Conductivity Calibration 17 8 3 Sample Test 18 8 4 Conductivity Electrode s Maintenance 18 8 5 Notes about Conductivity Calibration 18 8 6 Parameter Setting 19 8 7 Temperature compensation coefficient 21 8 8 Notes about conductivity parameter setting 22 9 DO Measurement 22 9 1 Preparation before us...

Page 3: ...in microprocessor chip with the intelligent functions of auto calibration auto temperature compensation auto salinity compensation manual baromatric pressure compensation data storage function settings auto power off and low voltage display etc 1 2 Adopts digital filter technology to intelligently improve meter s response speed and accuracy The smiley face icon will appear when the reading is stab...

Page 4: ... 3 Conductivity Measurement range Conductivity 0 00 to 19 99 μS cm 20 0 to 199 9 μS cm 200 to 1999 μS cm 2 00 to 19 99 mS cm 20 0 to 199 9 mS cm TDS 0 to 100 g L Salinity 0 to 100 ppt Resistivity 0 to 100 MΩ cm Resolution 0 01 0 1 1μS cm 0 01 0 1 mS cm Accuracy Meter 1 0 F S Overall 1 5 F S Temp compensation range 0 to 50 C automatic Electrode constant 0 1 1 10 cm 1 Reference temperature 25 C 20 C...

Page 5: ...e type Polarographic 2 5 Other Technical Parameters Data storage 400 sets Data content Serial number measurement value measurement unit and temperature Power Supply Two AA alkaline batteries 1 5V x2 Dimensions and weight Meter 65 120 31 mm 180g Complete Kit 255 x 210x 50 mm 1760g Quality and safety certification CE ISO 9001 2015 2 6 Working Condition Working temperature 5 to 35 C Working humidity ...

Page 6: ...When in parameter setting mode short press to make changes 3 2 3 Function key a In measurement mode short press 1 5s to switch between and Long press to enter parameter setting P1 P2 P3 b In other measurement mode short press this key to enter the parameter setting mode P1 P2 P3 3 2 4 Backlight and confirmation key a In measurement mode short press to turn on or off the backlight b In calibration ...

Page 7: ...e meter will recall all the data in turn hold or to quickly review the data b In data recalling mode RM and serial number in the upper right corner short press to return to measurement mode 3 3 3 Delete data In data recalling mode hold for 5 seconds CLr will show up for 2 seconds meaning that all the saved data have been eliminated Then the meter will return to measurement mode 4 What s in the kit...

Page 8: ... 8 5 Preparation What you need in addition to what s in the kit Pure water RO distilled or deionized water for rinsing off the electrode ...

Page 9: ... KCL storage bottle and put it aside do not dump or spill the KCL solution Rinse the electrode with distilled or deionized water Shake off excess water or blot dry with clean tissue or kimwipe Stir the electrode for a few seconds after it s dipped into the test solution and then hold it still Wait for the reading to get fully stabilized appears and stays and then take the measurement When the test...

Page 10: ...ld be replaced within 3 months after opening The new buffer solutions should be made by a legitimate lab supply manufacturer Avoid sunlight and air contact when the buffers are not being used and store at room temperature 2 This meter can adopt random 1 point 2 point or 3 point automatic calibration During calibration short press to return to measurement mode When the measurement accuracy is 0 1pH...

Page 11: ...e measurement by pressing According to the pH isothermal measurement principle the closer the test sample s temperature is to the calibration solution s the higher the accuracy of the measurement This principle is recommended to follow for the best result For example if you must test at 150 F we recommend warming up the calibration solutions to the same temperature before performing calibration in...

Page 12: ...bSen 851 H Wastewater or emulsion LabSen 333 An 8 pin to BNC convertor AI7103 is required to connect LabSen pH electrode to this meter Visit aperainst com product electrode labsen or contact us at 1 614 285 3080 for more details 6 6 Parameter Setting Table 4 1 Prompt Mark Parameter Setting Items Code Parameters P1 pH buffer solution series selection USA U S A series NIS NIST series CH China series...

Page 13: ...ation setting or c Press to enter next parameter setting or press to confirm and return to measurement mode d The factory default setting is OFF Note will appear in the upper right corner of the LCD if pure water temperature compensation function is set 6 6 3 Ammonia added pure water pH temperature compensation setting P3 a Short press in mode P2 to enter mode P3 see picture 4 4 b Press or to choo...

Page 14: ...on will be closed if choosing 0min c Press to enter next parameter setting or press to confirm and return to measurement mode d The factory default setting for P6 is 10min 6 6 7 Restore to factory default setting P7 a Short press in P6 to enter P7 see picture 4 8 b Press or to choose meaning that the parameters have been restored to the producer setting mode and return to measurement mode after 2 ...

Page 15: ...ectrode 6 8 1 The stable icon 2 00 pH or 19 99 pH this icon appears when the pH value exceeds the measurement range This icon will also show up when the electrode is not well connected with the meter or when the electrode is not insertd into solution This is a normal phenomenon 6 8 2 Electrode offset out of range 60mV or 60mV 6 8 3 Electrode slope out of range 85 or 105 When or shows up 1 Make sur...

Page 16: ...urate measurement If contaminated clean the connector with alcohol prep pads and blow dry 7 ORP Measurement 7 1 Sample Test Press to power on connect the ORP combination 301 Pt S electrode See Section 5 for connection tutorial the meter will enter ORP measurement mode automatically Screw off the storage bottle Rinse the electrode with pure water Shake off excess water or blot dry with clean tissue...

Page 17: ...wash it in distilled water then submerge it in the 3M soaking solution for 6 hours 7 4 ORP Parameter Setting mV and ORP measurement parameter setting Table Table 5 2 Prompt mark Parameter Setting Items Code Parameters P1 Backlight display time setting bl 0 1 3 6 min P2 Auto power off time setting ac 0 10 20 min 7 4 1 Backlight display time setting P1 Press the meter enters P1 see details in sectio...

Page 18: ...a selection 8 4 Conductivity Electrode s Maintenance 1 Always keep the conductivity electrode clean Before taking a measurement rinse the electrode in pure water It is recommended to rinse it again in the sample solution When submerge the electrode in solution stir the solution briefly to eliminate air bubbles and allow it to stay until a stable reading is reached Conductivity electrodes are usual...

Page 19: ...uctivity electrode sold separately K 0 1 no temperature sensor built in you can use Manual Temperature Compensation mode long press temperature value starts flickering press or to change the value of temperature and then press to confirm 8 6 Parameter Setting Conductivity measurement parameter setting Table Table 6 3 Prompt Mark Parameter Setting Items Code Parameter P1 Standard solution series se...

Page 20: ... next parameter setting or press to return to measurement mode d The factory default setting of P3 is 25 C 8 6 4 Temperature compensation coefficient setting P4 a In P3 short press to enter P4 as shown in picture 6 6 b Press or to change the number the changing range of data is from 0 00 to 9 99 long press or to change quickly Attention When the number set as 0 00 means there is no temperature com...

Page 21: ...fer to Section 6 6 6 8 6 9 Restore to producer setting P9 In P8 short press and enter P9 for details please refer to Section 6 6 7 8 7 Temperature compensation coefficient The temperature compensation coefficient of the meter setting is 2 0 C However the conductivity temperature coefficient is different from solutions and concentration Please refer to Table 11 and the data collected during testing...

Page 22: ... bottom lid of electrode calibration sleeve inspect whether the sponge inside is moist If it is dried out add in several drops of distilled water to the sponge to maintain the satured air inside the calibration sleeve Do NOT add too much water so it won t be dripping 9 1 2 Electrode polarization After each power on the DO electrode must be polarized for 5 minutes before measurement or calibration ...

Page 23: ...ading is fully stabilized 9 3 DO Measurement 9 3 1 Measurement DO in flowing water Power on the meter Place the DO electrode into the flowing water The water surface level should be higher than the location of the temperature electrode The angle for the electrode and water surface should be 45 to 75 Hold the electrode in the flowing water and wait for a stable reading then press to record the meas...

Page 24: ...lectrode temperature and water temperature have larger difference the reading time must be greater than 3 minutes Otherwise there could be some large errors c Salinity and barometric pressure also affect DO measurement The meter has automatic salinity compensation and manual barometric pressure compensation For details refer to Section 9 9 3 d When the meter is performing abnormally please set the...

Page 25: ...rface gold slice with a clean tissue or kimwipe d Add new inner solution DO502 into a new membrane cap DO503 slowly and do not let any air bubbles appear If you found any air bubbles in the cap carefully flick on the membrane cap to eliminate them e Place the membrane cap on the table and put in the electrode vertically slowly twist in and then screw on the cap tightly The excess inner solution wi...

Page 26: ...ed oxygen is also affected by salinity in water The meter has automatic salinity compensation and the salinity electrode is pre calibrated before leaving the factory In general there is no need to perform salinity calibration Salinity calibration is only needed when replacing a new electrode For the procedure of salinity calibration please refer to 9 9 3 in P2 For the salinity electrode installed ...

Page 27: ...ess to choose resolution 0 01 0 1 c Press to enter the next parameter setting or press to return to the measurement mode 9 9 3 Salinity calibration setting P2 a In P1 short press to enter P2 see picture 4 3 b Immerse the DO electrode into 12 88mS cm calibration solution sold separately solution level should exceed salinity electrode let it stand still after stirring then press when the value is st...

Page 28: ...er setting or short press to return to measurement mode 9 9 6 Backlight display time setting P5 a Short press in P4 to enter P5 see picture 4 6 b Short press or to choose the auto off time of backlight 0 min 1 min 3 min or 6 min The backlight display function will be closed if choosing 0 min c Short press to enter next parameter setting or short press to return to measurement mode d The default se...

Page 29: ...NTS LLC any malfunctioned or damaged product attributable to responsibility of APERA INSTRUMENTS LLC for a period of THREE YEARS SIX MONTHS for the electrode from the delivery This limited warranty does not cover any damages due to Transportation storage improper use failure to follow the product instructions or to perform any preventive maintenance modifications combination or use with any produc...

Page 30: ...4 16 9 86 32 7 30 1 14 22 17 9 66 33 7 18 2 13 82 18 9 46 34 7 07 3 13 44 19 9 27 35 6 95 4 13 09 20 9 08 36 6 84 5 12 74 21 8 90 37 6 73 6 12 42 22 8 73 38 6 63 7 12 11 23 8 57 39 6 53 8 11 81 24 8 41 40 6 43 9 11 53 25 8 25 41 6 34 10 11 26 26 8 11 42 6 25 11 11 01 27 7 96 43 6 17 12 10 77 28 7 82 44 6 09 13 10 53 29 7 69 45 6 01 14 10 30 30 7 56 15 10 08 31 7 43 ...

Page 31: ...6 10 09 8 26 6 96 762 101 60 10 11 8 27 6 97 763 101 73 10 12 8 28 6 98 764 101 86 10 14 8 30 6 99 765 102 00 10 15 8 31 7 00 766 102 13 10 16 8 32 7 01 767 102 26 10 18 8 33 7 02 768 102 40 10 19 8 34 7 02 769 102 53 10 21 8 35 7 03 770 102 66 10 22 8 36 7 04 771 102 80 10 23 8 37 7 05 772 102 93 10 25 8 39 7 06 773 103 06 10 26 8 40 7 07 774 103 19 10 28 8 41 7 08 775 103 33 10 29 8 42 7 09 Conv...

Page 32: ...4 695 7 54 10000 3049 70 17 527 5 71 3000 915 90 95 683 7 41 10500 3201 68 84 517 5 61 3500 1067 89 35 671 7 28 11000 3354 67 38 506 5 49 4000 1220 87 75 659 7 15 12000 3659 66 58 500 5 42 4500 1372 86 15 647 7 02 13000 3963 65 78 494 5 36 5000 1524 84 56 635 6 89 14000 4268 64 98 488 5 29 5500 1677 83 09 624 6 77 15000 4573 64 18 482 5 23 6000 1829 81 63 613 6 65 16000 4878 63 38 476 5 16 6500 19...

Reviews: