

15
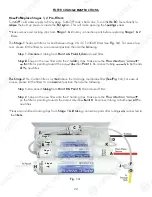
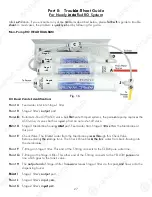
3. Point W - Drain water connection:
Tubing color: Black tubing. Connect the BLACK tubing from the RO to the Drain Saddle.
Fitting type: Simply push the Clear tubing into the Quick Connect fitting. No Inserts, Sleeves or Nuts
are needed to secure the connection. No Teflon tape needed here.
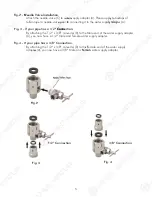
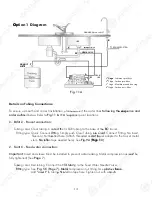
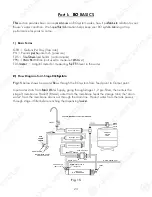
4. Point A - System water inlet (to Stage 1 pre-filter) connection:
Tubing color: Red tubing. Connect the RED tubing from the Feed Water Valve to the RO’s stage -1
prefilter.
Fitting type: Quick Connect fitting See
Fig. 10D (Page 12)
. Simply push the Red tubing into the QC
fitting. No Inserts, Sleeves or Nuts are needed to secure the connection. No Teflon tape
needed here.
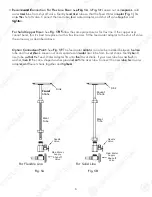
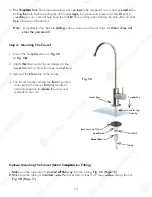
5. Point H - Stage-4 filtered water to faucet connection:
Tubing color: Clear tubing. Connect the CLEAR tubing from the faucet base stud to the Stage-6 filter’s
outflow
end at
point H.
(See “
Flow -->
” arrow on the filter is the output to faucet at Point Z.)
Fitting type: Quick Connect: Simply push the Clear tubing into the QC fitting. No Inserts, Sleeves or
Nuts are needed to secure the connection. No Teflon tape needed here.
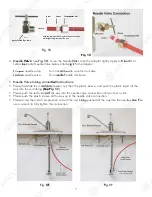
6. Point G - Stage-4 filter’s T-fitting connection:
Tubing color: Yellow tubing. Connect the YELLOW tubing to Stage-5 filter’s T-fitting.
Fitting type: Quick Connect: Simply push the Yellow tubing into the QC fitting. No Inserts, Sleeves or
Nuts are needed to secure the connection. No Teflon tape needed here.
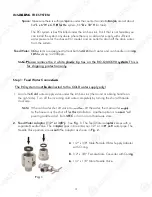
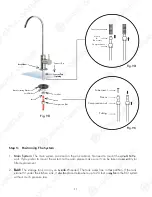
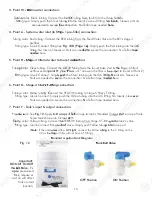
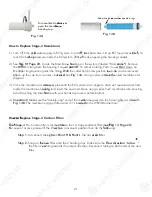
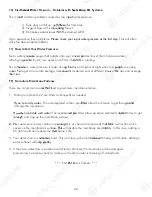
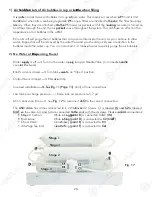
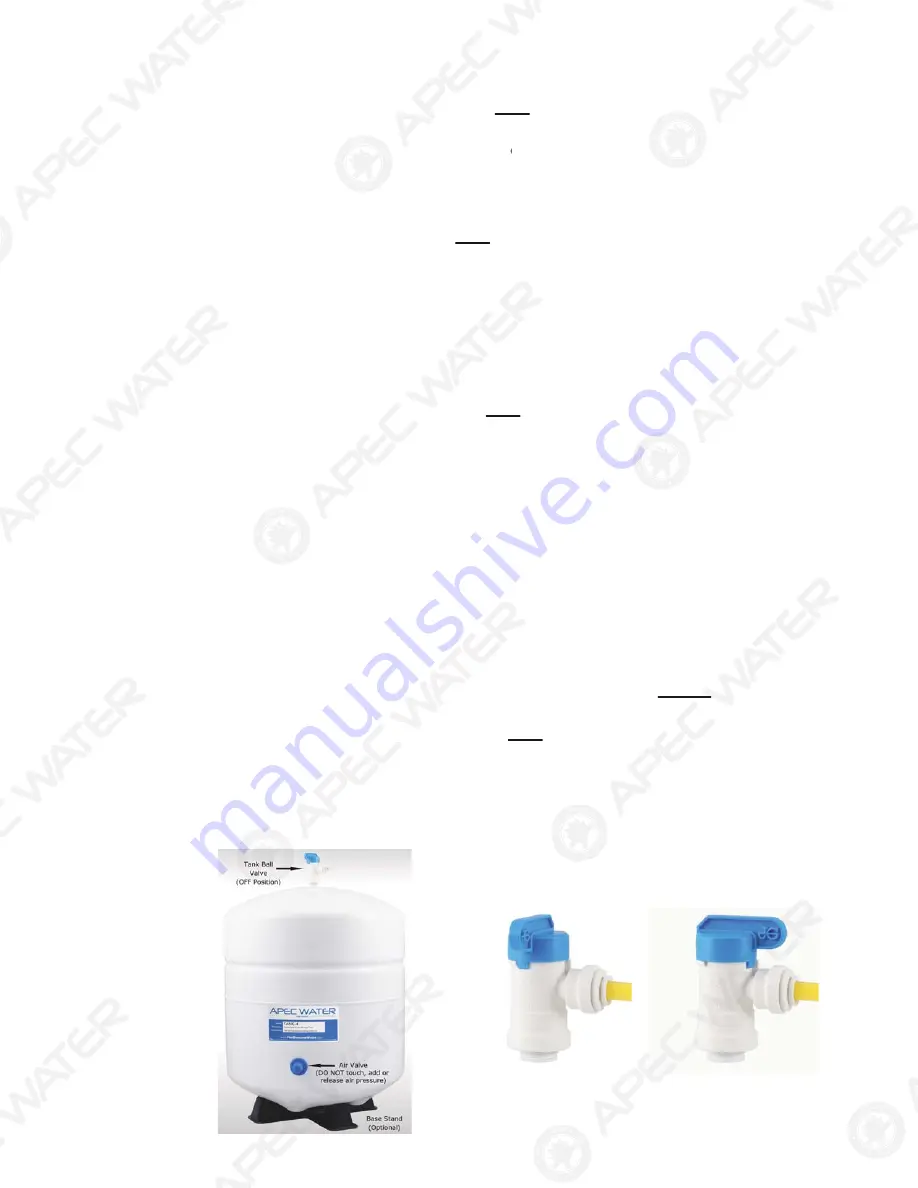
7. Point Y - Tank’s input & output connection:
Prepare tank: See
Fig.12.
Apply
6-8 wraps
of Teflon tape to tank’s threaded Output stem on top of tank.
Screw tank Valve onto Output stem.
Tubing color: Yellow tubing. Connect the YELLOW tubing from Stage-5 T-fitting to the tank’s valve.
Fitting type: Quick-Connect fitting on ball valve. Simply push Yellow tubing into valve port.
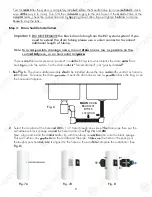
Standard 4-gallon Tank Diagram:
Tank Ball Valve
OFF Position
ON Position
Fig. 12
Important:
DO NOT TOUCH
the Air Valve,
It’s
a pre-pressurized
tank, release or
add air will affect
tank normal
function.
(
Note:
If the unit comes with a
UV Light
, connect the Yellow tubing to the T- fitting on the
UV, as the Stage 4 filter will not have a T-fitting).
15
3. Point W
W
-
- D
D
ra
rain water connection:
Tu
Tu
bi
bi
ng
ng
c
c
olor: Black tubing. Connect the BL
L
AC
AC
K
K
tubing from the RO to the Drai
i
n
n
Sadd
ddle
le.
Fi
i
tt
tt
in
i
g type: Simply push the Clear tubing
g
i
int
nto the Quick Connect fitting. N
N
o
o In
Inse
se
rt
rt
s, Sleeves or Nuts
are needed to secu
re
re t
t
he
he c
c
on
on
nection. No Teflon tape needed
he
he
re
re
.
.
TT
4.
4
Point A - System water inlet (to St
Stag
ag
e
1 pre-filter) connection:
Tubing color: Red tubing. Connect the RED tubing from the Feed Water Valve to the RO’s stage -1
prefilter.
Fitting type: Quick Connect fitting See
Fig. 10D (Page 12
2
)
)
. Simply push the Red tubing into the QC
QC
fittin
n
g.
g
No Inserts, Sleeves or Nuts are neede
ded
d
to
to secure the connection. No Teflon ta
ta
pe
pe
ne
need
ed
ed
ed here.
5. Point H
-
-
S
Sta
tag
ge-4 filtered water to faucet co
onn
nnec
ect
tion:
Tubing
ng
c
c
ol
o
or: Clear tubing. Connect the CL
CL
EA
A
R
R
t
tubing from the faucet base stud to
o
th
th
e
e S
Stage-6 filter’s
outflow
end at
w
point H.
(
(
Se
See
e “
“
Fl
F
ow -->
” arrow on the filter is t
t
he
he
o
o
utpu
pu
t to faucet at Point Z.)
Fi
Fit
tting type: Quick Connect: Simpl
pl
y
y pu
pu
sh
sh the Clear tubing into the QC fi
tt
tt
in
in
g.
g. N
N
o
o
Inserts, Sleeves or
Nuts are needed to
s
s
ec
ec
u
ure the connection. No Teflon tape nee
ee
de
ded
d
h
here.
6. Point G - Stage-4 filte
e
r’
r’s
s
T-
T-
fi
fi
tt
ti
ing connection:
Tubing color: Yellow tubin
ng
g. C
C
on
nect the YELLOW tubing to Stage-5 filter’s T-fitting.
Fitting type: Quick Connect: Simply push the Yellow tubing into the QC fitting. No Inserts, Sleeve
e
s
s
or
o
Nuts are needed to secure the connection
.
.
No
N
Teflon tape needed here.
7. Point Y - Tank’s input & output connection:
Prep
p
ar
ar
e
e
ta
ta
nk: See
Fig.12.
Apply
6-8 wraps
of
f
Te
Te
fl
fl
on tape to tank’s threaded Outpu
u
t
t
st
stem
em on top of tank.
p
Screw tank Valve onto Output
ut
s
s
te
tem
m.
Tu
Tu
bi
bi
n
ng color: Yellow tubing. Connect the
he
YEL
L
LO
LOW tubing from Stage-5 T-fitting
g
to
to
t
t
he
he
tank’s valve.
Fi
F
tting type: Quick-Connect fitting on
on
b
b
al
all
l valve. Simply push Yellow tubing
ng
i
i
nt
nt
o
o
v
valve port.
S
Standard 4-gallon Tank Diagram
m
:
:
T
Tank Ball Valve
OFF Position
ON Position
Fig. 12
Important:
DO NOT
O
TOUCH
the
e
Ai
Air
r Va
V
lve,
It’s
a
a pr
pre
e-pressurized
ta
ta
nk, release or
add air will affect
tank normal
function.
(
Note:
If the unit com
om
es
es
w
w
it
ith a
UV Light
, connect the Yellow tub
ub
in
in
g
g
to
t
the T- fitting on the
UV, as the
e
St
St
ag
ag
e 4 filter will not have a T-fitting).
Summary of Contents for Ultimate RO-QUICK90
Page 2: ......


