background image


2  Controls and functions 


2-1 Front panel controls 

 
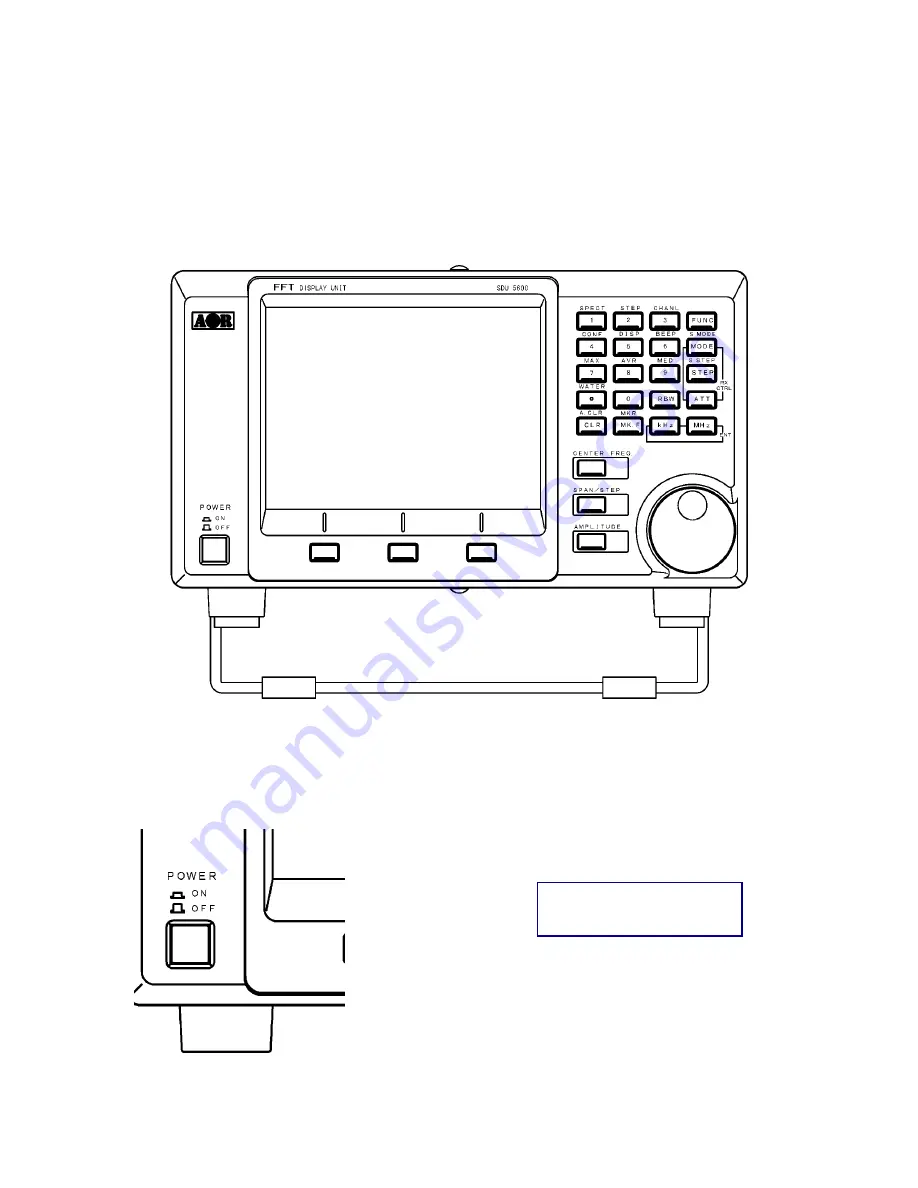
The front panel of the SDU5600 is dominated by the large color LCD. Controls are ‘grouped’ to 
assist efficient operation; there are a total of 26 keys in addition to the power on/off switch and the 
rotary dial encoder. 


    1    Power switch 

                                                      
                                                  Press once to latch the switch in, switching on the SDU5600.  
                                                  To switch off the SDU5600, press the switch again, the switch 
                                                  releases outward. 


Downloaded by

Amateur Radio Directory

www.hamdirectory.info

Summary of Contents for SDU5600

Page 1: ...SDU5600 PROFESSIONAL SPECTRUM DISPLAY UNIT FOR USE WITH A COMPANION RECEIVER INSTRUCTION MANUAL AOR LTD Downloaded by Amateur Radio Directory www hamdirectory info ...

Page 2: ...4 2 Channel scope mode 14 6 5 Operation modes 15 6 6 Basic settings for operation 17 6 6 1 Spectrum analyzer mode 17 6 6 2 Step resolution mode 18 6 6 3 Channel scope mode 20 6 6 4 Other settings 21 6 7 Marker function 24 6 8 Calculation function 27 6 8 1 Maximum trace MAX 27 6 8 2 Average trace AVE 27 6 8 3 Middle trace MED 28 6 9 Waterfall function 28 6 10 Display setting 29 6 11 Beep on of 29 6...

Page 3: ...ur dealer for technical assistance Do not use or leave the SDU5600 in direct sunlight especially the LCD It is best to avoid locations where excessive heat humidity dust and vibration are expected Always keep the SDU5600 free from dust and moisture LCD contrast and brightness may be adjusted via menus adjust appropriately to your operating environment Note Never push or knock the LCD screen it is ...

Page 4: ...bile operations Built in waterfall display function FFT signal processing and analysis DSP Wide input level range 0 90dBm High dynamic range 60 dB Fully interactive with AOR AR5000 models AR5000 models can be operated from the SDU5600 providing selection of center frequency receive mode etc Any frequency spotted and monitored by the SDU5600 may be immediately received by the AR5000 Wide spectrum c...

Page 5: ...ed to assist efficient operation there are a total of 26 keys in addition to the power on off switch and the rotary dial encoder 1 Power switch Press once to latch the switch in switching on the SDU5600 To switch off the SDU5600 press the switch again the switch releases outward Downloaded by Amateur Radio Directory www hamdirectory info ...

Page 6: ... is active on the LCD 4 Rotary dial encoder A rotary dial encoder is provided to move the marker position enter center frequency to the unit and so forth 5 Main Control keys There are 20 main keys including numeric keys Some keys have secondary functions and the functions are printed above each respective key To access the secondary function press the FUNC key located at the top right of the contr...

Page 7: ...re expansion or options 1 RF IN Using the supplied coaxial cable with a BNC connector at each end connect to the IF output from the companion receiver such as an AOR AR5000 series receiver 2 PC I F A computer may be connected to this connector As the connector is identical to that used for the companion receiver connection great care should be taken to avoid connection to the incorrect connector A...

Page 8: ...r to control the AR5000 receiver the following setting is required to the AR5000 receiver Baud rate 9600 bps External IF output EXT IF1 Note See details on page 29 of the AR5000 instruction manual 1 Connect an AC adapter to the SDU5600 2 Connect the DB 9 interface cable between the RX CTR connector on the rear panel of the SDU5600 and the REMOTE connector on the rear panel of the AR5000 receiver 3...

Page 9: ...FU5600 IC R8500 ICOM IC R8500 IC R7100 ICOM IC R7100 Optional CT 17 required 4 Switch on the SDU5600 It is important that the AR5000 receiver is switched on FIRST and then press the power switch of the SDU5600 so that the display appears on the receiver and the SDU5600 Please note that the AR5000 must be set to 9600 bps in advance To switch off the SDU5600 press the power switch again and then swi...

Page 10: ...n with a lower baseline wihile 128 KHz provides faster refresh rates 6 STEP Tuning Frequency Step The tuning frequency step of the connected receiver is displayed in KHz As an example when the span is set to 10 MHz the frequency step will be 31 250 KHz 10 MHz 320 steps on the X axis 31 250 KHz In the Step Resolution Mode each step will be will be equal to the frequency step 7 OP MODE Operating Mod...

Page 11: ...unction key The Function key is located on the top right of the control keys When the function key is pressed followed by certain keys they serve a secondary function The secondary function is printed above the respective key While the function key is pressed the reversed FUNC yellow icon appears on the top left corner of the screen Numeric keys 0 9 decimal The numeric keys are used for entry of t...

Page 12: ...ing screen appears RX key To select the receiver connected with the SDU5600 press the RX key that is defined as the left of the Special function keys The RX icon will be displayed in reverse waiting for selection of the receiver Rotate the main tuning dial to select the desired receiver model number and press the ENT key KHz key or MHz key on the Main Control Keys to finish the selection PLOT key ...

Page 13: ...F output modification required AR8200 AR8200MKII 45 05 MHz IF output modification AR8200MKIII CC8200A required AR ONE AR ONE Set IF output frequency RFU5600 RFU5600 Internal RF adapter IC R8500 ICOM IC R8500 IC R7100 ICOM IC R7100 Optional CT 17 required Other 10M Receiver with 10 7 MHz IF Other 45M Receiver with 45 05 MHz IF Note There is no guarantee for operation with other manufacturer s recei...

Page 14: ...rm the following steps 1 Press the STEP key 2 Then the icon indicating the current tuning frequency step will blink 3 Using the numeric keypad enter the desired step 4 Press the ENT key to complete the setting ATT key This is to select to activate deactivate the RF attenuator function Pressing the ATT key will toggle between ON and OFF Memo AUTO Mode Setting of the receiver When the AR5000 receive...

Page 15: ...ntered using the numeric keypad the main tuning dial will be temporary disabled To use the rotary dial encoder again press the CLR key and the press the CENTER FREQ key of the Special function keys Memo Center frequency vs Tuning frequency step Using the rotary dial encoder of the SDU5600 will change the frequency with the step set by the one indicated at the top right of the screen Using the rota...

Page 16: ...sing this function you can monitor the frequency immediately once you found the signal by using the regular marker 6 5 Operation Modes There are three 3 operation modes with your SDU5600 They are the Spectrum Analyzer Mode Step Resolution Mode and the Channel Scope Mode To go to the Spectrum Analyzer Mode press the FUNC key and press the 1 key on the Main Control Keys To go to the Step Resolution ...

Page 17: ... t want to view the area between the channel allocations You cannot manually set the SPAN however since it has to be calculated by the SDU5600 Channel Scope Mode Channel In the Channel Scope Mode you may view a defined bandwidth In particular the Channel Scope Mode is very useful for viewing relatively narrow bands of a couple of MHz ONLY the wanted steps are checked for activity and as a narrower...

Page 18: ...isplay step 31 25 KHz Center Frequency CF Press the CENTER FREQ key located between the LCD display and the rotary dial encoder The icon indicating the current center frequency will be reversed prompting the entry of new center frequency Using either the numeric keypad or the rotary dial encoder enter a new frequency followed by the ENT key KHz key or MHz key If the entered frequency data is valid...

Page 19: ...rt Frequency End Stop Frequency Enter the Start Frequency and the End Stop Frequency using the Special Function Keys located on the lower side of the LCD display and the numeric keys followed by the ENT key KHz key or MHz key Memo Frequency entry Example 10 MHz Press 1 0 MHz or Press 1 0 0 0 0 KHz The Display step on the above example 10 MHz 320 steps 31 25 KHz 6 6 2 Step Resolution Mode On the ab...

Page 20: ...pting the entry of new center frequency Using either the numeric keypad or the rotary dial encoder enter a new frequency followed by the ENT key KHz key or MHz key If the entered frequency data is valid the frequency will be accepted and changed Display Step STEP Press the SPAN STEP key located between the LCD display and the rotary dial encoder The icon indicating the current display step will be...

Page 21: ... KHz x 320 steps 8 MHz 6 6 3 Channel Scope Mode On the above screen the following information is displayed Start frequency 118 0 MHz Step frequency 25 KHz End Stop frequency 122 0 MHz Frequency span 4 MHz Marker frequency 121 8 MHz Receive marker frequency 119 7 MHz Unlike the Spectrum Analyzer mode or Step Resolution mode the CF Center Frequency setting is not available in the Channel Scope Mode ...

Page 22: ...key KHz key or MHz key Receive Frequency RX FREQ After setting the receiver will monitor the start frequency To change the receive frequency move the marker using the rotary dial encoder and press the MK F key Memo End Stop frequency limit It is calculated by the following formula CH START Ch STEP x 160 or Ch START 5 MHz 6 6 4 Other Settings Reference Level AMPLITUDE A 60 dB range is displayed on ...

Page 23: ...of noise that does not actually exist On the above screen the reference level has been set to 20 dBm As you can see a clearer display is observed Therefore it is very important to select the proper reference level in accord with the signals Beside the above mentioned reference level using a RF attenuator on the receiver and the AGC Automatic Gain Control setting will affect the measurements Also i...

Page 24: ...seline while 128 KHz provides faster refresh rates Press the RBW key on the numeric keys The icon indicating the current Resolution Band Width will be reversed prompting a new entry Rotating the rotary dial encoder select the desired value and press the ENT key Below are screens of the same signals with two different RBW settings RBW 4 KHz RBW 128 KHz ...

Page 25: ...tions by a narrow RBW filter the signal strength readout may become different This occurs due to its narrow filter As most of signal s energy is filtered out by the RBW filter the output from the filter may become reduced before filtering 6 7 Marker Function Selection of Marker Peak Continuous Peak is available with your SDU5600 To select the marker function press the FUNC key and press the MK F k...

Page 26: ...s will be frozen on the LCD until this function is deactivated Press the Peak key on the Special Function Keys The icon indicating the current trigger level will be reversed prompting a new entry Using the numeric keypad enter a new trigger level followed by the ENT key KHz key or MHz key Once incoming signals are detected and if the signal level is higher than the entered trigger level the marker...

Page 27: ...ed and the frequency of transmission is displayed to the right of the C Peak icon To activate the Continuous Peak function press the C Peak key on the Special Function Keys To return to the Marker mode or the Peak mode press the CLR key on the numeric keypad Marker Frequency MK F A vertical line with triangle marker indicates the receive frequency MK CF ...

Page 28: ... is a useful function to trap occasional transmissions over a long time scale and to check on band allocation for transmission license issuers Press the CLR to exit from this function 6 8 2 Average Trace AVR Press the FUNC key and press the 8 key to select the Average Trace The average height of traces are calculated and displayed on the LCD The effect is a wave of activity and is useful for acces...

Page 29: ...frames The number of frames can be entered by the numeric keypad followed by the ENT key While the buffer is loading the number of frames is indicated until the programmed number has been sampled After this point the specified number of frames will be averaged on an on going basis and the middle value of level will be displayed Press the CLR key to exit from this function 6 9 Waterfall Function Yo...

Page 30: ...al key To quit the Waterfall Function press the CLR key on the numeric keys 6 10 Display Setting Press the FUNC key and press the 5 key will toggle between the receiver information display on and off This will give you a wider screen view of the LCD Receiver information ON Receiver information OFF 6 11 Beep On Off Press the FUNC key and press the 6 key will toggle between the beep sound on and off...

Page 31: ...y and press the 4 key 2 Press the RX key on the left of the Special function keys 3 Rotate the rotary dial encoder to select the AR5000 and press the ENT key Example We are setting the SDU5600 with the AR5000 to the following parameters Receive Frequency 80 00000 MHz Receive Mode AUTO Frequency Step 100 000 KHz RF Attenuator OFF 1 Receive Frequency Press the Center Frequency key on the Special fun...

Page 32: ...Mode The following screen is a sample display of monitored FM broadcast signals in Japan As the screen is showing incoming signal is overloading the SDU5600 To correct the situation you will need to change the reference level Changing the Reference Level from 30 dBm 20 dBm Press the AMPLITUDE key on the Special Keys Rotate the Rotary Dial Encoder to select 20 and press the ENT key By this setting ...

Page 33: ...it is proper to set the RBW to 128 KHz 7 3 Monitoring FM broadcast frequencies in the Step Resolution Mode Let s try to monitor FM broadcast signals in the Step Resolution Mode To go into the Step Resolution Mode press the FUNC key and press the 2 key from the numeric keypad Now change the display step to 25 KHz Press the SPAN STEP key on the Special Keys Enter 2 5 key followed by the KHz key on t...

Page 34: ... from the numeric keypad Set the Start Frequency to 118 MHz Frequency Step to 25 KHz and End Stop Frequency to 122 MHz NOTE The End Stop Frequency in the Channel Scope Mode is determined by the following formula Start Frequency Frequency Step x 160 or Start Frequency 5 MHz Example Start Frequency 118 MHz Frequency Step 25 KHz The End Stop Frequency will be 122 MHz 118 0 025 x 160 122 MHz ...

Page 35: ...e reminded of the following points Displayed signal level The signal level which the SDU5600 provides is always the RF input of the SDU5600 NOT the signal level at the receiver antenna input Frequency characteristics While multiple active signals are simultaneously displayed you may notice that a received signal changes positions i e a strong signal is displayed weaker and a weaker signal is displ...

Page 36: ...he receiver reacts to varying incoming signals When the receiver is tuned to a very weak signal or to a frequency with no activity at all the receiver s RF gain is set to a maximum Under such circumstances when a strong signal is received the AGC reacts to reduce the input level to the SDU5600 Some receivers have an AGC OFF position which can prevent such fluctuation This will however consequently...

Page 37: ...interference to radio communications However there is no guarantee that the interference will not occur in a particular installation If this equipment does cause harmful interference to radio or television reception which can be determined by turning the equipment off and on the user is encouraged to try to correct the interference by one or more of the following measures Reorient or relocate the ...

Page 38: ...ort Limitations Any and all implied warranties including those pertaining to merchantability and utility for a specific purpose are limited to the duration of this limited warranty AOR s limits on warranty pertain only to the repair or at its option replacement of defective products AOR shall not be liable for any other damages including consequential incidental or otherwise arising from any defec...

Page 39: ... aorja com AOR USA INC 20655 S Western Ave Suite 112 Torrance CA 90501 U S A Phone 310 787 8615 Fax 310 787 8619 http www aorusa com info aorusa com Copyright 2003 All rights reserved Printed in the U S A Downloaded by Amateur Radio Directory www hamdirectory info ...
Reviews: