background image


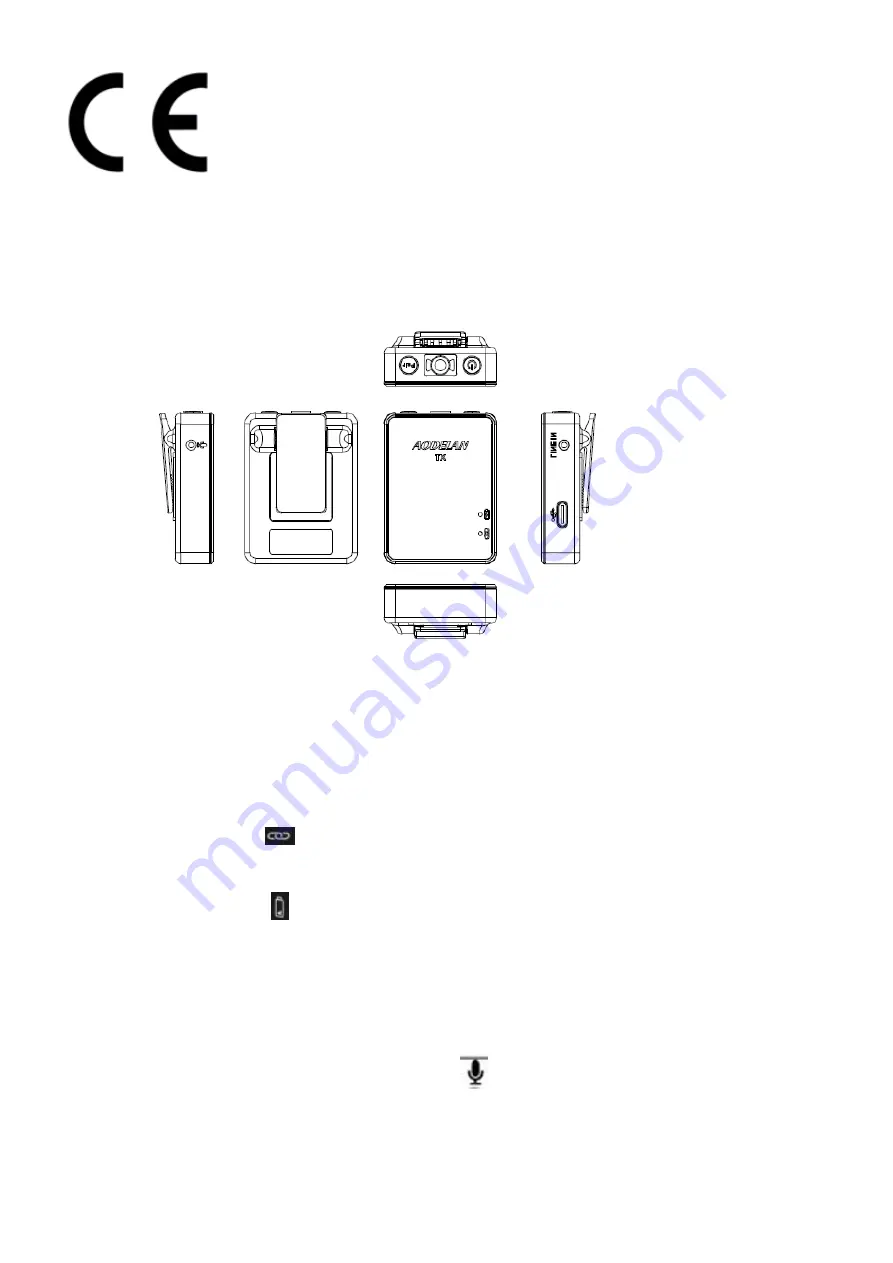
Parts and Functions 

Transmitter (TX) 


1.  Power button 

Press and hold the power button (for at least 2 seconds) to turn on or turn off the transmitter. 
While the transmitter is turned on, press the button to detect the battery level state.   

2.  Internal microphone 
3.  Pair button 

Press  and  hold  the  pair  button  (for  at  least  2  seconds)  to  make  the  transmitter  enter  the 
pairing state, which is used to pair the transmitter and receiver. 

4.  State lamp (Blue)


Indicates the connection state between the transmitter and the receiver. 

5.  Battery level lamp 


Indicates the battery charge state or the battery level status of the transmitter. 
The  red  slow  blinking  (once  per  two  seconds)  battery  level  lamp  indicates  that  battery 
charging is needed. (TBC) 

6.  Clip 

Use this clip for attaching the microphone to your clothing. 

7.  External microphone input jack (3.5mm) 


Connecting  an  external  microphone  to  this  jack  automatically  switches  the  audio  input 
source to the connected external microphone. (TBC) 

8.  LINE IN (Audio input) jack

 (3.5mm)


Connect LINE IN type audio input, such as electric guitar, etc. 
The  audio  input  source  automatically  switches  to  the  connected  audio  device  after 

Summary of Contents for WM2

Page 1: ...ns subject to extremely high low temperatures high humidity or direct sunlight Do not clean the product with organic solvent or alcohol based liquid A thorough explanation of how to use the product by...

Page 2: ...orrect the interference by one or more of the following measures Reorient or relocate the receiving antenna Increase the separation between the equipment and receiver Connect the equipment into an out...

Page 3: ...between the transmitter and the receiver 5 Battery level lamp Indicates the battery charge state or the battery level status of the transmitter The red slow blinking once per two seconds battery level...

Page 4: ...ver to a computer with the supplied USB C cable starts charging the receiver s built in battery and turns on the charge lamp in green 5 Clip Use this clip for attaching the receiver to the proper plac...

Page 5: ...ble For smartphone tablet Mac or laptop with combo headphone Mic jack 3 USB C cable Type C to USB A 4 Lavalier microphone equipped with clip and foam windshield 5 Fur wind screen Attach the fur wind s...

Page 6: ...tter receiver turned off Turning on the transmitter receiver while charging makes the transmitter receiver ready for power supply and stops charging TBD Do not apply force to the transmitter receiver...

Page 7: ...ough the audio cable If a speedlite needs to be attached on the hot shoe of the camera you can remove the receiver from the hot shoe of the camera and install it in another proper position keeping the...

Page 8: ...nal microphone If you are using a tablet Mac or laptop with an earphone microphone jack connect the device to the receiver through the 3 5mm TRRS audio cable in the same way Attaching the microphone t...

Page 9: ...er for 2 seconds the transmitter enters into the pairing state and pairs with the receiver When the transmitter is in the pairing state its state lamp blinks in blue quickly twice per second 4 When th...

Page 10: ...he devices and clear audio recording is available If no connection is established the state lamp on the receiver blinks once per second bring the transmitter and the receiver closer to each other for...

Page 11: ...ophone of transmitter automatically turns off and the sound picked up by the external microphone is recorded 2 Attach the transmitter to a proper location such as a belt with the clip 3 Clip the laval...

Page 12: ...uilt in battery the battery level lamp lights up in green When the charging is finished the battery level lamp goes out TBD Disconnecting the USB C cable between the transmitter and the computer the b...

Reviews: